
There's nothing quite like the moment you slice into a perfectly baked apple crumble cheesecake and watch your guests' eyes light up. I've been making this apple crumble cheesecake for years, and it never fails to steal the show at family gatherings. The combination of creamy cheesecake, spiced apples, and that irresistible buttery crumble creates something truly magical. Whether you're planning a holiday feast or just craving comfort food, this apple crumble cheesecake brings together two beloved desserts in one spectacular creation.
What makes this apple crumble cheesecake so special is how it balances rich, tangy cheesecake with warm cinnamon apples and a crunchy topping. Every bite delivers three distinct textures that somehow work in perfect harmony. Trust me, once you master this recipe, it'll become your signature dessert that friends and family request again and again.

Background & Why This Apple Crumble Cheesecake Stands Out
The beauty of apple crumble cheesecake lies in its roots; combining British apple crumble tradition with classic American cheesecake. This fusion dessert gained popularity in the early 2000s when bakers started experimenting with layered desserts. What sets this version apart is the technique of baking the apples separately before adding them, which prevents a soggy crust and ensures every layer shines.
I've tested countless variations, and this apple crumble cheesecake recipe delivers consistent results every time. The graham cracker crust provides stability, the cream cheese filling stays silky smooth, and the oat crumble adds that satisfying crunch. It's perfect for Thanksgiving, Christmas gatherings, or any autumn celebration when apples are at their peak. Plus, it feeds a crowd and can be made a day ahead, making your life so much easier when entertaining.
Jump to:
- Background & Why This Apple Crumble Cheesecake Stands Out
- Ingredients
- Instructions
- Expert Cooking Tips
- Recipe Variations & Substitutions
- Equipment Recommendations
- Storage & Meal Prep Tips
- Grandma's Secret That Changed Everything
- FAQ
- Your Next Baking Adventure Awaits
- Related
- Pairing
- Apple Crumble Cheesecake Recipe
Ingredients
For the Graham Cracker Crust:
- Graham cracker crumbs (about 16 crackers)
- Granulated sugar
- Unsalted butter, melted
- Salt
For the Cheesecake Filling:
- Cream cheese, softened to room temperature
- Granulated sugar
- Eggs, room temperature
- Sour cream
- Vanilla extract
- All-purpose flour
For the Apple Layer:
- Granny Smith apples, peeled and diced
- Unsalted butter
- Brown sugar
- Ground cinnamon
- Nutmeg
- Lemon juice
For the Crumble Topping:
- Old-fashioned oats
- All-purpose flour
- Brown sugar, packed
- Cinnamon
- Salt
- Cold butter, cubed
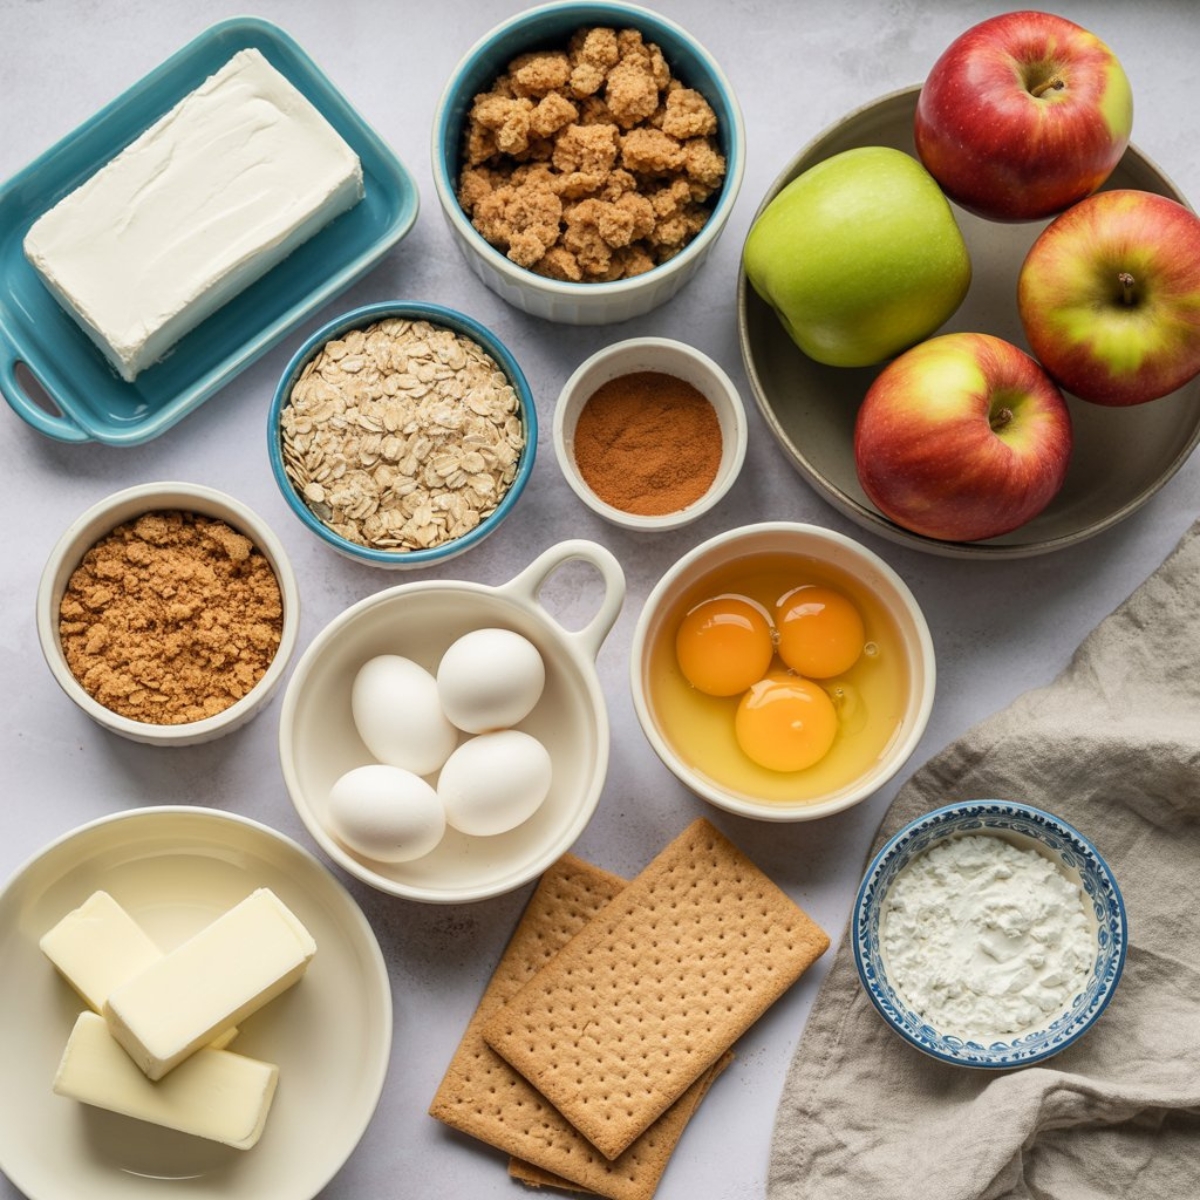
See recipe card for quantities.
Instructions
Step 1: Prepare Your Crust and Pan
- Preheat your oven to 325°F and position the rack in the center.
- Wrap the outside of a 9-inch springform pan with two layers of aluminum foil to prevent water from seeping in during the water bath.
- Mix graham cracker crumbs, sugar, melted butter, and salt in a bowl until the mixture resembles wet sand.
- Press the mixture firmly into the bottom of your prepared pan, using the bottom of a measuring cup to compact it evenly.
- Bake the crust for 10 minutes, then remove and let it cool while you prepare the filling.
Step 2: Make the Creamy Cheesecake Base
- Beat the softened cream cheese on medium speed for 2-3 minutes until completely smooth and fluffy with no lumps.
- Add sugar and continue beating for another 2 minutes until well incorporated.
- Mix in eggs one at a time, beating on low speed after each addition to avoid incorporating too much air.
- Add sour cream, vanilla extract, and flour, mixing just until combined and scraping down the sides.
- Pour the smooth cheesecake batter over your cooled crust and tap the pan gently on the counter to release air bubbles.
Step 3: Cook the Spiced Apple Filling
- Melt butter in a large skillet over medium heat and add your diced apples.
- Stir in brown sugar, cinnamon, nutmeg, and lemon juice, coating the apples evenly.
- Cook for 5-7 minutes, stirring occasionally, until apples are slightly softened but still hold their shape.
- Let the apple mixture cool for 10 minutes before gently spooning it over the apple crumble cheesecake batter, leaving a ½-inch border around the edges.
Step 4: Add Crumble and Bake to Perfection
- Combine oats, flour, brown sugar, cinnamon, and salt in a bowl.
- Cut in cold butter using a pastry cutter or your fingers until the mixture forms pea-sized crumbs.
- Sprinkle the crumble topping evenly over the apples, covering them completely.
- Place the springform pan in a larger roasting pan and pour hot water into the roasting pan until it reaches halfway up the sides of the springform pan.
- Bake for 65-75 minutes until the edges are set but the center still jiggles slightly when gently shaken.
- Turn off the oven, crack the door open, and let the cheesecake cool inside for 1 hour to prevent cracking.
- Remove from water bath, cool completely at room temperature, then refrigerate for at least 6 hours or overnight before serving.
Expert Cooking Tips
Getting your apple crumble cheesecake just right requires attention to a few key details that make all the difference:
Temperature Matters for Smooth Texture Always bring your cream cheese, eggs, and sour cream to room temperature before mixing. Cold ingredients create lumps that won't smooth out, no matter how long you beat them. I leave mine on the counter for about an hour before starting.
The Water Bath Secret Using a water bath (also called a bain-marie) keeps the cheesecake moist and prevents those unsightly cracks on top. Make sure your foil wrap is tight and secure. If you're worried about leaks, use a silicone springform pan or place the wrapped pan in a large oven bag before adding it to the water bath.
Don't Overmix Your Batter Once you add the eggs, mix on low speed and stop as soon as everything is combined. Overmixing incorporates too much air, which causes the cheesecake to puff up and then collapse, creating cracks.
Apple Selection Makes a Difference
- Granny Smith apples hold their shape best and provide a nice tart contrast to the sweet cheesecake
- Honeycrisp apples add extra sweetness and stay firm
- Avoid Red Delicious or McIntosh as they become mushy when cooked
Keep Crumble Topping Cold Cold butter is essential for achieving that perfect crumbly texture. If your kitchen is warm, pop the butter and crumble mixture in the freezer for 5 minutes before adding it to the cheesecake.
The Jiggle Test Your cheesecake is done when the edges are set (about 2 inches from the rim) but the center still wobbles like jello when you gently shake the pan. It will continue cooking as it cools and firm up perfectly.
Recipe Variations & Substitutions
This apple crumble cheesecake adapts beautifully to different dietary needs and flavor preferences:
No-Bake Version Skip the baking process entirely by using a no-bake cheesecake filling. Mix 16 oz softened cream cheese with ½ cup sugar and 1 teaspoon vanilla, then fold in 1 cup whipped heavy cream. Pour over a no-bake graham crust, top with cooled cooked apples and raw crumble topping, then refrigerate for 4 hours.
Gluten-Free Adaptation
- Replace graham crackers with gluten-free cookies or almond flour crust
- Substitute all-purpose flour in the filling with cornstarch
- Use certified gluten-free oats in the crumble topping
Dairy-Free and Vegan Options Use vegan cream cheese (like Kite Hill or Miyoko's), replace eggs with aquafaba or commercial egg replacer, swap butter for vegan butter, and use coconut cream instead of sour cream. The texture will be slightly different but still delicious.
Flavor Twists to Try
- Caramel Apple Version: Drizzle salted caramel sauce between layers and on top
- Biscoff Crust: Replace graham crackers with crushed Biscoff cookies for a spiced cookie base
- Mini Cheesecakes: Divide the recipe among 12 muffin tins lined with cupcake liners, reducing baking time to 20-25 minutes
- Apple Pie Spice Boost: Add ½ teaspoon apple pie spice to both the apple filling and crumble topping
- Pecan Crumble: Add ½ cup chopped pecans to your crumble topping for extra crunch
Ingredient Substitutions
- Swap sour cream for Greek yogurt for added protein
- Use coconut sugar instead of brown sugar for a deeper flavor
- Replace half the apples with pears for an interesting variation
Equipment Recommendations
Having the right tools makes creating this apple crumble cheesecake so much easier:
- 9-inch Springform Pan: Essential for easy removal; look for one with a tight seal to prevent leaks
- Electric Mixer: Stand mixer or hand mixer saves your arm and creates the smoothest filling
- Food Processor: Makes quick work of crushing graham crackers into fine crumbs
- Large Roasting Pan: Must be big enough to hold your springform pan with room for water
- Pastry Cutter: Creates perfect crumble texture; you can also use two knives or your fingers
- Offset Spatula: Helps spread batter evenly and smooth the top
- Heavy-Duty Aluminum Foil: Regular foil tears too easily when wrapping the pan
- Apple Peeler/Corer: Speeds up apple prep significantly if you make this often
- Instant-Read Thermometer: The center should reach 150°F when done
Storage & Meal Prep Tips
Proper storage keeps your apple crumble cheesecake fresh and delicious for days:
Refrigerator Storage Cover your cheesecake tightly with plastic wrap or store in an airtight container for up to 5 days. The crumble topping may soften slightly over time, but the flavor remains excellent. For best texture, let it sit at room temperature for 15 minutes before serving.
Freezing Instructions This dessert freezes beautifully for up to 3 months. Wrap individual slices in plastic wrap, then aluminum foil, and place in a freezer-safe container. To serve, thaw slices in the refrigerator overnight. The crumble topping maintains its texture surprisingly well after freezing.
Make-Ahead Strategy You can prepare this apple crumble cheesecake up to 2 days in advance, making it perfect for holiday entertaining. The flavors actually improve as they meld together in the fridge. Add a fresh drizzle of caramel sauce just before serving for a restaurant-quality presentation.
Component Prep
- Make the crust up to 3 days ahead and store covered at room temperature
- Cook the apple filling 2 days in advance and refrigerate in an airtight container
- Prepare the crumble topping and keep it refrigerated for up to 4 days
Serving Temperature Tips While some prefer it chilled, letting your apple crumble cheesecake sit at room temperature for 20-30 minutes before serving brings out the full flavor and creates a creamier texture.
Grandma's Secret That Changed Everything
Here's what transformed my apple crumble cheesecake from good to absolutely unforgettable. My grandmother taught me to brush the baked crust with a thin layer of melted white chocolate before adding the filling. This creates an invisible moisture barrier that keeps the crust crispy even after days in the fridge. It's such a simple trick, but it makes a world of difference.
The second game-changing secret is adding a tablespoon of bourbon or apple brandy to the apple filling. The alcohol cooks off completely, but it intensifies the apple flavor in a way that regular cooking never achieves. Even people who don't drink alcohol won't be able to identify it; they'll just wonder why your apple crumble cheesecake tastes so much better than anyone else's. If you prefer to skip alcohol entirely, use apple cider instead and reduce it by half for concentrated flavor.
FAQ
What are some common mistakes when making apple crumble?
The biggest mistake is cutting the butter into the apple crumble cheesecake topping while it's too soft, which creates a paste instead of crumbs. Always use cold butter straight from the fridge. Another common error is making the apple pieces too large; dice them into ½-inch cubes for even cooking and easier serving.
Should crumble cheesecake be refrigerated?
Yes, your apple crumble cheesecake must be refrigerated because the cream cheese filling is perishable. Store it covered in the refrigerator and never leave it at room temperature for more than 2 hours. The cold temperature also helps the cheesecake maintain its structure for clean slicing.
What is an interesting fact about the apple crumble?
Apple crumble originated in Britain during World War II when food rationing made traditional pie crusts difficult to make. The simple combination of butter, flour, and sugar required fewer ingredients than pastry. When combined with American cheesecake, it created the fusion dessert we now know as apple crumble cheesecake, which gained popularity in the United States during the early 2000s.
How long to rest apple crumble?
After baking your apple crumble cheesecake, let it cool in the turned-off oven with the door cracked for 1 hour, then at room temperature for another hour before refrigerating. The cheesecake needs at least 6 hours (preferably overnight) in the refrigerator to fully set and develop its flavors before serving.
Your Next Baking Adventure Awaits
Now that you've mastered this apple crumble cheesecake, you're ready to impress at any gathering or simply treat yourself to something special. The combination of creamy, tangy, sweet, and crunchy elements makes this dessert absolutely irresistible. Every slice showcases your baking skills and brings comfort with every bite.
Don't stop here; your baking journey has just begun! Try our Apple Crumb Cake Recipe for a simpler weekday treat that uses similar flavors, or explore our Peach Cheesecake Bars Recipe when summer arrives and you're craving something fruity and creamy. Both recipes share techniques with this apple crumble cheesecake, so you'll find them easy to master. Remember, the best desserts are the ones shared with people you love, so grab your apron and start creating memories in the kitchen today!
With love from my kitchen to yours,
Kaitlyn Reed
Related
Looking for other recipes like this? Try these:


Pairing
These are my favorite dishes to serve with this apple crumble cheesecake recipe:


Apple Crumble Cheesecake Recipe
Equipment
- 9-inch springform pan Wrapped with foil for water bath
- Electric mixer Stand or hand mixer
- Large roasting pan For the water bath
- Pastry cutter To create crumble texture
- Mixing bowls For crust, filling, and topping
- Spatula For smooth batter and scraping sides
- Apple peeler and corer Optional, for quicker prep
Ingredients
For the Graham Cracker Crust
- 2 cups graham cracker crumbs about 16 crackers
- ⅓ cup granulated sugar
- ½ cup unsalted butter melted
- ¼ teaspoon salt
For the Cheesecake Filling
- 24 oz cream cheese softened to room temperature
- ¾ cup granulated sugar
- 3 large eggs room temperature
- ½ cup sour cream
- 2 teaspoon vanilla extract
- ¼ cup all-purpose flour
For the Apple Layer
- 3 medium Granny Smith apples peeled and diced
- 2 tablespoon unsalted butter
- ¼ cup brown sugar
- 1 teaspoon ground cinnamon
- ¼ teaspoon nutmeg
- 1 tablespoon lemon juice
For the Crumble Topping
- 1 cup old-fashioned oats
- ¾ cup all-purpose flour
- ½ cup brown sugar packed
- ½ teaspoon cinnamon
- ¼ teaspoon salt
- 6 tablespoon cold butter cubed
Instructions
- Preheat oven to 325°F and wrap springform pan with foil to prepare for water bath.
- Mix crust ingredients, press into pan, and bake for 10 minutes; let cool.
- Beat cream cheese and sugar until smooth, add eggs, sour cream, vanilla, and flour; mix gently.
- Cook apples with butter, brown sugar, cinnamon, nutmeg, and lemon juice until tender; cool slightly.
- Spoon apples over cheesecake filling, leaving a small border.
- Combine crumble ingredients with cold butter until coarse crumbs form.
- Sprinkle crumble topping over apples evenly.
- Bake cheesecake in water bath for 65–75 minutes until edges set and center jiggles slightly.
- Cool 1 hour in oven, 1 hour at room temperature, then refrigerate for at least 6 hours.
- Slice, drizzle with caramel (optional), and serve.


Leave a Reply