
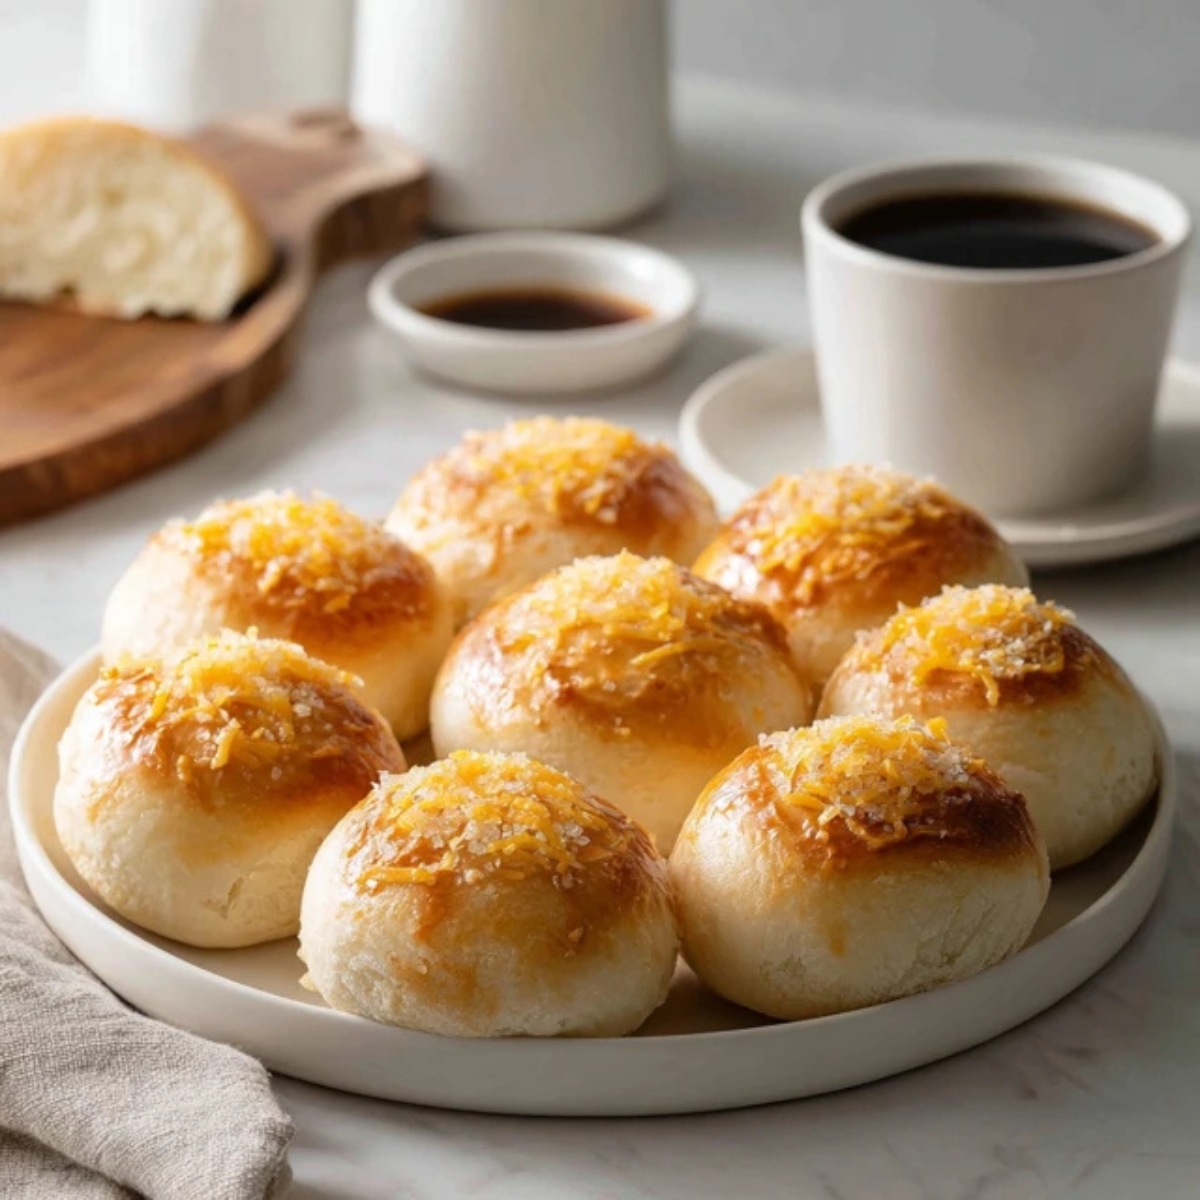
There's something magical about freshly baked ensaymada bread; the kind that fills your home with a sweet, buttery aroma and brings back memories of your favorite Filipino bakery. Making ensaymada bread at home is easier than you think, and honestly, it tastes even better when you've put love into every roll. This traditional Filipino bread combines soft, pillowy dough with generous layers of butter and cheese; creating that irresistible texture that keeps people coming back for more. Whether you're baking ensaymada bread for a special breakfast or an afternoon snack with coffee, this recipe will guide you through creating bakery-quality rolls right in your own kitchen.
The beauty of homemade ensaymada bread is that it's surprisingly simple to master. Once you understand the basic technique for preparing the dough and layering your toppings, you'll be making ensaymada bread like a professional Filipino baker every single time.
Background & Why This Recipe Stands Out
Ensaymada bread holds a special place in Filipino food culture; representing the perfect blend of Spanish heritage and Filipino creativity. This sweet bread became a beloved staple in Filipino bakeries, especially in Pampanga where it originated as a festive treat. What makes ensaymada bread truly special is how it balances simplicity with elegance; transforming basic ingredients into something restaurant-worthy. The recipe has been passed down through generations of Filipino families; and each baker adds their own touch whether that's extra cheese, buttercream topping, or a hint of vanilla in the dough.
Traditional ensaymada bread is more than just bread; it's a celebration in every bite. The technique of rolling butter and sugar into sweet dough creates natural layers that bake into a golden, caramelized exterior while keeping the interior incredibly moist and fluffy. What sets this recipe apart from other Filipino pastries is how the ensaymada bread becomes almost pastry-like without requiring complicated lamination. Home bakers love this recipe because it delivers that impressive bakery quality without demanding professional skill or expensive equipment.
Jump to:
Ingredients
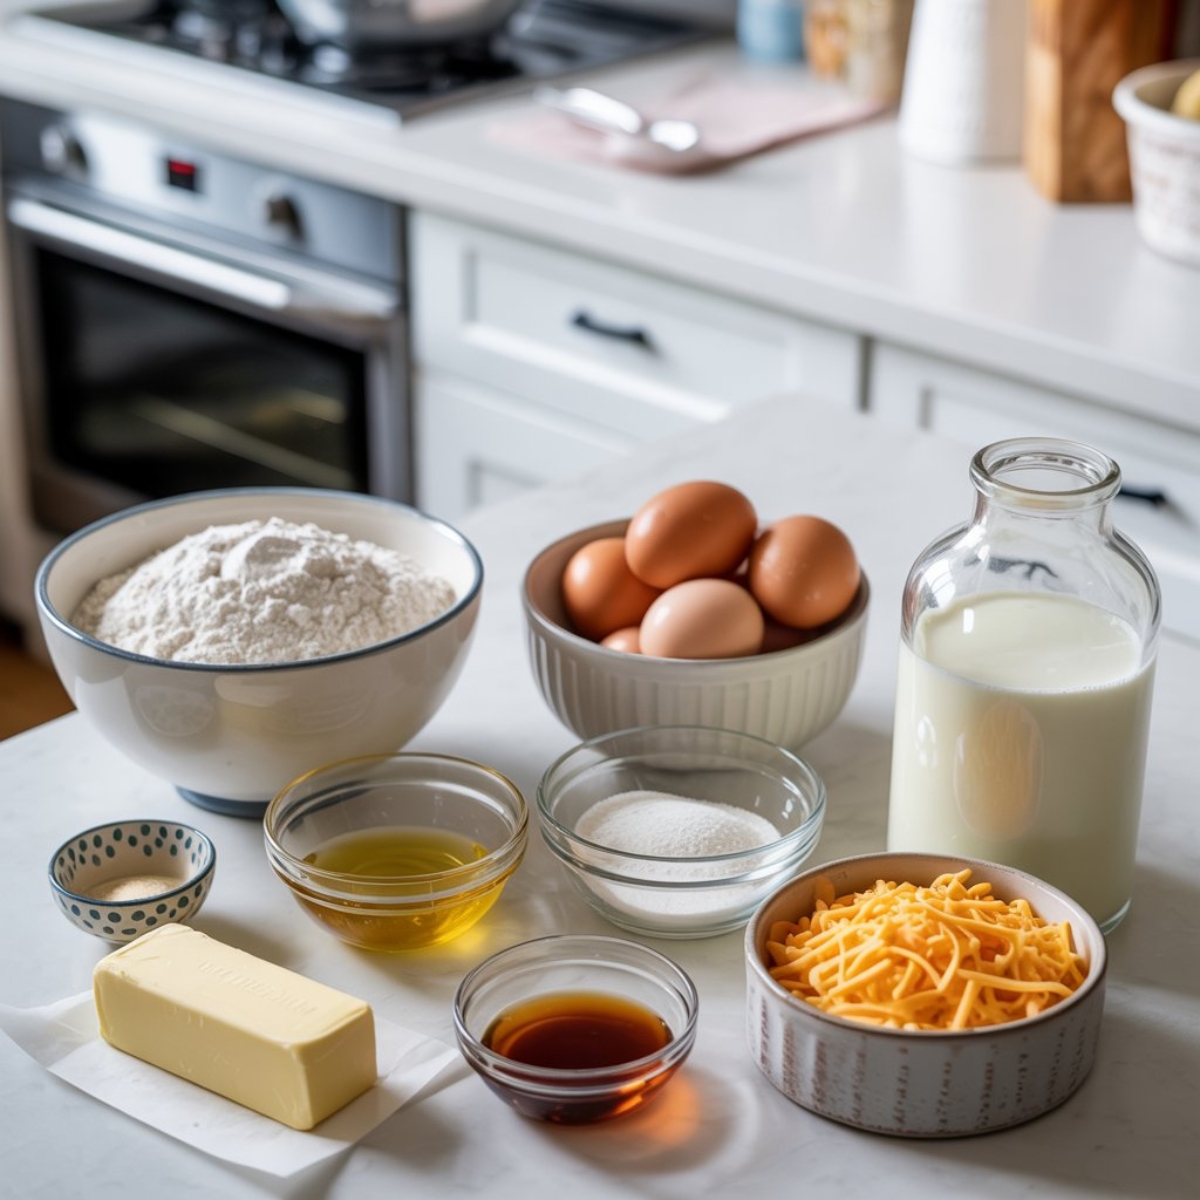
For the Dough
- All-purpose flour
- Instant yeast
- Granulated sugar
- Salt ;
- Eggs (room temperature)
- Warm milk ;
- Unsalted butter (softened)
- Vanilla extract
For Filling and Topping
- Unsalted butter (softened; for layering) ;
- shredded cheddar cheese ;
- Granulated sugar (for coating) ;
- Buttercream topping (optional; for extra richness)
See recipe card for quantities.
Instructions
Step 1; Mixing and Kneading the Dough
1; Combine your warm milk and instant yeast in a small bowl; letting it sit for 2 minutes until foamy. In a large mixing bowl; whisk together the flour; granulated sugar; and salt. Make a well in the center and add your eggs; vanilla extract; and the yeast mixture.
2; Mix until a shaggy dough forms; then begin kneading. Add your softened unsalted butter gradually; kneading for about 8 to 10 minutes until the dough becomes smooth and elastic. The ensaymada bread dough should be soft and slightly sticky; but not unmanageable.
Step 2; First Rise and Preparation
3; Place your dough in a greased bowl; cover it with a damp towel; and let it rise for 60 to 90 minutes until doubled in size. Once risen; punch down the dough and transfer it to a lightly floured surface. Roll it out into a thin rectangle; approximately 30cm x 20cm; creating the base for your bread.
Step 3; Filling and Rolling
4; Spread your softened butter evenly across the entire dough surface; then sprinkle the shredded cheddar cheese and granulated sugar throughout. Starting from one long end; roll the dough tightly into a long log; then coil it into a spiral shape. Place the spiral on a parchment-lined baking sheet; leaving space between each bread coil.
Step 4; Final Rise and Baking
5; Cover your shaped bread with a damp towel and let it rise for 45 to 60 minutes until puffy. Preheat your oven to 180°C (350°F). Bake the bread for 25 to 30 minutes until golden brown and cooked through. Once baked; brush the tops with melted butter while still warm; adding extra shredded cheese if desired for that signature bakery finish.
Expert Cooking Tips
Perfecting Your Dough Temperature
; Ensure your milk is warm but not hot; around 40-43°C; to activate the instant yeast properly ; Keep all ingredients at room temperature for consistent dough development ; If your kitchen is cold; let the ensaymada bread dough rise in a warm location like an oven with the light on
The key to achieving that perfect soft texture in ensaymada bread lies in understanding dough temperature and hydration. Many home bakers rush this step; but taking time to activate your yeast properly makes a noticeable difference. Your ensaymada bread will have better rise; softer crumb structure; and that authentic bakery quality.
Layering Butter and Cheese Like a Professional
; Apply butter thin and evenly to ensure it doesn't leak out during baking ; Use good quality unsalted butter; as the flavor directly impacts your final ensaymada bread result ; Mix your shredded cheddar with a pinch of salt to enhance the cheese flavor throughout the rolls
Timing Your Rises Correctly
; The first rise should result in dough that's clearly doubled; usually visible after 60-90 minutes ; Don't skip the second rise; this is where your ensaymada bread develops that fluffy; pillowy interior ; If rising slowly; your kitchen may be cold; so consider warmer locations for better results
Recipe Variations and Substitutions
Different Cheese Options
You can customize your bread by experimenting with various cheeses; each bringing unique flavor profiles. Mozzarella creates a milder; stretchy version; while a blend of cheddar and parmesan adds a sharper; more complex taste. Some Filipino bakeries use a combination of cheeses to create their signature ensaymada bread; so don't hesitate to mix and match.
; Mozzarella ensaymada bread; for a milder; creamier option ; Parmesan and cheddar blend; for a sharper cheese flavor ; Cream cheese swirls; mixed with a touch of sugar for sweetness ; Gouda ensaymada bread; for a slightly smoky note
Adding Sweet or Savory Elements
Transform your bread by incorporating different flavor dimensions. Sweet versions can include brown sugar; cinnamon; or a buttercream coating; while savory versions work beautifully with garlic powder; dried herbs; or even ham bits. The base dough recipe remains the same; making it simple to create multiple variations for different occasions and preferences.
; Cinnamon sugar topping; for a classic sweet twist on ensaymada bread ; Garlic and herb seasoning; for a savory morning option ; Brown sugar and butter caramel; for extra richness in your ensaymada bread ; Condensed milk drizzle; for a Filipino pastry-shop finish
Dietary Adaptations
While traditional ensaymada bread relies on butter and cheese; you can make adjustments for different dietary needs. Reduce-fat versions use less butter in the dough and filling; while those avoiding dairy can experiment with alternatives; though results will differ from authentic ensaymada bread.
Equipment Recommendations
To create perfect ensaymada bread at home; having the right tools makes the process smoother and results more consistent.
; Stand mixer with dough hook; ideal for hands-free kneading without overworking your ensaymada bread dough ; Parchment paper; essential for non-stick baking and easy cleanup ; Kitchen thermometer; helpful for monitoring dough and water temperature ; Bench scraper; useful for handling sticky ensaymada bread dough during shaping ; Instant-read thermometer; to verify internal bread temperature reaches 90°C ; Large mixing bowls; for dough rising and ingredient preparation
Storage and Meal Prep Tips
Room Temperature Storage
Fresh ensaymada bread stays best at room temperature in an airtight container for up to 3 days. Keep the container sealed to prevent the bread from drying out; while still allowing minimal air circulation. This is the ideal storage method if you plan to eat your ensaymada bread within a few days of baking.
; Place cooled ensaymada bread in airtight containers; avoiding stacking to prevent crushing ; Add a slice of bread to the container to maintain moisture in your ensaymada bread ; Store away from direct sunlight and heat sources for best results
Refrigerator and Freezer Options
For longer storage; refrigeration works well for up to 5 days; though the ensaymada bread texture changes slightly. Freezing is your best option for extending shelf life; lasting up to 2 months when properly wrapped. Thaw frozen ensaymada bread at room temperature for 2 to 3 hours; or reheat briefly in the oven for that just-baked quality.
; Wrap individual ensaymada bread rolls tightly in plastic wrap before freezing ; Label containers with the baking date so you track your frozen ensaymada bread freshness ; Reheat frozen rolls in a 160°C oven for 10 minutes for optimal texture restoration
Reheating Instructions
Bring your ensaymada bread back to life by reheating in a 160°C oven for 8 to 10 minutes; which restores the soft interior while crisping the exterior slightly. Avoid microwaves; as they can make the bread tough and chewy. This method ensures your stored ensaymada bread tastes nearly as good as freshly baked.
Grandma's Secret That Changed Everything
The real magic behind restaurant-quality ensaymada bread isn't complicated; it's patience and butter temperature. Professional bakers know that cold unsalted butter creates distinct layers when rolled into warm dough; which develops those beautiful caramelized edges while keeping the interior impossibly soft. Many home cooks overlook this detail; but using softened butter for the initial dough ensures proper incorporation; while keeping your butter for filling at a cool (but not cold) temperature creates that signature texture that makes ensaymada bread stand out.
Another game-changing secret that separates ordinary ensaymada bread from extraordinary versions is brushing melted butter on the warm bread immediately after baking. This step locks in moisture; creates shine; and enhances the overall flavor profile. Filipino grandmothers have been doing this for generations; and it's why their ensaymada bread always tastes better; lasts longer; and disappears faster than any store-bought version.
FAQ
What is ensaymada made of?
Traditional ensaymada bread combines enriched sweet dough with butter; granulated sugar; and shredded cheese as the primary components. The dough itself contains eggs; warm milk; instant yeast; and unsalted butter; creating that rich; tender crumb structure. Once baked; the ensaymada bread receives a topping of more melted butter and often additional cheese; sometimes finished with buttercream for extra indulgence and authentic bakery presentation.
Is ensaymada Spanish or Filipino?
Ensaymada has fascinating roots connecting both Spanish and Filipino cultures; representing the beautiful culinary heritage of the Philippines. The name comes from the Spanish word "ensaimada"; and the bread reflects Spanish pastry traditions brought during colonial times. However; Filipino bakers transformed this concept into something uniquely theirs; adding their own touches like more generous cheese portions and distinctive shapes that make ensaymada bread distinctly Filipino today.
Is ensaymada a brioche?
While ensaymada bread and brioche share similarities as enriched doughs containing eggs and butter; they're distinct breads. Brioche typically has more eggs and butter by proportion; creating a more custardy crumb; whereas ensaymada bread uses a balanced enriched dough that stays slightly less dense. The key difference lies in the preparation and topping; as ensaymada bread incorporates cheese and butter as integral filling elements; while traditional brioche relies on the dough itself for richness and sweetness.
What is the English of ensaymada?
There isn't a direct single English translation for ensaymada; as the word represents a specific Filipino-Spanish pastry tradition. The closest descriptors would be "sweet cheese spiral bread" or "butter and cheese bread rolls"; though these don't capture the full essence of what makes ensaymada bread special. Filipino bakers often refer to ensaymada bread in English as simply "ensaymada"; recognizing that the word itself represents a beloved cultural food that transcends simple translation.
Time to Create Your Own Bakery Magic
Making ensaymada bread at home opens up a world of possibilities beyond just enjoying delicious pastries; you're creating memories and traditions in your kitchen. This recipe provides the foundation for mastering a beloved Filipino staple that impresses family; friends; and anyone lucky enough to taste your creations. Start with the basic version; then explore variations like our Garlic Parmesan Bread Recipe for a savory option or Cloud Bread Recipe for a lighter alternative. Each baking session teaches you something new; bringing you closer to that authentic Filipino bakery experience you love.
Whether you're preparing ensaymada bread for a weekend breakfast; a holiday gathering; or simply because you're craving that familiar comfort food; you now have everything needed to succeed. The techniques; tips; and variations in this guide ensure that your homemade ensaymada bread rivals anything from your favorite bakery. Share your baked creations; experiment with flavors; and most importantly; enjoy every soft; buttery; cheesy bite of the ensaymada bread you've made with your own hands.
With love from my kitchen to yours,
Aubrey James
Related
Looking for other recipes like this? Try these:


Pairing
These are my favorite dishes to serve with this ensaymada bread recipe:


Homemade Ensaymada Bread Recipe
Equipment
- 1 Stand mixer with dough hook for kneading
- 1 Large mixing bowl for dough mixing and rising
- 1 Bench scraper for dividing and shaping dough
- 1 Parchment paper for baking sheet lining
- 1 Rolling pin for flattening dough
- 1 Oven preheated to 180°C (350°F)
- 1 Kitchen thermometer to monitor dough temperature
Ingredients
Dough
- 500 g all-purpose flour base of the dough
- 7 g instant yeast activates dough rise
- 100 g granulated sugar adds sweetness
- 10 g salt balances flavor
- 2 large eggs room temperature
- 120 ml warm milk about 40–43°C
- 60 g unsalted butter softened for dough
- 5 ml vanilla extract for aroma
Filling & Topping
- 100 g unsalted butter softened; for layering
- 150 g shredded cheddar cheese for filling and topping
- 50 g granulated sugar for coating after baking
- 30 g buttercream optional; for extra topping
Instructions
- Mix warm milk and yeast; let it foam for 2 minutes. Combine flour, sugar, and salt, then add eggs, vanilla, and yeast mixture.
- Knead dough for 8–10 minutes, gradually adding butter until smooth and elastic.
- Place dough in a greased bowl, cover, and let rise for 60–90 minutes until doubled.
- Roll dough into a 30x20 cm rectangle, spread butter, and sprinkle cheese and sugar.
- Roll into a log, shape into spirals, and place on parchment-lined tray.
- Cover and let rise again for 45–60 minutes until puffy.
- Bake at 180°C (350°F) for 25–30 minutes until golden brown. Brush with melted butter and top with cheese.


Leave a Reply