
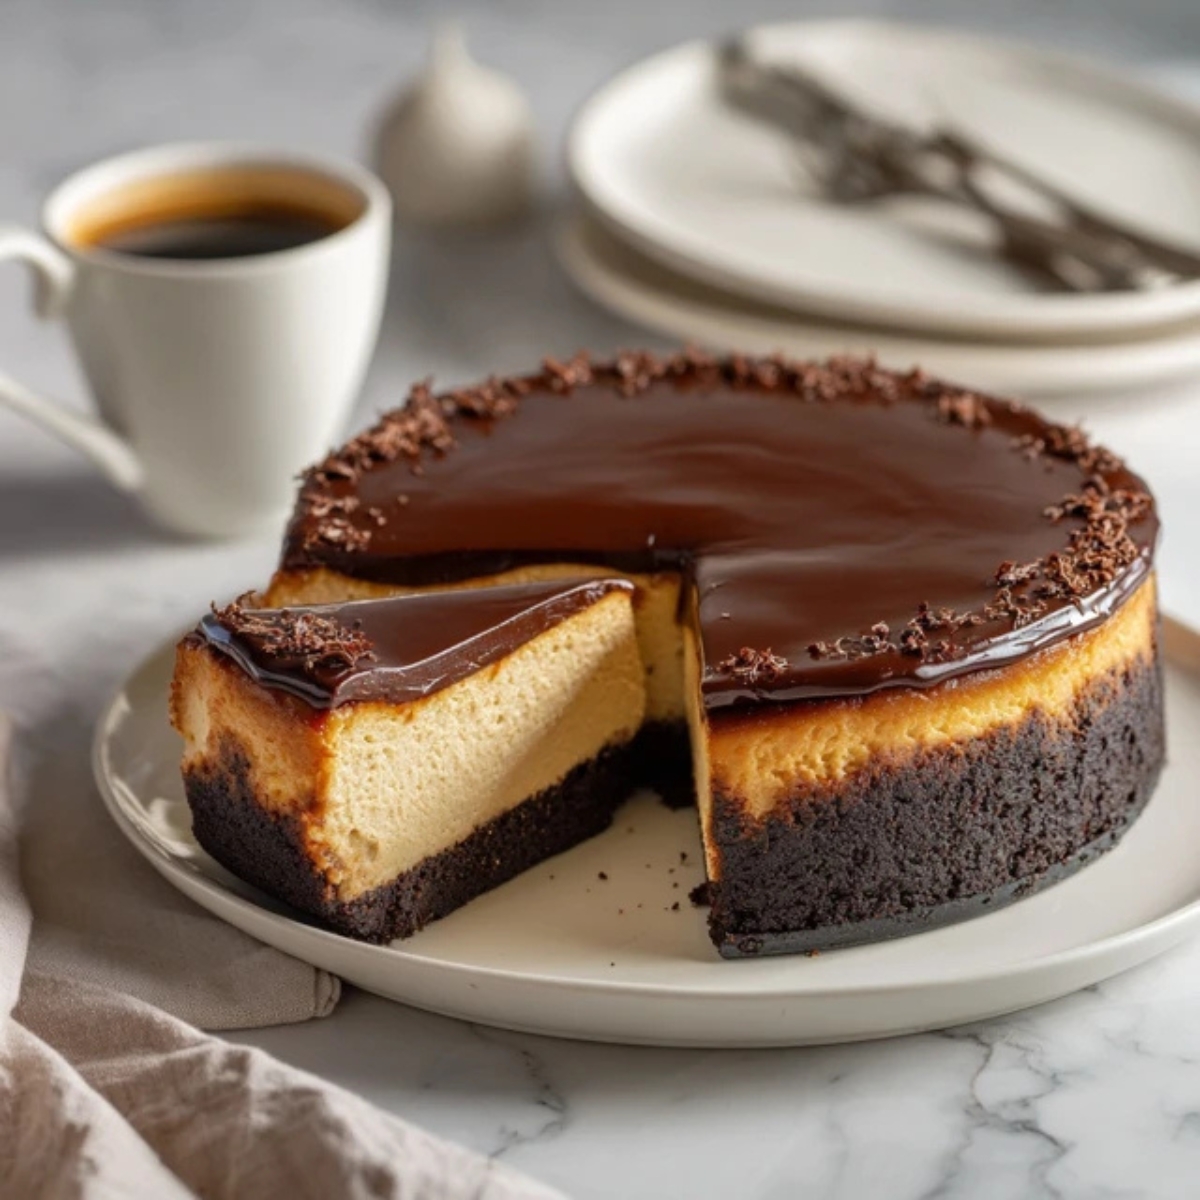
Have you ever craved a dessert that combines the bold richness of coffee with the smooth, velvety texture of classic cheesecake? This espresso cheesecake delivers exactly that; a perfect marriage of deep coffee flavor and creamy indulgence. I remember the first time I made this espresso cheesecake for a dinner party, and my guests couldn't stop raving about how the coffee notes balanced perfectly with the sweet, tangy cream cheese filling.
Whether you're a coffee lover looking for your next favorite dessert or simply want to impress at your next gathering, this espresso cheesecake recipe is surprisingly simple to make. The combination of espresso powder and a hint of chocolate creates a sophisticated flavor profile that tastes like it came straight from a fancy bakery, but you'll have it ready in your own kitchen with just a few basic ingredients.
Background & Why This Recipe Stands Out
What makes this espresso cheesecake truly special is how it captures the essence of your favorite coffee shop experience in dessert form. The intense coffee flavor comes from high-quality espresso powder mixed directly into the filling, creating a bold taste that coffee enthusiasts dream about. Unlike other coffee desserts that can taste artificial or overly sweet, this espresso cheesecake strikes the perfect balance between rich coffee bitterness and creamy sweetness.
This recipe has become my go-to for special occasions because it's actually quite forgiving for home bakers. The espresso cheesecake bakes at a lower temperature in a water bath, which prevents those annoying cracks on top and ensures a silky-smooth texture every single time. Plus, you can make it a day ahead, which takes the stress out of entertaining since the flavors actually improve after chilling overnight in the fridge.
Jump to:
Ingredients
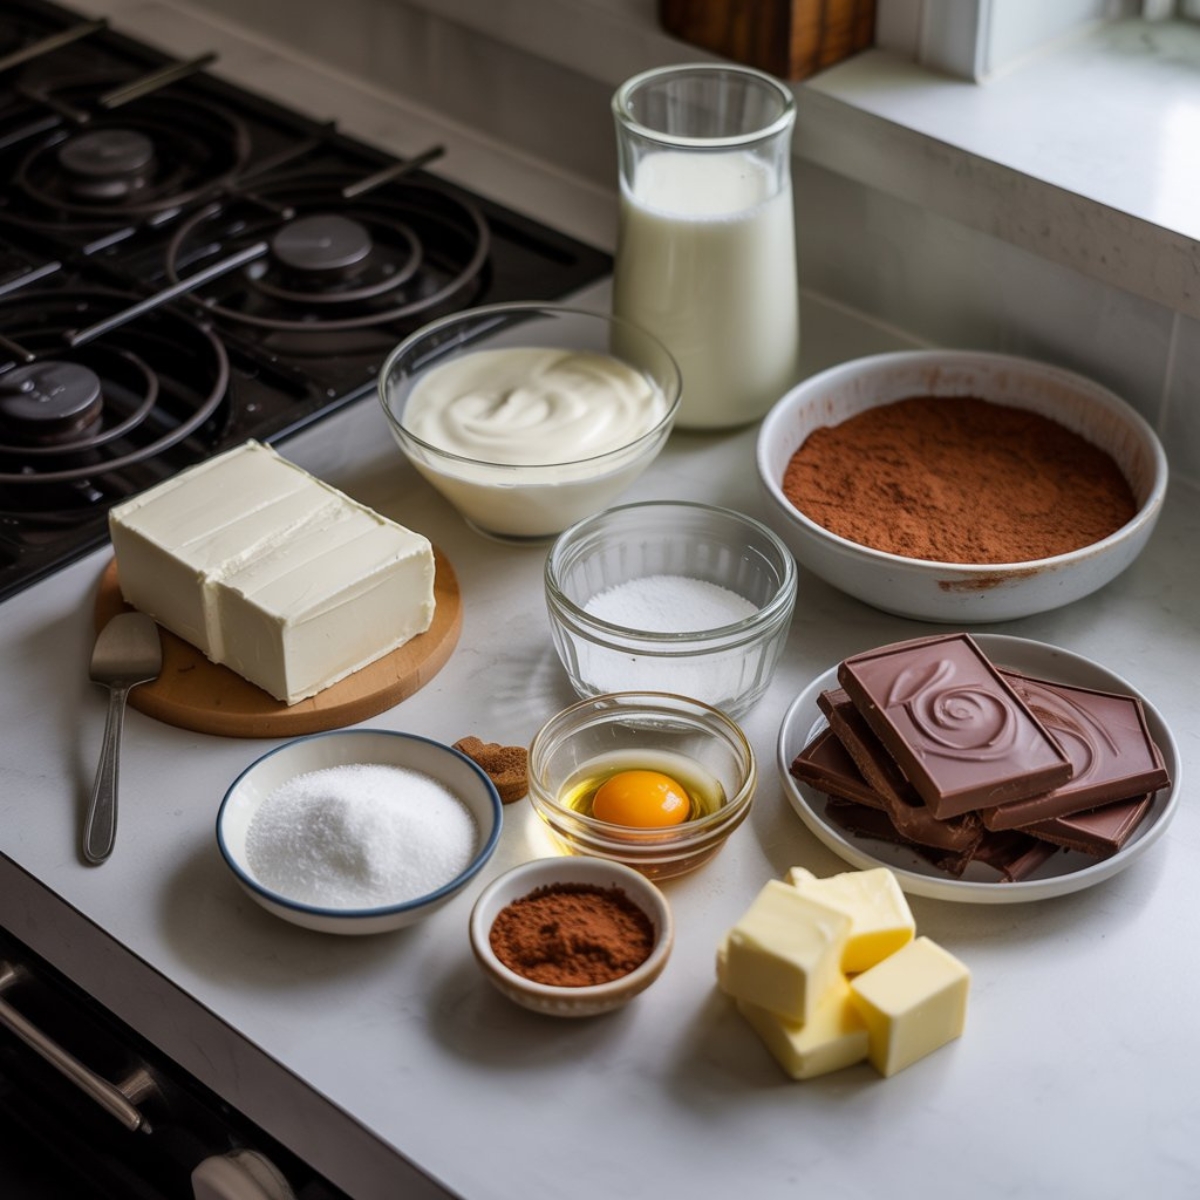
For the Chocolate Crust:
- Chocolate cookie crumbs (about 24 cookies)
- Unsalted butter, melted
- Granulated sugar
- Pinch of salt
For the Espresso Filling:
- Cream cheese (four 8-ounce packages), softened to room temperature
- Granulated sugar
- Eggs, room temperature
- Sour cream, room temperature
- Heavy cream
- Instant espresso powder
- Vanilla extract
- Salt
For the Ganache Topping (Optional):
- Espresso powder
- Dark chocolate, chopped
- Heavy cream
See recipe card for quantities.
Instructions
Step 1: Prepare Your Pan and Crust
- Preheat your oven to 325°F (163°C) and position the rack in the lower third of your oven.
- Wrap the outside of a 9-inch springform pan with two layers of heavy-duty aluminum foil to prevent water from seeping in during the water bath.
- Mix the chocolate cookie crumbs, melted butter, sugar, and salt in a medium bowl until the mixture resembles wet sand.
- Press the crumb mixture firmly into the bottom of your prepared pan using the bottom of a measuring cup to create an even layer.
- Bake the crust for 10 minutes, then remove and let it cool while you prepare the filling.
Step 2: Make the Creamy Espresso Filling
- Dissolve the espresso powder in 2 tablespoons of hot water and set aside to cool slightly.
- Beat the softened cream cheese in a large bowl with an electric mixer on medium speed for about 2 minutes until completely smooth and creamy.
- Add the sugar gradually and continue beating for another 2 minutes until well combined and fluffy.
- Mix in the espresso mixture, vanilla extract, and salt until fully incorporated.
- Add the eggs one at a time, beating on low speed after each addition just until combined (overmixing can create too much air and cause cracks).
- Gently fold in the sour cream and heavy cream with a spatula until the mixture is smooth and uniform.
Step 3: Bake in a Water Bath
- Pour the espresso cheesecake filling over the cooled crust and smooth the top with a spatula.
- Place your springform pan inside a larger roasting pan and put both in the oven.
- Carefully pour hot water into the roasting pan until it reaches about halfway up the sides of the springform pan.
- Bake for 70-80 minutes until the edges are set but the center still has a slight jiggle (about 3 inches in diameter).
- Turn off the oven, crack the door open slightly, and let the cheesecake cool in the oven for 1 hour to prevent sudden temperature changes.
Step 4: Chill and Top
- Remove the cheesecake from the water bath and take off the foil wrapping.
- Let it cool completely at room temperature for about 30 minutes.
- Cover the top loosely with plastic wrap and refrigerate for at least 6 hours or overnight for the best texture.
- If making the ganache, heat the cream until steaming, pour over the chopped chocolate and espresso powder, let sit for 2 minutes, then stir until smooth and glossy.
- Pour the ganache over the chilled cheesecake and spread evenly, then refrigerate for another 30 minutes to set.
Expert Cooking Tips
Getting your espresso cheesecake to turn out perfectly every time comes down to a few key techniques that professional bakers swear by. Here's what you need to know:
- Temperature Matters: Always bring your cream cheese, eggs, and sour cream to room temperature before mixing. Cold ingredients don't blend smoothly and can create lumps in your filling. I usually set mine out about 2 hours before baking, or you can soften cream cheese in the microwave for 10-15 seconds at 50% power.
- Don't Overmix: Once you add the eggs to your espresso cheesecake batter, mix on the lowest speed just until combined. Overmixing incorporates too much air, which expands during baking and then collapses, causing those frustrating cracks on top.
- Water Bath is Non-Negotiable: The water bath creates a humid environment that prevents the top from drying out and cracking. Make sure your foil wrapping is secure and use hot water from the tap to save time.
- The Jiggle Test: Your cheesecake is done when the outer 2-3 inches are set but the center still jiggles like jello when you gently shake the pan. It will continue cooking as it cools and firm up perfectly in the fridge.
- Quality Espresso Powder: Use instant espresso powder (not regular instant coffee) for the most authentic coffee flavor. Brands like Medaglia d'Oro or King Arthur Baking give you that deep, rich taste that makes this espresso cheesecake stand out.
Recipe Variations & Substitutions
One of the best things about this espresso cheesecake recipe is how adaptable it is to different tastes and dietary needs. Here are some creative ways to customize it:
- Crust Variations: Swap the chocolate cookie crust for graham crackers mixed with 1 tablespoon of cocoa powder for a lighter option. Biscoff cookies create an amazing caramel-coffee combination, or try Oreos (filling and all) for an extra-indulgent base.
- No-Bake Version: Skip the baking entirely by using 2 tablespoons of unflavored gelatin dissolved in ¼ cup hot water, mixed into the uncooked filling. Pour over the crust and refrigerate for at least 6 hours until set.
- Mocha Twist: Add ¼ cup unsweetened cocoa powder to the filling along with the espresso for a rich mocha espresso cheesecake that chocolate lovers will go crazy for.
- Mini Cheesecakes: Divide the mixture among lined muffin tins and bake for just 20-25 minutes at 325°F for perfect single-serving portions.
- Dairy-Free Option: Use vegan cream cheese (like Kite Hill or Miyoko's), coconut cream in place of sour cream, and aquafaba or flax eggs as egg replacements. The texture won't be quite as creamy but still delicious.
- Kahlua Kick: Replace 2 tablespoons of the heavy cream with Kahlua or other coffee liqueur for an adult version with extra depth.
- Lighter Version: Substitute half the cream cheese with Greek yogurt and use reduced-fat cream cheese for the other half. This cuts calories while maintaining a tangy, creamy texture.
Equipment Recommendations
- 9-inch Springform Pan: This is absolutely necessary for easy removal and clean slices. Look for one with a tight seal to prevent water bath leaks. A quality pan like Wilton or Nordic Ware will last you years of cheesecake making.
- Heavy-Duty Aluminum Foil: Regular foil tears too easily when wrapping your pan. The heavy-duty version creates a watertight seal that protects your espresso cheesecake during the water bath.
- Large Roasting Pan: You need something big enough to hold your springform pan with room for water around the sides. A 13x9-inch roasting pan works perfectly.
- Electric Mixer: While you can mix by hand, a stand mixer or hand mixer makes the process much easier and creates a smoother filling with less effort.
- Instant-Read Thermometer: The center of your cheesecake should reach 150°F for food safety while still maintaining that slightly jiggly center.
Storage & Meal Prep Tips
Proper storage keeps your espresso cheesecake tasting fresh and creamy for days after baking. Here's exactly how to do it:
- Refrigerator Storage: Cover your cheesecake loosely with plastic wrap or aluminum foil once completely cooled. It will stay fresh in the fridge for up to 5 days. For the best coverage, use a cake dome if you have one, which prevents the wrap from touching the surface.
- Freezing Instructions: This espresso cheesecake freezes beautifully for up to 3 months. Wrap individual slices or the whole cheesecake tightly in plastic wrap, then again in aluminum foil. Thaw overnight in the refrigerator before serving for the best texture.
- Make-Ahead Strategy: Bake your cheesecake 2-3 days before you need it. The flavors actually deepen and improve after a day or two in the fridge. Add the ganache topping the day before serving for the freshest look.
- Preventing Odor Absorption: Cheesecake picks up other food smells easily, so store it in an airtight container or wrap it well. Keep it away from strong-smelling foods like onions or garlic in your fridge.
- Serving Temperature: Take your espresso cheesecake out of the fridge about 20-30 minutes before serving. Slightly softened cheesecake has the best, creamiest texture and the coffee flavor really shines through.
The Secret That Changed Everything
Want to know the one trick that transformed my espresso cheesecake from good to absolutely incredible? It's all about blooming your espresso powder before adding it to the batter. When you dissolve the espresso powder in a small amount of hot water first, you're actually activating the coffee oils and intensifying the flavor compounds. This simple 30-second step creates a depth of coffee flavor that adding dry powder could never achieve.
Here's another secret most recipes won't tell you; let your baked espresso cheesecake rest in the turned-off oven with the door cracked for a full hour. I know it's tempting to pull it out right away, but this gradual cooling process is what prevents those surface cracks and creates that perfect, smooth top everyone admires. The cheesecake continues to set during this time, and the gentle temperature change keeps the texture silky instead of dense.
FAQ
Can espresso cheesecake be frozen?
Yes, espresso cheesecake freezes wonderfully for up to 3 months! Wrap individual slices or the whole cake tightly in plastic wrap and then aluminum foil. Thaw it overnight in the refrigerator, and it will taste just as creamy and delicious as the day you made it.
How long can cheesecake stay unrefrigerated?
Your espresso cheesecake should not sit at room temperature for more than 2 hours due to the dairy content. If you're serving it at a party, keep it refrigerated until about 30 minutes before serving, then return any leftovers to the fridge promptly.
What are some fun facts about cheesecake?
Cheesecake actually dates back to ancient Greece, where it was served to athletes during the first Olympic games around 776 BC! The modern cream cheese version we love today was invented in New York in the 1900s, and Americans now consume over 36 million cheesecakes every year.
What to serve with coffee cheesecake?
This espresso cheesecake pairs beautifully with fresh whipped cream, a drizzle of caramel sauce, or chocolate-covered espresso beans for garnish. For beverages, serve it alongside a bold cup of coffee, cappuccino, or even a sweet dessert wine like Vin Santo.
Time to Create Your Coffee Masterpiece
Now that you've got all the secrets to making the perfect espresso cheesecake, it's time to get baking! This rich, creamy dessert brings together everything coffee lovers crave in one stunning slice. The bold espresso flavor, silky-smooth texture, and chocolate crust create a combination that's impossible to resist. Whether you're making this espresso cheesecake for a special celebration or just because you deserve something amazing, I promise it'll become one of your most-requested recipes.
Don't stop at just this recipe though. If you loved this coffee-infused dessert, you absolutely need to try our Pumpkin Cheesecake Recipe for a seasonal twist that's perfect for fall gatherings. And for chocolate lovers who can't get enough, our Red Velvet Cheesecake Brownies Recipe combines two classic desserts into one incredible treat. Both recipes are just as easy to make and guarantee to impress your family and friends. So grab your springform pan, brew yourself a cup of coffee, and let's make some espresso cheesecake magic happen in your kitchen today!
With love from my kitchen to yours,
Aubrey James
Related
Looking for other recipes like this? Try these:


Pairing
These are my favorite dishes to serve with this espresso cheesecake recipe:


Espresso Cheesecake Recipe
Equipment
- 1 9-inch springform pan essential for easy release
- 1 Electric mixer stand or hand mixer works
- 1 Large roasting pan for water bath baking
- 1 Heavy-duty aluminum foil to wrap pan securely
- 1 Mixing bowl set for crust and filling
- 1 Rubber spatula for folding and smoothing
- 1 Instant-read Thermometer optional, for doneness check
Ingredients
For the Chocolate Crust
- 2 cups chocolate cookie crumbs about 24 cookies
- 5 tablespoon unsalted butter melted
- 2 tablespoon granulated sugar
- 1 pinch salt enhances flavor
For the Espresso Filling
- 32 ounces cream cheese softened to room temperature
- 1.25 cups granulated sugar
- 4 large eggs room temperature
- 1 cup sour cream room temperature
- 0.25 cup heavy cream
- 3 tablespoon instant espresso powder dissolved in hot water
- 2 teaspoon vanilla extract
- 0.25 teaspoon salt balances sweetness
For the Ganache Topping (Optional)
- 4 oz dark chocolate finely chopped
- 0.5 cup heavy cream heated
- 1 teaspoon espresso powder intensifies flavor
Instructions
- Wrap springform pan in foil and preheat oven to 325°F (163°C).
- Combine cookie crumbs, butter, sugar, and salt; press into pan and bake 10 minutes.
- Beat cream cheese and sugar until smooth, add espresso mix, vanilla, salt, eggs, sour cream, and cream.
- Pour filling over crust; bake in a water bath for 70–80 minutes until edges are set and center jiggles slightly.
- Let cheesecake cool in oven with door cracked for 1 hour, then at room temp for 30 minutes.
- Cover and refrigerate for at least 6 hours or overnight for best flavor and texture.
- Pour warm ganache over chilled cheesecake, spread evenly, and chill 30 minutes before serving.


Leave a Reply