
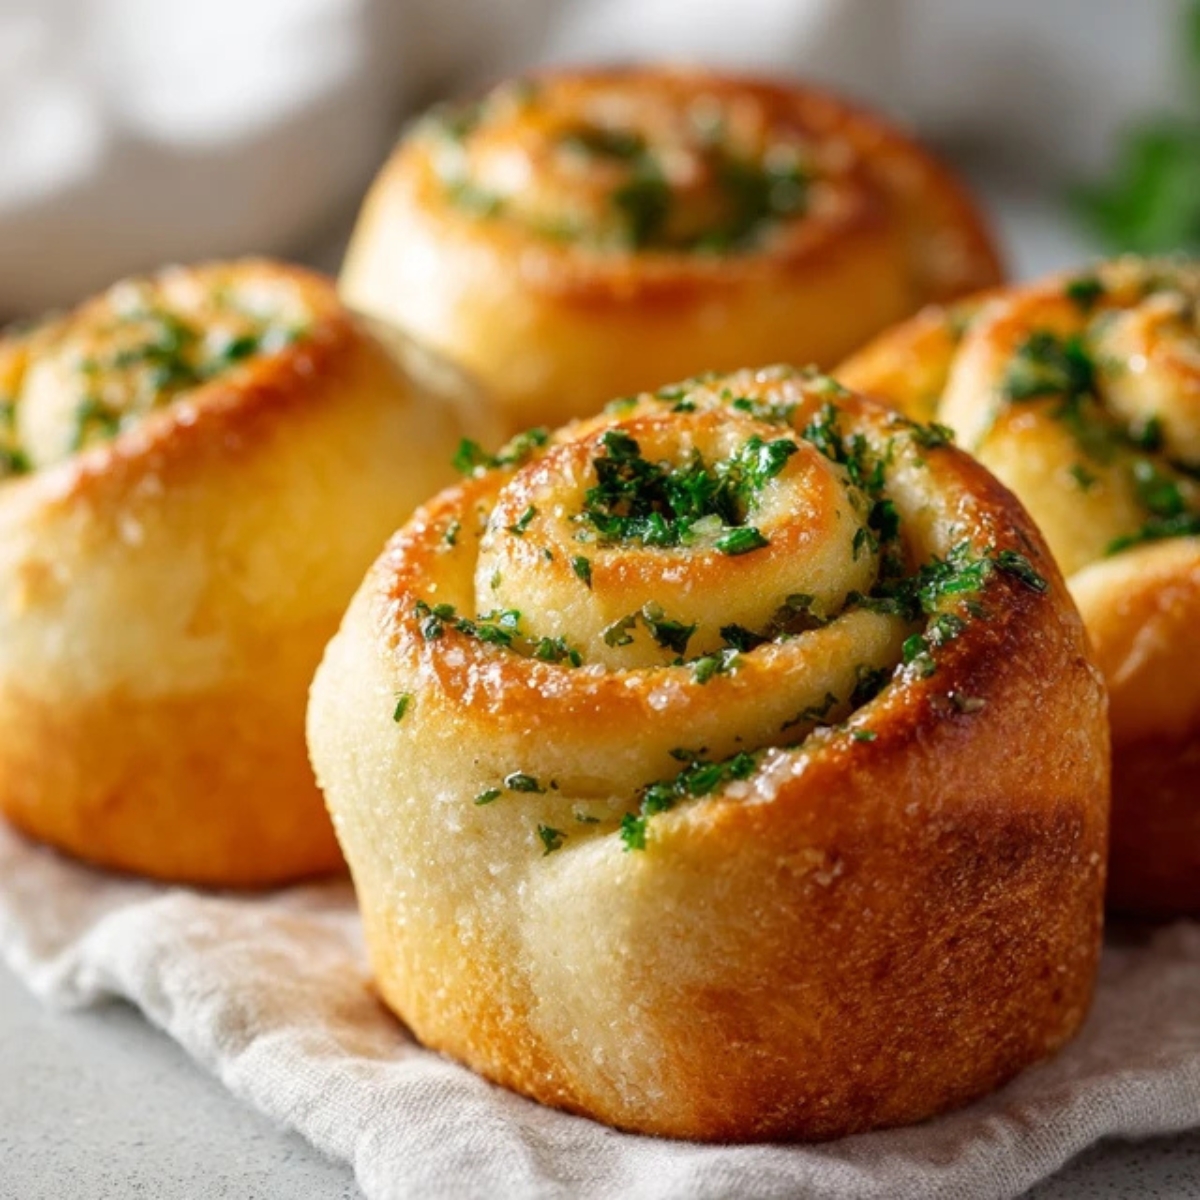
There's something magical about pulling apart warm, fluffy garlic swirl rolls straight from the oven. The aroma of garlic swirl rolls baking fills your kitchen with that cozy, homey scent that makes everyone gather around the table. I've been making these garlic swirl rolls for years, and they never fail to steal the show at family dinners, holiday gatherings, or even casual weeknight meals. Whether you're serving them alongside pasta, soup, or just want a delicious starter, these garlic swirl rolls are about to become your new favorite recipe.
What I love most about this recipe is how simple it is to create something that looks and tastes absolutely restaurant-quality. You don't need fancy techniques or professional baking skills; just follow along, and you'll have golden, buttery rolls with gorgeous garlic swirls running through each bite. Trust me, once you make these homemade garlic rolls, store-bought will never compare.
Background & Why These Rolls Are Total Game-Changers
Garlic swirl rolls have been a staple at dinner tables for generations, but this particular recipe takes everything you love about garlic bread rolls and elevates it to a whole new level. The secret is in the swirl; by rolling garlic herb butter directly into the dough, you get flavor in every single bite, not just on the surface. These soft garlic rolls are incredibly versatile too. Serve them as baked garlic swirl bread alongside your favorite Christmas dinner, pair them with Italian pasta dishes, or enjoy them as energizing breakfast treats with eggs.
What makes these garlic swirl rolls stand out from regular dinner rolls is the perfect balance of buttery richness and aromatic garlic without being overwhelming. The texture is incredibly soft and fluffy, with a slight pull-apart quality that makes them irresistible. I've tweaked this recipe over the years to get the ratios just right, and the result is rolls that stay fresh longer, freeze beautifully, and always get rave reviews. Whether you're planning fancy easy recipes for the holidays or just want to add something special to your weeknight rotation, these garlic swirl rolls deliver every single time.
Jump to:
Ingredients
For the Dough:
- All-purpose flour
- Active dry yeast (1 packet)
- Warm milk (110°F)
- Granulated sugar
- Unsalted butter, melted
- Egg
- Salt
For the Garlic Swirl Filling:
- Unsalted butter, softened
- Garlic, minced (or 2 teaspoons garlic powder)
- Fresh parsley, finely chopped
- Salt
- Black pepper
- Optional: ¼ cup grated Parmesan cheese for cheesy garlic swirl rolls
For the Topping:
- 2 tablespoons melted butter
- 1 teaspoon garlic powder
- Fresh parsley for garnish
See recipe card for quantities.
Instructions
Step 1: Prepare the Dough
- In a large mixing bowl, combine warm milk, sugar, and yeast. Let it sit for 5-7 minutes until foamy.
- Add melted butter, egg, and salt to the yeast mixture. Stir well to combine.
- Gradually add flour, one cup at a time, mixing until a soft dough forms.
- Turn the dough onto a floured surface and knead for 8-10 minutes until smooth and elastic.
- Place dough in a greased bowl, cover with a clean kitchen towel, and let it rise in a warm spot for 60-75 minutes until doubled in size.
Step 2: Make the Garlic Butter Filling
- While the dough rises, prepare your garlic herb butter by mixing softened butter, minced garlic, parsley, salt, and pepper in a small bowl.
- Stir until everything is well combined and the mixture is smooth and spreadable.
- If making cheesy garlic rolls, fold in the grated Parmesan cheese at this stage.
- Set aside at room temperature so it stays spreadable when you're ready to use it.
Step 3: Shape the Garlic Swirl Rolls
- Once the dough has doubled, punch it down gently to release air bubbles.
- Roll the dough into a large rectangle, approximately 16x12 inches, on a floured surface.
- Spread the garlic butter filling evenly over the entire surface of the dough, leaving a small border along one long edge.
- Starting from the opposite long edge, tightly roll the dough into a log, keeping the roll as tight and even as possible.
- Using a sharp knife or dental floss, cut the log into 12 equal pieces.
- Place the garlic swirl rolls cut-side up in a greased 9x13-inch baking dish, leaving small gaps between each roll.
- Cover with a towel and let rise for another 30-40 minutes until puffy.
Step 4: Bake to Golden Perfection
- Preheat your oven to 375°F while the rolls complete their second rise.
- Once risen, bake the garlic swirl rolls for 22-25 minutes until golden brown on top.
- Remove from oven and immediately brush with melted butter mixed with garlic powder.
- Sprinkle with fresh parsley and serve warm for the best experience.
Expert Cooking Tips
Getting your garlic swirl rolls absolutely perfect every time comes down to a few key techniques that make all the difference:
- Temperature Matters for Yeast Activation Always use milk between 105-115°F when activating your yeast. Too hot and you'll kill the yeast; too cold and it won't activate properly. I like to test the temperature on my wrist; it should feel comfortably warm, not hot.
- Don't Skip the Kneading Proper kneading develops the gluten structure that gives these homemade garlic rolls their soft, fluffy texture. You'll know the dough is ready when it bounces back when poked and feels smooth and elastic. If you have a stand mixer with a dough hook, knead on medium speed for 6-8 minutes.
- The Right Rising Environment Dough rises best in a warm, draft-free spot. I turn my oven on for just 1 minute, turn it off, and then place my covered bowl inside. The residual warmth creates the perfect environment. You can also place the bowl near a warm (not hot) stovetop.
- Spread Filling to the Edges When applying your garlic herb butter, spread it all the way to the edges except for that small border on one side. This ensures every bite of your baked garlic swirl bread has maximum flavor. Don't be shy with the filling!
- Use Dental Floss for Clean Cuts Here's a game-changer: slide unflavored dental floss under your rolled log, cross the ends over the top, and pull to slice. This gives you perfect, clean cuts without squishing the rolls like a knife sometimes does.
- Second Rise is Non-Negotiable Never skip that second rise after shaping. This is what gives your buttery garlic rolls their light, airy texture. They should look noticeably puffy and have expanded to touch each other before baking.
Recipe Variations & Substitutions
One of the best things about this garlic swirl rolls recipe is how adaptable it is to different tastes and dietary needs:
- Make It Cheesy Transform these into cheese garlic rolls by adding ¾ cup shredded mozzarella or cheddar cheese to the filling. You can also sprinkle cheese on top during the last 5 minutes of baking for extra indulgence. Garlic parmesan swirl rolls are especially popular; just add ½ cup Parmesan to the filling.
- Herb Variations While parsley is classic, you can customize the herbs based on what you love. Try fresh rosemary and thyme for savory swirl rolls that pair beautifully with roasted meats, or add Italian seasoning for a Mediterranean twist on these garlic herb rolls.
- Dairy-Free Adaptation Substitute the milk with unsweetened almond or oat milk, and use plant-based butter in both the dough and filling. The texture stays remarkably similar, making these accessible for those avoiding dairy.
- Whole Wheat Option Replace up to half the all-purpose flour with whole wheat flour for added nutrition. You may need to add 1-2 tablespoons more liquid as whole wheat absorbs more moisture. These make excellent energizing breakfast rolls.
- Stuffed Garlic Rolls For stuffed garlic rolls, place a small cube of mozzarella in the center of each piece before the second rise. As they bake, you'll get a melty cheese surprise inside each roll.
Quick Shortcut Version Short on time? Use store-bought pizza dough or crescent roll dough for easy garlic swirl rolls. Roll it out, add the garlic butter filling, roll, cut, and bake. They'll be ready in under 30 minutes, perfect for quick garlic rolls when you need something delicious fast.
Equipment Recommendations
Having the right tools makes preparing these garlic swirl rolls so much easier and ensures better results:
- Stand Mixer with Dough Hook - While you can knead by hand, a stand mixer saves time and effort, giving you perfectly developed dough every time
- Rolling Pin - Essential for rolling your dough into an even rectangle; a silicone one prevents sticking
- 9x13-inch Baking Dish - The perfect size for arranging 12 rolls with just enough space for that pull-apart quality
- Pastry Brush - For brushing that final garlic butter on top; silicone brushes are easiest to clean
- Digital Kitchen Thermometer - Takes the guesswork out of milk temperature for activating yeast
- Bench Scraper - Makes cutting and handling dough much cleaner and easier
Storage & Meal Prep Tips
These garlic butter rolls store beautifully, making them perfect for meal prep and advance planning:
- Room Temperature Storage Keep leftover garlic swirl rolls in an airtight container at room temperature for up to 2 days. They'll stay soft and delicious. Before serving, warm them in a 300°F oven for 5-7 minutes to refresh that just-baked quality.
- Refrigerator Storage For longer storage, place the rolls in an airtight container or resealable bag and refrigerate for up to 5 days. The cold can make them slightly firm, but a quick 10-second microwave zap or 8 minutes in a warm oven brings them back to life.
- Freezing for Later These homemade garlic rolls freeze exceptionally well. Cool completely, then wrap individual rolls in plastic wrap and place in a freezer bag. They'll keep for up to 3 months. Thaw at room temperature for 2 hours or overnight in the refrigerator, then warm in the oven.
- Make-Ahead Strategy You can prepare the rolls through the shaping stage, place them in the baking dish, cover tightly with plastic wrap, and refrigerate overnight. In the morning, let them sit at room temperature for 30-45 minutes before baking. This is perfect for Christmas dinner bread recipes or when you want fresh rolls without morning stress.
- Freeze Unbaked Rolls Shape the rolls, place them on a baking sheet, and freeze until solid. Transfer to a freezer bag and store for up to 2 months. When ready to bake, arrange in your baking dish, let thaw and rise at room temperature for 2-3 hours, then bake as directed.
Grandma's Secret That Changed Everything
Here's the tip that transformed my garlic swirl rolls from good to absolutely unforgettable: brush the rolls with garlic butter not once, but twice. Most recipes tell you to brush after baking, but I do it before AND after. Right before the rolls go into the oven, I give them a light brush with garlic butter. This creates a golden, slightly crispy exterior with incredible flavor. Then, when they come out of the oven, I brush them again for that glossy, buttery finish.
The second secret is letting your garlic butter filling come to room temperature before spreading. Cold butter tears the dough and doesn't spread evenly, creating gaps in your swirl. Room-temperature butter spreads like a dream, giving you those gorgeous, even spirals in every soft garlic roll. These two simple tricks make all the difference between homemade rolls that are merely good and ones that have people begging for your recipe. Trust me, these garlic swirl rolls will become your signature dish.
FAQ
How long can garlic bread be left out?
Garlic swirl rolls can safely sit at room temperature for up to 2 hours. After that, they should be stored in an airtight container. While they won't spoil immediately, keeping them covered maintains their soft texture and prevents the garlic butter from developing off-flavors.
What's the secret to flavorful garlic rolls?
The secret is using fresh garlic rather than just garlic powder, and making sure your garlic herb butter is generously applied throughout the entire dough. Also, brushing the finished garlic swirl rolls with additional garlic butter right when they come out of the oven locks in maximum flavor and creates that irresistible aroma.
Do you have to refrigerate rolls?
If you're eating your garlic swirl rolls within 2 days, they're perfectly fine at room temperature in an airtight container. Beyond that, refrigeration helps prevent mold and keeps them fresh for up to 5 days. Just remember to warm them before serving to restore that soft, fresh-baked texture.
Are you supposed to cook garlic bread in the bag?
No, never bake garlic swirl rolls or any bread in plastic bags. Always remove all packaging before baking. For these homemade garlic rolls, you'll bake them uncovered in a baking dish so they develop that beautiful golden-brown top while staying soft and fluffy inside
Your New Signature Recipe
These garlic swirl rolls are about to become your go-to recipe for every occasion. From holiday gatherings to casual weeknight dinners, these buttery garlic rolls never disappoint. The combination of soft, fluffy dough and aromatic garlic herb butter creates something truly special that brings people together around the table. Once you master this recipe, you'll find yourself making these garlic swirl rolls again and again.
Ready to expand your bread repertoire? Try our Garlic Parmesan Bread Recipe for another twist on garlic-infused goodness, or make our famous Texas Roadhouse Rolls Recipe for those sweet, buttery rolls that pair perfectly with any meal. Both recipes use similar techniques, so if you've mastered these garlic swirl rolls, you'll breeze through those too. Happy baking, and enjoy every delicious bite of these homemade treasures!
With love from my kitchen to yours,
Taylor Monroe
Related
Looking for other recipes like this? Try these:


Pairing
These are my favorite dishes to serve with this garlic swirl rolls recipe:


Garlic Swirl Rolls Recipe
Equipment
- Stand mixer with dough hook Optional but helps knead the dough evenly
- Rolling pin For rolling out dough
- 9x13 inch baking dish To bake the rolls
- Pastry brush For brushing garlic butter
- Mixing bowl For dough and butter mixture
- Digital kitchen thermometer To check yeast activation temperature
- Bench scraper or dental floss For clean cuts when slicing rolls
Ingredients
For the Dough
- 3 ½ cups all-purpose flour plus more for dusting
- 2 ¼ teaspoons active dry yeast one packet
- 1 cup warm milk about 110°F
- ¼ cup granulated sugar
- ⅓ cup unsalted butter melted
- 1 large egg
- 1 teaspoon salt
For the Garlic Swirl Filling
- 6 tablespoons unsalted butter softened
- 4 cloves garlic minced (or 2 teaspoon garlic powder)
- 2 tablespoons fresh parsley finely chopped
- ½ teaspoon salt
- ¼ teaspoon black pepper
- ¼ cup grated Parmesan cheese optional, for cheesy version
For the Topping
- 2 tablespoons melted butter for brushing baked rolls
- 1 teaspoon garlic powder
- 1 tablespoon fresh parsley for garnish
Instructions
- Activate yeast in warm milk with sugar until foamy.
- Mix in melted butter, egg, and salt, then gradually add flour to form soft dough.
- Knead for 8–10 minutes until smooth and elastic; let rise for 60–75 minutes.
- Combine butter, garlic, parsley, salt, pepper, and Parmesan (optional).
- Roll dough into a rectangle, spread filling, roll tightly, and slice into 12 rolls.
- Arrange rolls in greased baking dish and let rise 30–40 minutes.
- Bake at 375°F for 22–25 minutes until golden brown.
- Brush warm rolls with garlic butter and sprinkle parsley.


Leave a Reply