
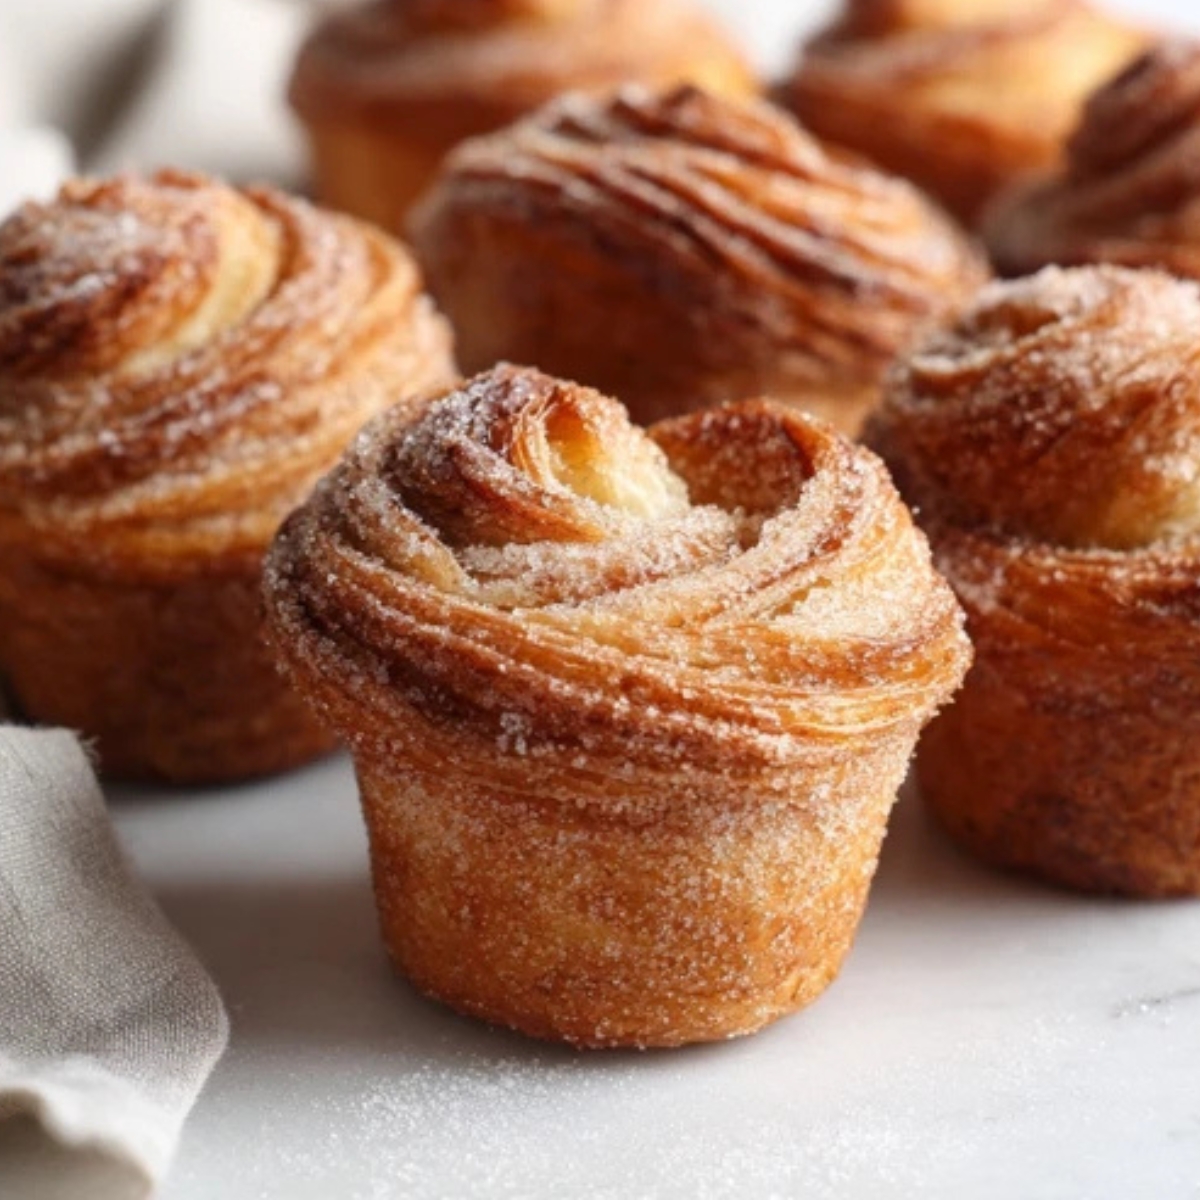
There's something magical about biting into a warm, flaky cruffin that melts in your mouth, and discovering you can make gluten free cruffins at home changes everything. I remember the first time I successfully created these gorgeous pastries in my own kitchen; the buttery layers, the golden exterior, and that perfect balance between a croissant and a muffin had my family convinced I'd secretly opened a bakery overnight. Whether you're navigating celiac disease, gluten sensitivity, or simply exploring healthier baking options, these gluten free cruffins deliver all the indulgence without compromise. The best part? You don't need fancy equipment or professional training to create bakery-quality gluten free cruffins that'll have everyone asking for seconds. This recipe transforms simple gluten free ingredients intoshow-stopping pastries that prove dietary restrictions never mean sacrificing flavor or texture.
The Rise of Cruffins & Why This Gluten Free Version Wins
The cruffin took the baking world by storm when innovative pastry chefs started experimenting with croissant dough baked in muffin tins, creating an Instagram-worthy hybrid that combined the best of both worlds. Traditional versions require hours of laminating butter into wheat-based dough, but this gluten free cruffins recipe simplifies the process while maintaining that signature flakiness everyone craves. What makes these gluten free cruffins truly stand out is the carefully balanced flour blend that mimics the structure gluten typically provides, creating layers that separate beautifully and a texture so tender you'd never guess they're gluten free. I've tested countless variations over the past few years, adjusting ratios and techniques until I discovered the perfect formula that works every single time.
These gluten free cruffins have become my go-to recipe for holiday brunches, weekend breakfast treats, and those moments when you want to impress without spending your entire morning in the kitchen. The versatility is unmatched; you can fill them with cinnamon sugar, fruit preserves, chocolate, or even savory ingredients depending on your mood. Unlike many gluten free baked goods that turn dense or crumbly, these gluten free cruffins maintain their structure for days, making them perfect for meal prep or gift-giving. The combination of almond flour and a quality gluten free flour blend creates a pastry that's not just "good for gluten free" but genuinely exceptional by any standard.
Jump to:
Ingredients
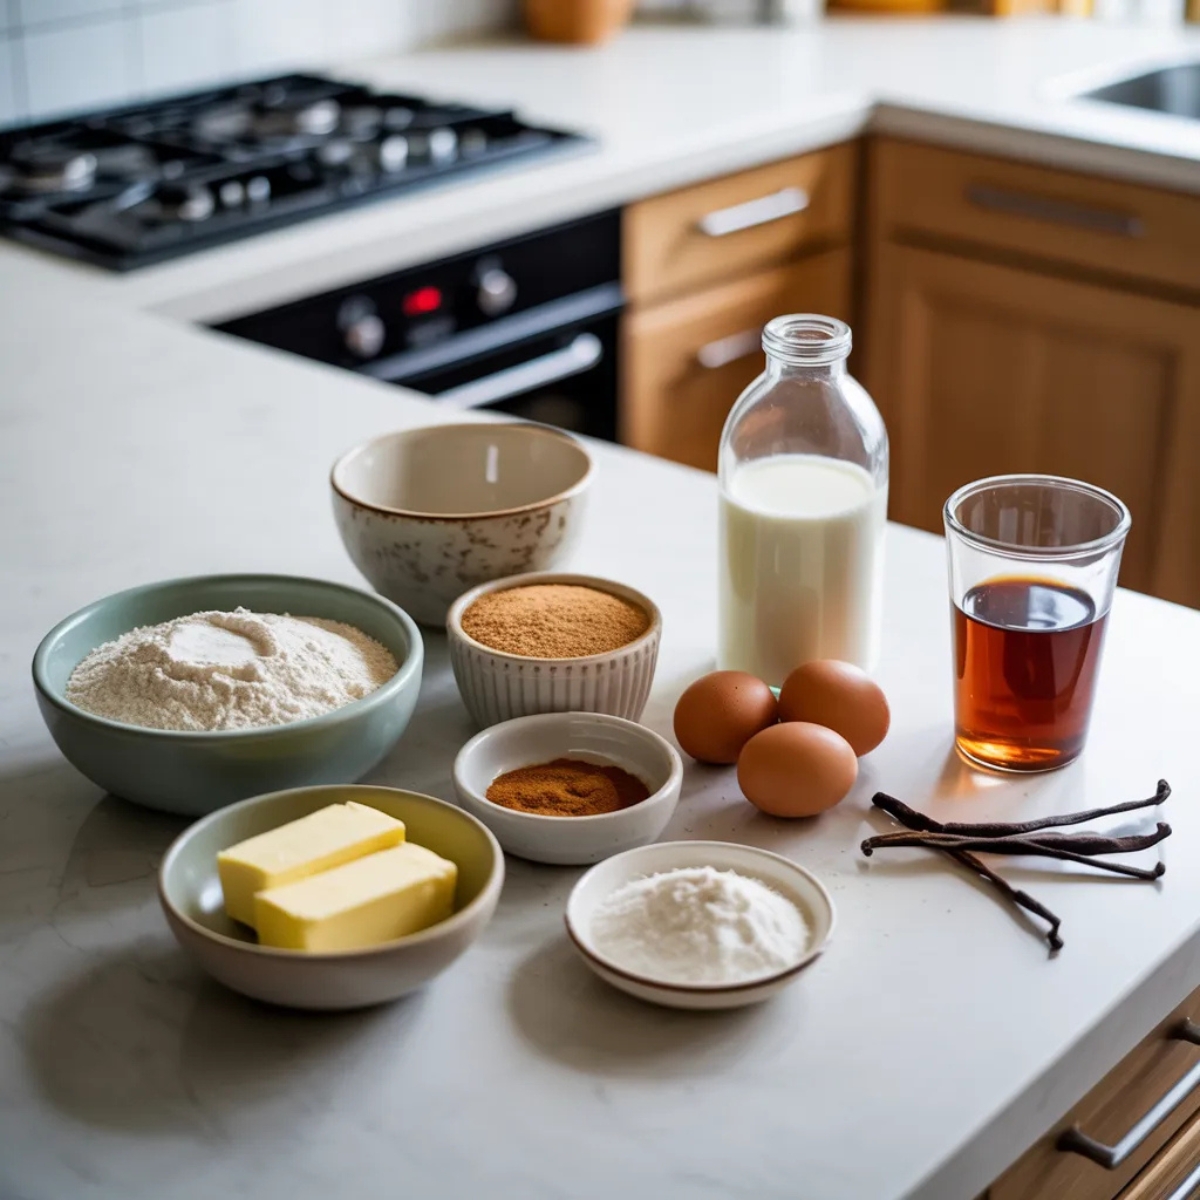
For the Dough:
- Gluten free flour blend (I recommend Bob's Red Mill 1:1 or King Arthur Measure for Measure)
- Slmond flour (adds moisture and richness)
- Granulated sugar
- Instant yeast (one standard packet)
- Xanthan gum (if your flour blend doesn't include it)
- Salt
- Warm whole milk (dairy or non-dairy alternatives work beautifully)
- Eggs, room temperature
- Vanilla extract
- Unsalted butter, softened and divided
For the Cinnamon Sugar Filling:
- Unsalted butter, melted
- Brown sugar, packed
- Ground cinnamon
- Pinch of nutmeg (optional but adds warmth)
For Topping:
- Melted butter
- Granulated sugar mixed with 1 teaspoon cinnamon
See recipe card for quantities.
Instructions
Step 1: Prepare Your Gluten Free Dough
1. Combine the gluten free flour blend, almond flour, sugar, instant yeast, xanthan gum, and salt in your stand mixer bowl fitted with the dough hook attachment.
2. Whisk together the warm milk (around 110°F), eggs, and vanilla extract in a separate bowl until smooth.
3. Pour the wet ingredients into the dry mixture and mix on low speed for about 30 seconds to combine.
4. Add 4 tablespoons of the softened butter and increase speed to medium, mixing for 3-4 minutes until a sticky but cohesive dough forms; gluten free dough will be softer and stickier than traditional dough.
5. Cover the bowl with plastic wrap and let rest in a warm spot for 45 minutes until slightly puffy (it won't double like wheat dough, but should look noticeably lighter).
Step 2: Roll and Layer Your Gluten Free Cruffins
1. Lightly dust your work surface with gluten free flour and turn out the dough.
2. Roll the dough into a large rectangle approximately 12x16 inches; if the dough feels too sticky, dust your rolling pin with additional flour.
3. Brush the entire surface generously with half the melted butter for the filling.
4. Mix your brown sugar, cinnamon, and nutmeg together, then sprinkle evenly across the buttered dough.
5. Starting from the long edge, tightly roll the dough into a log, keeping the roll as even as possible.
6. Cut the log lengthwise down the middle using a sharp knife or bench scraper, creating two long strips with the layers exposed.
Step 3: Shape Into Muffin Cups
1. Take one strip and twist it gently, keeping the cut side facing up to showcase those beautiful layers.
2. Coil the twisted strip into a spiral, tucking the end underneath.
3. Place each shaped gluten free cruffins into a generously greased muffin tin, pressing gently to fit.
4. Repeat with remaining strips; this recipe makes 10-12 cruffins depending on size.
5. Cover the muffin tin loosely with a kitchen towel and let rest for another 20 minutes while you preheat your oven to 375°F.
Step 4: Bake to Golden Perfection
1. Brush the tops of each gluten free cruffins with the remaining 2 tablespoons of melted butter.
2. Bake for 22-26 minutes until the tops are deeply golden brown and the pastries feel firm when gently pressed.
3. Remove from oven and let cool in the pan for 5 minutes to set the structure.
4. Carefully transfer to a wire rack and immediately brush with melted butter, then roll in or sprinkle with the cinnamon sugar topping while still warm.
Expert Cooking Tips
Temperature Matters More Than You Think
Working with gluten free dough requires attention to temperature at every stage. Your milk should be warm but not hot (105-110°F is ideal) to activate the yeast without killing it; if you don't have a thermometer, the milk should feel like warm bathwater on your wrist. Room temperature eggs incorporate more smoothly into the dough, creating a more uniform texture in your gluten free cruffins. When rolling out the dough, if it becomes too soft or sticky to handle, pop it in the refrigerator for 10-15 minutes to firm up, making it much easier to work with.
Don't Skip the Resting Periods
Patience pays off: That initial 45-minute rest allows the gluten free flour to fully hydrate, creating a more manageable dough that won't crack when rolled. The second 20-minute rest after shaping gives the yeast time to create one final lift before baking. During cold weather, place your covered bowl near (not on) a warm oven or in a turned-off oven with just the light on to create the perfect proofing environment.
Rolling Technique for Flaky Layers
Work quickly but gently: Gluten free dough can be more delicate than wheat-based dough, so use a light touch when rolling. If your dough tears, simply pinch it back together; small imperfections won't show in the final product. For the flakiest gluten free cruffins, ensure your filling butter is melted but not hot, which would make the dough too greasy. Roll from the center outward in both directions to maintain even thickness.
Cutting and Twisting Without Disasters
Sharp tools are essential: A sharp knife or bench scraper makes clean cuts through the filled dough without squishing the layers together. When twisting the strips, handle them confidently but don't overwork; 2-3 gentle twists is plenty. If a strip breaks during twisting, overlap the pieces slightly when coiling and they'll bake together seamlessly in your gluten free cruffins.
Recipe Variations & Substitutions
Dietary Adaptations
For dairy-free gluten free cruffins: Replace regular milk with unsweetened almond milk, oat milk, or your preferred non-dairy alternative, and use plant-based butter; the recipe works beautifully with these substitutions without any other adjustments needed. For egg-free versions: Try using two flax eggs (2 tablespoons ground flaxseed mixed with 6 tablespoons water, let sit 5 minutes) though the texture will be slightly denser. Refined sugar-free option: Swap granulated sugar with coconut sugar and use date paste or maple syrup in the filling, though note this changes the moisture content slightly.
Flavor Variations to Try
Chocolate lovers: Replace the cinnamon filling with 1 cup chocolate chips or Nutella spread, creating decadent chocolate-filled gluten free cruffins. Fruit-filled versions: Spread 2-3 tablespoons of your favorite jam or fruit preserves across the dough before adding cinnamon sugar; berry, apricot, and apple butter work wonderfully. Savory twist: Skip the sweet filling entirely and use garlic butter, fresh herbs, and grated Parmesan cheese for a sophisticated brunch option. Fall spice blend: Add ½ teaspoon cardamom and ¼ teaspoon ground ginger to your cinnamon sugar for a chai-spiced version perfect for autumn mornings.
Flour Blend Recommendations
While I've tested this recipe with multiple gluten free flour blends, some work better than others. Best results: Bob's Red Mill 1:1 Baking Flour and King Arthur Measure for Measure provide the most reliable structure. Avoid: Single-grain flours like rice flour alone or coconut flour, which lack the proper balance for this application. If you want to make your own blend, combine 1½ cups white rice flour, ¼ cup tapioca starch, and ¼ cup potato starch for these gluten free cruffins.
Equipment Recommendations
- Stand mixer with dough hook: While you can mix by hand, a stand mixer makes incorporating the sticky gluten free dough much easier and ensures better development; KitchenAid and Bosch models work perfectly for these gluten free cruffins.
- Rolling pin: A marble or wooden rolling pin at least 12 inches long helps create even dough thickness without sticking.
- Standard 12-cup muffin tin: Use a quality metal tin rather than silicone, which doesn't conduct heat as efficiently and can result in soggy bottoms.
- Bench scraper or sharp knife: Essential for making clean cuts through the filled dough without smashing the layers.
- Pastry brush: For applying melted butter evenly across the dough and finished pastries.
- Instant-read thermometer: Takes the guesswork out of checking milk temperature for yeast activation.
- Parchment paper rounds: Optional but helpful for easy removal from muffin tins if you're worried about sticking.
Storage & Meal Prep Tips
Keeping Your Cruffins Fresh
Room temperature storage: Keep gluten free cruffins in an airtight container at room temperature for up to 3 days; they'll maintain their texture better than refrigerated ones. Refrigeration: If your kitchen is particularly warm or humid, store in the fridge for up to 5 days, but let them come to room temperature or warm briefly before serving for the best texture. Freezing for later: These freeze beautifully! Wrap individual gluten free cruffins tightly in plastic wrap, then place in a freezer bag for up to 3 months; thaw overnight in the refrigerator and warm in a 300°F oven for 5-7 minutes.
Make-Ahead Strategies
Prepare dough the night before: After the initial mixing and first rise, cover the bowl tightly and refrigerate overnight; let it come to room temperature for 30 minutes before rolling out the next morning. Shape and refrigerate: You can shape your gluten free cruffins into the muffin tin, cover tightly, and refrigerate overnight; add 5-10 minutes to the baking time when baking straight from the fridge. Freeze unbaked: Shape the cruffins, freeze them on a baking sheet until solid, then transfer to a freezer bag; bake from frozen, adding 8-10 minutes to the standard baking time.
Reheating for Best Results
The key to reviving day-old gluten free cruffins is gentle heat that won't dry them out. Oven method (best): Wrap individual pastries loosely in foil and warm in a 300°F oven for 8-10 minutes; the exterior crisps up while the inside stays tender. Microwave method (quick): Heat for 15-20 seconds on 50% power with a cup of water in the microwave to add moisture to the air. Air fryer method: 2-3 minutes at 300°F creates a beautifully crispy exterior that rivals fresh-baked.
The Baker's Secret That Changed Everything
Here's what transformed my gluten free cruffins from good to absolutely extraordinary: cold butter chunks. Instead of using only softened butter in the dough, I started adding 2 tablespoons of cold, grated butter during the final minute of mixing. Those little butter pieces create steam pockets during baking, resulting in incredibly flaky layers that rival traditional croissants. This technique mimics the lamination process professional bakers use, but without the hours of folding and chilling. The second game-changing secret involves brushing the shaped gluten free cruffins with heavy cream instead of butter right before baking; this creates a glossy, golden crust that looks professionally made.
My grandmother, who baked traditional cruffins for decades before I went gluten free, taught me that the secret to any great pastry is in the final five minutes. Those last moments in the oven make the difference between a pale, soft pastry and one with deeply caramelized edges and a satisfying crunch. When you think your gluten free cruffins are done, give them just two more minutes; that's when the magic happens. This small adjustment, combined with the cold butter technique, creates bakery-quality results that'll have people convinced you bought them from an upscale café.
FAQ
What is the secret to gluten free baking?
The secret to successful gluten free baking lies in proper hydration and patience. Gluten free flours need more time to absorb liquids than wheat flour, which is why resting the dough is crucial for these gluten free cruffins. Using a blend of flours rather than a single type creates better structure and texture, while xanthan gum or psyllium husk powder helps bind ingredients together, mimicking gluten's role.
Can croissants be made with gluten free flour?
Absolutely! While traditional croissant-making with gluten free flour requires extensive lamination, this gluten free cruffins recipe achieves similar results with a simplified method. The key is using a quality flour blend and incorporating butter in stages to create layers. These gluten free cruffins deliver that signature flaky texture and buttery flavor without the complexity of full croissant lamination.
What flour is best for gluten free baking?
For gluten free cruffins and most pastries, a well-balanced all-purpose gluten free flour blend works best; I recommend Bob's Red Mill 1:1 or King Arthur Measure for Measure. These blends combine multiple flours (typically rice flour, tapioca starch, and potato starch) to replicate wheat flour's properties. Adding almond flour contributes moisture, richness, and helps create tender gluten free cruffins.
What are the common mistakes with gluten free muffins?
The biggest mistakes include overmixing (which creates gummy texture), using flour blends without binders like xanthan gum (resulting in crumbly pastries), and underbaking (leaving centers gummy). For perfect gluten free cruffins, mix just until combined, ensure your flour blend includes a binder, and bake until deeply golden; gluten free baked goods often need slightly longer baking times than their wheat-based counterparts.
Your Next Baking Adventure Awaits
Now that you've mastered these incredible gluten free cruffins, your kitchen possibilities have expanded exponentially. These pastries prove that gluten free baking doesn't mean sacrificing flavor, texture, or those special moments when you pull something gorgeous from the oven and watch faces light up. Whether you're serving them at a holiday brunch, packing them for a special breakfast, or simply treating yourself on a lazy weekend morning, these gluten free cruffins deliver joy in every flaky, buttery bite. The beauty of this recipe is its versatility; once you've conquered the basic technique, you can experiment endlessly with fillings, toppings, and flavor combinations.
If you loved these gluten free cruffins, you'll want to try my Peach Pie Cruffins Recipe, which combines the same flaky pastry technique with a luscious fruit filling that tastes like summer in every bite. The sweet peach filling contrasts beautifully with the buttery layers, creating a dessert-worthy treat that's still acceptable for breakfast. For another creative twist on this hybrid pastry concept, check out my second Cruffins Recipe variation that incorporates a cream cheese drizzle and streusel topping for extra indulgence. These recipes build on the foundation you've learned here, taking your gluten free cruffins skills to the next level with seasonal flavors and creative presentations that'll keep your family asking what's coming out of the oven next.
With love from my kitchen to yours,
Kaitlyn Reed
Related
Looking for other recipes like this? Try these:


Pairing
These are my favorite dishes to serve with this gluten free cruffins recipe:


Gluten Free Cruffins Recipe
Equipment
- Stand mixer with dough hook Makes mixing the sticky gluten free dough easier
- Rolling pin For rolling the dough evenly
- 12-cup muffin tin Use metal for best heat conduction
- Bench scraper or sharp knife To slice dough cleanly
- Pastry brush For brushing butter or cream
- Instant-read Thermometer To check milk temperature
- Wire rack To cool cruffins evenly
Ingredients
For the Dough
- 2 cups gluten free flour blend Bob’s Red Mill 1:1 or King Arthur Measure for Measure
- 0.5 cup almond flour Adds richness and moisture
- 0.25 cup granulated sugar
- 2.25 teaspoon instant yeast One packet
- 1 teaspoon xanthan gum Skip if flour blend includes it
- 0.5 teaspoon salt
- 0.75 cup warm milk Dairy or non-dairy, 105–110°F
- 2 large eggs Room temperature
- 1 teaspoon vanilla extract
- 6 tablespoon unsalted butter Softened and divided
For the Cinnamon Sugar Filling
- 0.5 cup unsalted butter Melted
- 0.75 cup brown sugar Packed
- 2 tablespoon ground cinnamon
- 1 pinch nutmeg Optional
For the Topping
- 2 tablespoon melted butter
- 0.25 cup granulated sugar
- 1 teaspoon ground cinnamon Mix with sugar
Instructions
- Combine dry ingredients in mixer bowl.
- Whisk milk, eggs, and vanilla in another bowl.
- Add wet to dry, then mix until sticky dough forms.
- Mix in butter; knead 3–4 minutes until cohesive.
- Cover and let rest 45 minutes until slightly puffy.
- Roll dough into 12x16 inch rectangle.
- Brush with butter; sprinkle cinnamon sugar.
- Roll into a log, then slice lengthwise.
- Twist strips and coil into muffin cups.
- Let rest 20 minutes while preheating oven.
- Brush with butter; bake 22–26 minutes at 375°F.
- Cool 5 minutes, then coat with cinnamon sugar topping.

Leave a Reply