
Have you ever craved that cheesy, savory pizza flavor but wanted something easier and more fun to eat? These Pepperoni Pizza Roll-Ups are about to become your new obsession! I remember the first time I made these for my kids' game night; they disappeared faster than I could pull them from the oven. What makes Pepperoni Pizza Roll-Ups so irresistible is how they pack all that classic pizza goodness into a perfectly portable, golden-brown bite.
Whether you're rushing to get dinner on the table or need crowd-pleasing appetizers for your next party, Pepperoni Pizza Roll-Ups deliver every single time. They're crispy on the outside, gooey on the inside, and ridiculously simple to make. Trust me, once you master these Pepperoni Pizza Roll-Ups, you'll find yourself making them weekly. The best part? You probably already have everything you need in your fridge right now!

Background & Why These Pepperoni Pizza Roll-Ups Changed My Kitchen Forever
The beauty of Pepperoni Pizza Roll-Ups lies in their versatility and foolproof nature. Unlike traditional pizza that requires dough-making skills and patience, these roll-ups use store-bought crescent dough as your secret weapon. I discovered this recipe during a particularly hectic week when my family was begging for pizza, but I had zero time for delivery or homemade dough. What started as a desperate experiment turned into our family's most-requested recipe.
These Pepperoni Pizza Roll-Ups have roots in the beloved West Virginia pepperoni roll tradition, but with a modern twist that makes them accessible for busy families everywhere. The combination of flaky crescent dough, melted mozzarella cheese, and quality pepperoni slices creates an explosion of flavor that rivals any pizzeria. What really sets these apart is how customizable they are; you can adjust the cheese ratio, add Italian seasoning, or brush them with garlic butter for an extra flavor boost. They're perfect as after school snacks, party appetizers, or even a quick weeknight meal when paired with a fresh salad. My neighbor once told me these Pepperoni Pizza Roll-Ups saved her son's birthday party when her pizza order fell through!
Jump to:
- Background & Why These Pepperoni Pizza Roll-Ups Changed My Kitchen Forever
- Ingredients
- Instructions
- Expert Cooking Tips
- Recipe Variations & Substitutions
- Equipment Recommendations
- Storage & Meal Prep Tips
- Grandma's Secret That Changed Everything
- FAQ
- Why You Need These Roll-Ups in Your Life
- Related
- Pairing
- Pepperoni Pizza Roll-Ups Recipe
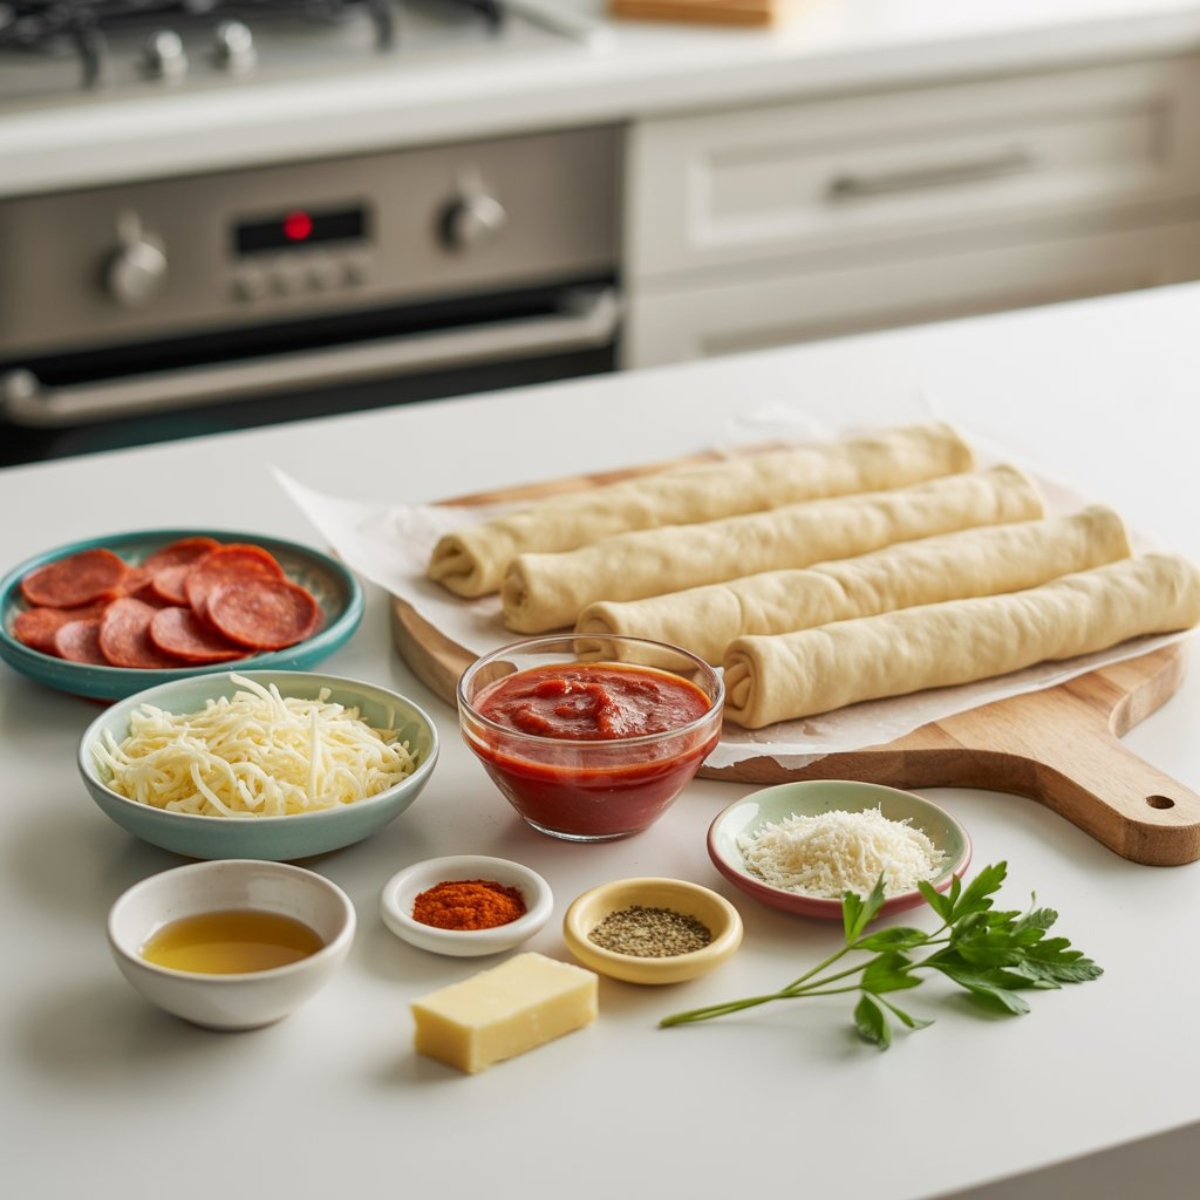
Ingredients
Main Components
- Refrigerated crescent dough
- Mozzarella cheese
- Pepperoni slices (about 1 package)
- Pizza sauce (for dipping)
Flavor Enhancers
- Melted butter
- Italian seasoning
- Garlic powder
- Grated parmesan cheese
- Fresh parsley for garnish (optional)
Optional Add-ins
- Bell peppers
- Sliced black olives
- Red pepper flakes for heat
- Additional marinara sauce for extra dipping
See recipe card for quantities.
Instructions
Step 1: Prepare Your Workspace and Ingredients
- Preheat your oven to 375°F (190°C) and line a large baking sheet with parchment paper or a silicone mat.
- Remove the crescent dough from the refrigerator and let it sit for about 5 minutes to make it easier to work with.
- In a small bowl, mix together the melted butter, Italian seasoning, and garlic powder; set this magical mixture aside.
- Gather all your toppings and arrange them within easy reach; this makes assembly so much faster.
- Warm your pizza sauce slightly in the microwave for 30 seconds; this brings out the flavors beautifully.
Step 2: Assemble the Pepperoni Pizza Roll-Ups
- Carefully unroll the crescent dough and separate it into individual triangles along the perforated lines.
- Place each triangle on your work surface with the wide end facing you.
- Sprinkle about 2 tablespoons of shredded mozzarella cheese on each triangle, leaving a small border around the edges.
- Layer 3-4 pepperoni slices on top of the cheese, slightly overlapping them for maximum flavor.
- Starting from the wide end, gently roll up each triangle toward the point, tucking in any cheese that tries to escape.
- Place each rolled-up triangle on your prepared baking sheet, spacing them about 2 inches apart.
Step 3: Add the Finishing Touches
- Brush each roll-up generously with your prepared garlic butter mixture using a pastry brush.
- Sprinkle the tops with grated parmesan cheese for an extra cheesy, golden crust.
- Add a light dusting of additional Italian seasoning if you want more herbaceous flavor.
- For extra flair, add a tiny pinch of red pepper flakes on top of each roll-up.
Step 4: Bake Your Pepperoni Pizza Roll-Ups to Golden Perfection
- Place your baking sheet in the preheated oven on the center rack.
- Bake for 12-15 minutes, watching carefully until the roll-ups turn golden brown and the cheese is bubbling.
- Check at the 10-minute mark; ovens vary, and you want crispy, not burnt.
- Remove from the oven and let them cool on the baking sheet for 3-4 minutes; this prevents cheese burns and lets them firm up.
- Transfer to a serving platter, garnish with fresh parsley if desired, and serve immediately with warm pizza sauce for dipping.
Expert Cooking Tips
Getting your Pepperoni Pizza Roll-Ups absolutely perfect comes down to mastering a few key techniques that I've learned through countless batches.
- Temperature Control Matters Always work with cold crescent dough straight from the fridge. If the dough gets too warm, it becomes sticky and difficult to roll. I learned this the hard way during a summer party when my kitchen was too hot; the rolls fell apart before baking. If your kitchen is warm, pop the dough back in the fridge for 10 minutes between steps.
- Cheese Distribution Strategy Don't overstuff these beauties! I know it's tempting to pile on the cheese, but too much will ooze out during baking and create a mess. Stick to 2 tablespoons per roll-up, and make sure to leave that quarter-inch border. This ensures the cheese melts inside, creating that perfect gooey center we're after. Also, freshly shredded mozzarella melts better than pre-shredded; the anti-caking agents in bagged cheese can make it less creamy.
- The Pepperoni Secret Quality pepperoni makes a huge difference. Look for pepperoni that's slightly thick-cut but not too thick; you want 3-4 slices to fit comfortably on each triangle. If your pepperoni is very greasy, pat it dry with paper towels before adding it to prevent soggy roll-ups. Some people prefer turkey pepperoni for a leaner option, which works great too!
- Baking Sheet Setup Always use parchment paper or a silicone baking mat. This prevents sticking and makes cleanup incredibly easy. Space your roll-ups at least 2 inches apart; they'll puff up as they bake, and you don't want them merging into one giant pizza blob. I arrange mine in rows of 4, which fits perfectly on a standard baking sheet.
- The Butter Brush Technique Don't skip the garlic butter step! This is what transforms good roll-ups into phenomenal ones. Brush it on generously but don't flood them. The butter helps create that golden, crispy exterior while the garlic adds incredible depth. Mix your butter blend while it's still warm so the seasonings incorporate properly.
- Timing is Everything Set a timer and check your roll-ups at 10 minutes. Every oven runs differently, and the difference between perfectly golden and overdone is just 2-3 minutes. Look for a deep golden brown color on top and slightly darker edges. If the bottoms are browning too quickly, move the rack higher in your oven next time.
Recipe Variations & Substitutions
One of the best things about this Pepperoni Pizza Roll-Ups recipe is how easily you can customize it to match your family's preferences or dietary needs.
- Meat Lovers Version Transform these into ultimate meat lovers' roll-ups by adding cooked Italian sausage crumbles, diced ham, or crispy bacon bits alongside the pepperoni. I sometimes use a combination of pepperoni and mini meatballs for extra protein. Just make sure any additional meat is fully cooked and well-drained before adding it to prevent sogginess.
- Vegetarian Friendly Options Skip the pepperoni and load up on vegetables instead! Diced bell peppers, mushrooms, black olives, and sun-dried tomatoes all work beautifully. My vegetarian sister-in-law loves when I make a batch with spinach and ricotta cheese mixed with the mozzarella. Just remember to sauté any vegetables with high water content first to remove excess moisture; otherwise, your roll-ups might end up soggy.
- Cheese Alternatives While mozzarella is traditional, you can experiment with different cheeses. A blend of mozzarella and provolone adds depth, while sharp cheddar gives a bolder flavor. For a gourmet twist, try adding small cubes of fresh mozzarella or a sprinkle of crumbled feta. Lactose-intolerant? Dairy-free mozzarella shreds work surprisingly well in this Pepperoni Pizza Roll-Ups recipe.
- Dough Substitutions Can't find crescent dough? Pizza dough works great; just roll it thin and cut it into triangles. Puff pastry creates an even flakier, more elegant version that's perfect for parties. For a lower-carb option, some readers have successfully used low-carb tortillas, though the texture is different. Biscuit dough also works in a pinch; just flatten each biscuit before adding toppings.
- Sauce Variations While pizza sauce is classic, marinara sauce, Alfredo sauce, or even pesto can completely change the flavor profile. I've made "white pizza" versions using garlic butter as the base instead of tomato sauce, then serving them with Alfredo for dipping. Buffalo sauce mixed with ranch creates an amazing spicy version that adults love at parties.
Equipment Recommendations
Having the right tools makes preparing Pepperoni Pizza Roll-Ups so much easier and more enjoyable.
- Large Baking Sheet: A 13x18-inch half-sheet pan is perfect for fitting all your roll-ups in one batch without crowding
- Parchment Paper or Silicone Mat: Essential for preventing sticking and ensuring easy cleanup
- Pastry Brush: Makes applying garlic butter evenly quick and simple; silicone brushes are easiest to clean
- Sharp Knife or Pizza Cutter: If you need to cut the crescent dough more precisely or adjust triangle sizes
- Small Mixing Bowls: For preparing your garlic butter mixture and organizing toppings
- Oven Thermometer: Ensures your oven is actually at 375°F; many ovens run hot or cold
- Cooling Rack: Optional but helpful for letting roll-ups cool slightly while maintaining crispiness
- Serving Platter: A nice presentation makes these even more appealing at parties
Storage & Meal Prep Tips
These roll-ups are fantastic for planning ahead, which makes weeknight dinners and parties so much less stressful.
- Short-Term Storage Store leftover Pepperoni Pizza Roll-Ups in an airtight container in the refrigerator for up to 3 days. Place a paper towel in the container to absorb any excess moisture and keep them from getting soggy. They're delicious cold as a snack straight from the fridge, or you can reheat them.
- Reheating Instructions The best way to reheat these is in a 350°F oven for 5-7 minutes until warmed through and crispy again. Avoid the microwave if possible; it makes them soft and chewy rather than crispy. An air fryer works brilliantly too; just 3-4 minutes at 350°F brings them back to life perfectly. A toaster oven is another great option for reheating small batches.
- Freezing for Later These freeze beautifully! Assemble the Pepperoni Pizza Roll-Ups completely but don't bake them. Place them on a baking sheet and freeze until solid, then transfer to a freezer bag. They'll keep for up to 2 months. When you're ready to bake, add 3-5 extra minutes to the baking time; no need to thaw first. This is my secret weapon for having party appetizers ready at a moment's notice.
- Make-Ahead Strategy You can prep these up to 4 hours ahead. Assemble the roll-ups, place them on the baking sheet, cover tightly with plastic wrap, and refrigerate. When guests arrive, just brush with butter, add toppings, and bake. The dough might puff up slightly in the fridge, but that's perfectly fine. I often prep two batches on game day; one to bake immediately and one to bake during halftime.
Grandma's Secret That Changed Everything
Want to know what took my Pepperoni Pizza Roll-Ups from good to absolutely unforgettable? My Italian grandmother shared this trick after I'd been making them for months. She told me to add a tiny pinch of sugar to the garlic butter mixture; just ¼ teaspoon for the whole batch. This barely-there sweetness balances the saltiness of the pepperoni and cheese, creating a more complex flavor that keeps people reaching for just one more.
The second game-changer she taught me was the "double-brush" method. Brush your roll-ups with garlic butter before baking, then as soon as they come out of the oven, while they're still piping hot, brush them again. This second layer of butter soaks into the warm dough, creating an incredibly rich flavor and an irresistible sheen. It's such a simple step, but it makes people wonder what your secret ingredient is. Every time I serve these Pepperoni Pizza Roll-Ups at gatherings, someone asks for the recipe, and it's these two little tricks that make all the difference.
FAQ
What is a fun fact about pepperoni rolls?
Pepperoni rolls were invented in 1927 by Giuseppe Argiro, an Italian immigrant in West Virginia who wanted to create a portable lunch for coal miners. These Pepperoni Pizza Roll-Ups are a modern, party-friendly twist on that classic tradition, keeping the spirit alive in a new, delicious format that's perfect for any occasion.
What makes a great pepperoni roll?
A great pepperoni roll has the perfect balance of fluffy, slightly crispy bread with quality pepperoni and melted cheese throughout. The key is using good pepperoni, not overstuffing, and achieving that golden-brown exterior. These Pepperoni Pizza Roll-Ups nail all these elements while being ridiculously easy to make at home.
Do you have to refrigerate pepperoni rolls?
Yes, once baked, Pepperoni Pizza Roll-Ups should be refrigerated within 2 hours if not consumed. They contain cheese and meat, which need refrigeration for food safety. Store them in an airtight container in the fridge for up to 3 days, and reheat in the oven or air fryer for best results.
What makes a pepperoni roll unique?
Traditional pepperoni rolls are unique because they bake the pepperoni right into the bread dough without sauce, creating a self-contained snack. Our Pepperoni Pizza Roll-Ups put a fun spin on this by using crescent dough, adding cheese, and serving with pizza sauce for dipping, making them more interactive and customizable while honoring the original concept.
Why You Need These Roll-Ups in Your Life
After making hundreds of batches of Pepperoni Pizza Roll-Ups over the years, I can confidently say they've earned their spot as one of my most-loved recipes. They're proof that the best food doesn't have to be complicated or time-consuming. Whether you're feeding hungry kids after school, entertaining friends on game day, or just craving something comforting and delicious, these roll-ups deliver every single time without fail.
The beauty of these Pepperoni Pizza Roll-Ups is how they bring people together around the kitchen counter, eagerly waiting for that first bite. Once you make them, you'll understand why they've become such a staple in so many homes, including mine. Don't forget to try the Pizza Chips Recipe for another creative pizza-inspired snack, or explore the Tortilla Pizza Rolls Recipe if you're looking for a slightly different take on this concept. Now grab that crescent dough and get rolling; your family is going to thank you! Make these Pepperoni Pizza Roll-Ups tonight, and I promise they'll become your new go-to recipe for any occasion.
With love from my kitchen to yours,
Taylor Monroe
Related
Looking for other recipes like this? Try these:


Pairing
These are my favorite dishes to serve with this Pepperoni Pizza Roll-Ups recipe:


Pepperoni Pizza Roll-Ups Recipe
Equipment
- Large baking sheet For baking all roll-ups evenly
- Parchment paper or silicone mat Prevents sticking and makes cleanup easy
- Pastry brush For brushing on the garlic butter mixture
- Small mixing bowl To mix butter, seasoning, and garlic
- Oven thermometer Helps ensure accurate baking temperature
- Cooling rack Optional, keeps roll-ups crisp after baking
Ingredients
- 2 cans (8 oz each) refrigerated crescent dough main base for roll-ups
- 2 cups shredded mozzarella cheese freshly shredded melts best
- 40–48 slices pepperoni about 1 standard package
- 1 cup pizza sauce for dipping
- 2 tablespoon melted butter for brushing tops
- 1 teaspoon Italian seasoning adds herby flavor
- 0.5 teaspoon garlic powder enhances aroma and flavor
- 2 tablespoon grated parmesan cheese creates golden crust
- 1 tablespoon fresh parsley optional, for garnish
- 0.5 cup diced bell peppers optional add-in
- 0.25 cup sliced black olives optional add-in
- 0.5 teaspoon red pepper flakes optional, for heat
Instructions
- Preheat oven to 375°F (190°C) and line baking sheet with parchment paper.
- Mix melted butter, garlic powder, and Italian seasoning in a small bowl.
- Unroll crescent dough and separate into triangles.
- Fill each triangle with mozzarella and 3–4 pepperoni slices.
- Roll triangles from wide end toward point and place on baking sheet.
- Brush tops with garlic butter mixture and sprinkle parmesan.
- Bake 12–15 minutes until golden brown and cheese is bubbling.
- Cool for 3–4 minutes before serving with warm pizza sauce.
Leave a Reply