
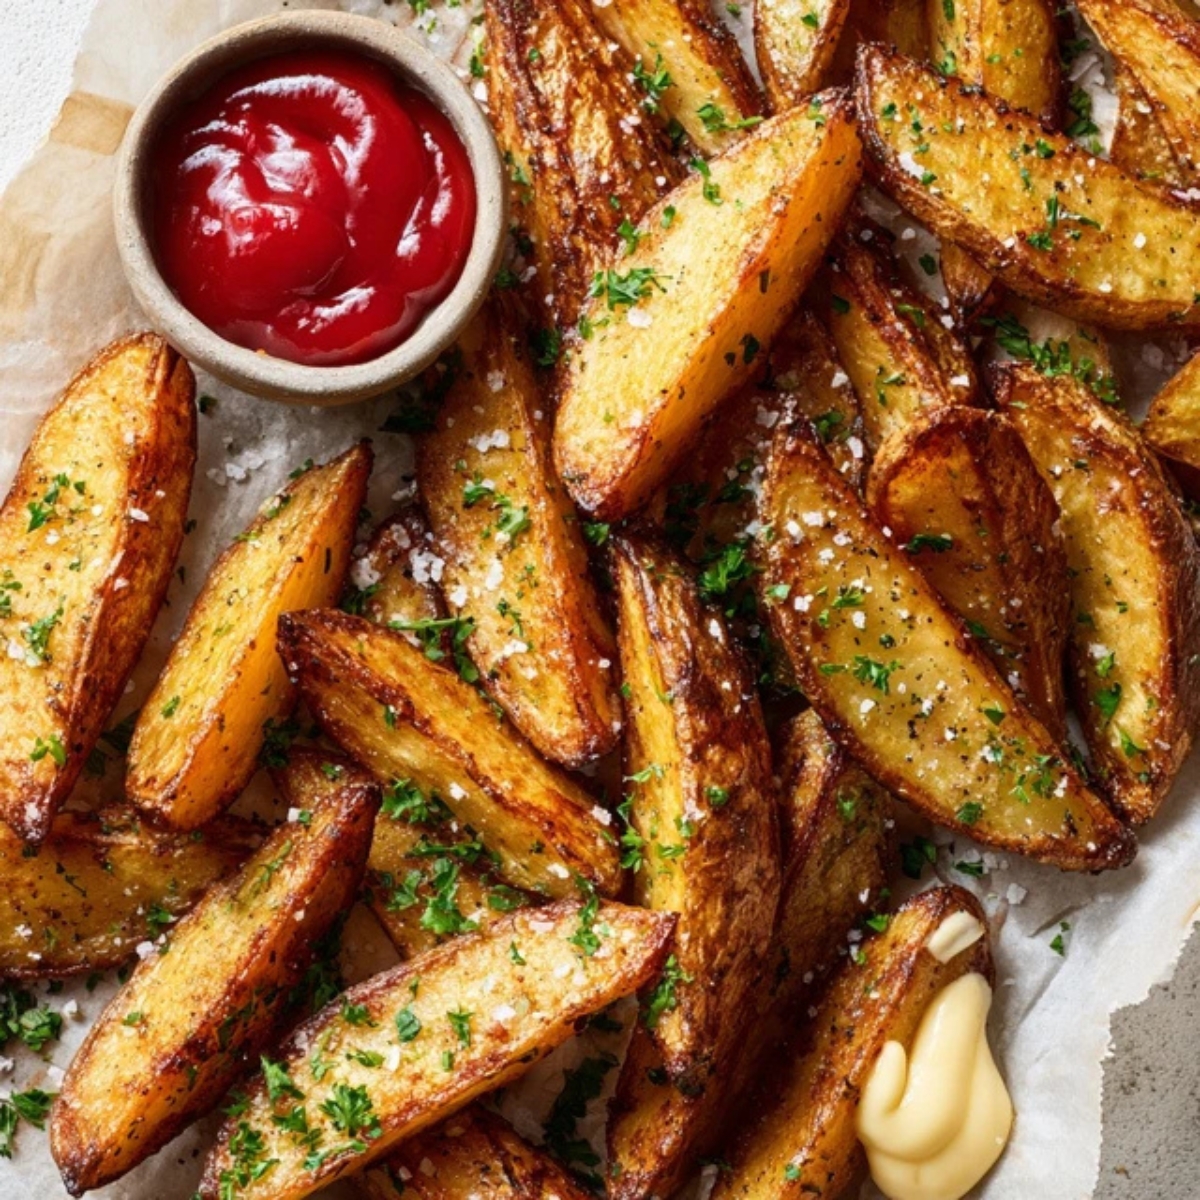
There's nothing quite like biting into perfectly crispy potato wedges with that satisfying crunch on the outside and fluffy, tender potato on the inside. Whether you're looking for the ultimate side dish for burger night or a crowd-pleasing appetizer for game day, these homemade potato wedges deliver every single time. I've spent years perfecting this recipe, and I'm excited to share exactly how you can make restaurant-quality potato wedges right in your own kitchen. The best part? You only need a handful of simple ingredients and about 35 minutes from start to finish to create these golden beauties that'll have everyone asking for seconds.
Background & Why These Wedges Will Change Your Side Dish Game
Potato wedges have been a beloved comfort food staple for generations, and for good reason. Unlike french fries that can be finicky and require special equipment, potato wedges are incredibly forgiving and versatile. What makes this particular recipe stand out is the perfect balance of simplicity and technique. I've tested countless methods over the years, from boiling first to double-baking, and I've discovered that the secret to achieving that coveted crispy exterior while maintaining a fluffy interior lies in just a few key steps. These potato wedges work beautifully whether you're baking them in the oven, crisping them up in an air fryer, or even grilling them for a smoky twist.
The beauty of this recipe is its adaptability to any occasion. Serve these seasoned potato wedges alongside juicy steaks, pair them with burgers for a backyard barbecue, or load them up with cheese and bacon for an indulgent appetizer. They're healthier than deep-fried alternatives but don't sacrifice any of that satisfying crunch we all crave. Plus, potato wedges are naturally budget-friendly and use simple pantry staples you probably already have on hand.
Jump to:
Ingredients
For the Potato Wedges:
- Russet potatoes (about 2 pounds), scrubbed clean
- Olive oil (or melted butter for extra richness)
- Garlic powder
- Paprika (smoked paprika adds a nice depth)
- Onion powder
- Dried oregano or Italian seasoning
- Salt (adjust to taste)
- Black pepper
- Cayenne pepper (optional, for a spicy kick)
Optional Additions:
- Parmesan cheese (for garlic parmesan potato wedges)
- Fresh rosemary, chopped
- Ranch seasoning mix
Substitution Notes: Feel free to swap russet potatoes with Yukon gold for a buttery flavor or red potatoes for a waxy texture. For a healthier option, use avocado oil instead of olive oil. If you're avoiding dairy, nutritional yeast works great in place of Parmesan cheese.

See recipe card for quantities.
Instructions
Step 1: Prep Your Potatoes
- Preheat your oven to 425°F (220°C) and line a large baking sheet with parchment paper or lightly grease it.
- Scrub the potatoes thoroughly under cold running water, but leave the skin on for extra texture and nutrients.
- Cut each potato in half lengthwise, then cut each half into 3-4 wedges depending on the size of your potatoes; aim for wedges that are about ¾-inch thick at the widest part for even cooking.
- Place the cut potato wedges in a large bowl of cold water and let them soak for 15-20 minutes; this removes excess starch and helps achieve that crispy exterior.
Step 2: Season and Coat
- Drain the potato wedges thoroughly and pat them completely dry with paper towels or a clean kitchen towel; any moisture will prevent crisping.
- Place the dried wedges back in the bowl and drizzle with olive oil, tossing to coat every surface evenly.
- In a small bowl, mix together garlic powder, paprika, onion powder, oregano, salt, black pepper, and cayenne pepper if using.
- Sprinkle the seasoning mixture over the oiled wedges and toss again until each wedge is well coated with the spices.
Step 3: Arrange and Bake
- Arrange the seasoned potato wedges on your prepared baking sheet in a single layer, making sure they're not touching or overlapping; crowding causes steaming instead of crisping.
- Position each wedge with one of the cut sides facing down for maximum contact with the hot pan.
- Place the baking sheet in the preheated oven and bake for 25-30 minutes, flipping the wedges halfway through cooking time for even browning.
- The potato wedges are done when they're golden brown and crispy on the outside with a fork-tender interior; if you want extra crispiness, broil for an additional 2-3 minutes, watching carefully to prevent burning.
Step 4: Finishing Touches
- Remove the baked potato wedges from the oven and let them rest on the pan for 2-3 minutes; this brief resting helps the exterior set up and become even crispier.
- Transfer to a serving platter and, if desired, sprinkle with freshly grated Parmesan cheese or chopped fresh herbs while still hot.
- Serve immediately with your favorite dipping sauce for the best texture and flavor experience.
Expert Cooking Tips
Getting perfectly crispy potato wedges every time comes down to mastering a few key techniques that make all the difference.
- Temperature matters more than you think. Always preheat your oven to the full 425°F before adding your potato wedges. A hot oven from the start ensures the exterior begins crisping immediately rather than steaming. If your oven runs cool, bump the temperature up to 450°F.
- The soaking step is non-negotiable. Soaking potato wedges in cold water for 15-20 minutes removes excess surface starch that would otherwise create a gummy texture. After soaking, make absolutely sure to dry them thoroughly; water and oil don't mix, and any lingering moisture will create steam instead of that coveted crisp.
- Don't skimp on spacing. Overcrowding your baking sheet is the number one mistake home cooks make. When wedges touch, they steam each other instead of crisping up. Use two baking sheets if necessary to give each wedge its own space.
- Flip at the right time. Wait until the wedges are golden on the bottom before flipping; this usually happens around the 15-minute mark. Flipping too early can cause them to stick and tear.
- Consider par-boiling for extra fluffy interiors. If you have time, boil the wedges for just 5 minutes before seasoning and baking. This creates an incredibly fluffy interior while still allowing for a crispy exterior.
- Season twice for maximum flavor. Add half your seasoning before baking and reserve half to sprinkle on immediately after removing from the oven. The heat will help the second round of spices bloom and become more aromatic.
Recipe Variations & Substitutions
One of the best things about this potato wedges recipe is how easily it adapts to different flavors and dietary needs.
- Garlic Parmesan Potato Wedges: After baking, toss the hot wedges with ¼ cup freshly grated Parmesan cheese, 2 tablespoons melted butter, 1 tablespoon minced fresh garlic, and 2 tablespoons chopped fresh parsley. This creates an irresistibly savory coating that's perfect for Italian-inspired meals.
- Spicy Buffalo Wedges: Mix 3 tablespoons of your favorite buffalo sauce with the olive oil before tossing with the wedges. After baking, drizzle with additional buffalo sauce and serve with ranch or blue cheese dressing for dipping.
- Ranch Potato Wedges: Replace the seasoning blend with 2 tablespoons of dry ranch seasoning mix. These pair perfectly with burgers and are always a hit at summer cookouts.
- BBQ Seasoned Wedges: Swap the spice blend for your favorite BBQ dry rub, or brush the wedges with BBQ sauce during the last 5 minutes of baking for a sticky, sweet coating.
- Rosemary and Sea Salt Wedges: Keep it simple with just olive oil, coarse sea salt, cracked black pepper, and 2 tablespoons of fresh rosemary. This elegant version pairs beautifully with roasted meats.
- Sweet Potato Wedges: Substitute regular potatoes with sweet potatoes for a naturally sweeter option that's packed with vitamin A. Reduce baking time by about 5 minutes as sweet potatoes cook faster.
- Air Fryer Adaptation: Preheat your air fryer to 380°F, arrange wedges in a single layer (cook in batches if needed), and air fry for 15-18 minutes, shaking the basket every 5 minutes.
- Loaded Potato Wedges: After baking, top with shredded cheddar cheese, crumbled bacon, sour cream, and sliced green onions for an indulgent appetizer that's essentially a deconstructed baked potato.
Equipment Recommendations
Having the right tools makes preparing perfect potato wedges even easier.
- Large Baking Sheet: A heavy-duty rimmed baking sheet (preferably aluminum) conducts heat evenly and prevents warping. I recommend having at least two on hand so you're never tempted to overcrowd.
- Parchment Paper or Silicone Baking Mat: Either option prevents sticking and makes cleanup a breeze. Parchment paper is my go-to for achieving maximum crispiness.
- Sharp Chef's Knife: A quality 8-inch chef's knife makes cutting uniform potato wedges safe and easy. Consistent sizing ensures even cooking.
- Large Mixing Bowl: You'll need a big bowl to toss the wedges with oil and seasonings without making a mess.
- Kitchen Towels or Paper Towels: Essential for thoroughly drying the wedges after soaking.
- Wire Cooling Rack (Optional): Placing your baking sheet on a wire rack allows air to circulate underneath, promoting even crisping.
- Air Fryer (Optional): If you have an air fryer with at least a 5-quart capacity, it's fantastic for making smaller batches of extra-crispy potato wedges with even less oil.
Storage & Meal Prep Tips
While potato wedges are always best fresh from the oven, you can definitely prepare them ahead and store leftovers.
- Make-Ahead Instructions: Cut and soak your potato wedges up to 24 hours in advance. Store the soaked wedges in a bowl of fresh water in the refrigerator, changing the water once. When ready to cook, drain, dry thoroughly, season, and bake as directed.
- Storing Leftovers: Place cooled potato wedges in an airtight container and refrigerate for up to 3 days. Be aware that they'll soften as they cool, but you can restore much of the crispiness when reheating.
- Reheating for Best Results: To bring back that crispy texture, reheat leftover wedges in a 400°F oven for 8-10 minutes or in an air fryer at 375°F for 5-6 minutes. Avoid the microwave, which will make them soggy.
- Freezing Instructions: Freeze fully cooked and cooled wedges in a single layer on a baking sheet for 1-2 hours, then transfer to a freezer-safe bag for up to 2 months. Reheat from frozen in a 425°F oven for 15-20 minutes.
- Pre-Seasoned Prep: Mix up a large batch of the seasoning blend and store it in an airtight container for up to 6 months. This makes it even faster to throw together potato wedges for weeknight dinners.
- Meal Prep Strategy: These potato wedges are perfect for meal prep. Make a large batch on Sunday and pair them throughout the week with different proteins; they work beautifully cold in lunch bowls too.
The Soaking Secret That Changes Everything
Here's the game-changing tip that separates mediocre potato wedges from exceptional ones: the cold water soak combined with proper drying creates a dual texture miracle.
When you soak cut potato wedges in cold water, you're removing excess surface starch that would otherwise form a gummy barrier, preventing proper crisping. This simple 15-20 minute soak allows the exterior to achieve that shattering crispiness we all love while the interior remains fluffy and light. But here's the crucial second half of this secret: after soaking, you absolutely must dry the wedges completely. Any lingering water droplets will turn to steam in the oven, sabotaging your efforts. I like to spread the drained wedges on a clean kitchen towel and pat them thoroughly, sometimes even letting them air-dry for an additional 5 minutes. This one-two punch of soaking and drying has transformed countless batches of bland, soggy wedges into crispy, golden perfection that rivals any restaurant version.
FAQ
How to make the best potato wedges?
The best potato wedges start with choosing the right potatoes; russet potatoes work perfectly because their high starch content creates that fluffy interior. Cut them into uniform wedges about ¾-inch thick, soak them in cold water to remove excess starch, dry them thoroughly, coat generously with oil and seasonings, then bake at 425°F on a preheated baking sheet without overcrowding for maximum crispiness.
Should I boil potatoes before wedges?
You don't need to boil potato wedges before baking, and in fact, skipping this step often yields crispier results. However, if you prefer an extra-fluffy interior, you can par-boil the wedges for just 5 minutes in salted water, then drain and dry them completely before seasoning and baking; just be careful not to overcook them during the boiling stage.
Are wedges healthier than fries?
Potato wedges are generally healthier than traditional deep-fried french fries because they're typically baked with just a few tablespoons of oil rather than submerged in hot oil. Baked potato wedges contain significantly less fat and fewer calories while still delivering that satisfying potato flavor and crispy texture; plus, leaving the skin on adds extra fiber and nutrients.
Why do you soak potato wedges in water?
Soaking potato wedges in cold water removes excess surface starch that can prevent proper crisping and create a gummy texture. The 15-20 minute soak allows the starch to leach out into the water, which helps the exterior of your potato wedges become wonderfully crispy and golden brown in the oven while the interior stays fluffy and tender.
Your New Go-To Side Dish Awaits
These crispy potato wedges are about to become your most-requested side dish, and for good reason. With their perfectly golden exterior, fluffy interior, and endless flavor possibilities, they're the kind of recipe you'll find yourself making week after week. Whether you're serving them alongside juicy burgers, grilled steaks, or as a standalone snack with your favorite dipping sauce, these homemade potato wedges deliver restaurant-quality results every single time.
Once you've mastered these classic potato wedges, expand your side dish repertoire with our Ranch Potatoes Recipe for a creamy, herb-infused twist, or pair them with our Garlic Butter Steak Bites and Potatoes Recipe for a complete meal that's guaranteed to impress. Don't forget to experiment with the variations I've shared; each one brings something special to the table. Now grab those potatoes and get ready to experience the most delicious potato wedges you've ever made at home!
With love from my kitchen to yours,
Taylor Monroe
Related
Looking for other recipes like this? Try these:


Pairing
These are my favorite dishes to serve with this potato wedges recipe:


Potato Wedges recipe
Equipment
- 1 Large baking sheet For even crisping
- 1 Parchment paper or silicone baking mat Prevents sticking
- 1 Large mixing bowl To toss potatoes evenly
- 1 Sharp Chef’s Knife For cutting uniform wedges
- 1 Kitchen towel or paper towels To dry potatoes thoroughly
- 1 Wire cooling rack Optional, promotes airflow
- 1 Air fryer Optional for crispier version
Ingredients
- 4 large russet potatoes about 2 lbs, scrubbed clean
- 3 tablespoons olive oil or melted butter for richness
- 1.5 teaspoons garlic powder
- 1.5 teaspoons paprika smoked paprika adds depth
- 1 teaspoon onion powder
- 1 teaspoon dried oregano or Italian seasoning
- 1 teaspoon salt adjust to taste
- 0.5 teaspoon black pepper
- 0.25 teaspoon cayenne pepper optional for heat
- 0.25 cup Parmesan cheese optional, for garlic parmesan wedges
- 2 tablespoons fresh rosemary optional, chopped
- 1 tablespoon ranch seasoning mix optional for variation
Instructions
- Preheat oven to 425°F (220°C) and line a baking sheet with parchment paper.
- Scrub potatoes, leave skin on, and cut into even wedges.
- Soak wedges in cold water for 15–20 minutes, then dry completely.
- Toss dried wedges with olive oil and seasoning blend.
- Arrange in a single layer and bake 25–30 minutes, flipping halfway.
- Broil 2–3 minutes for extra crispiness if desired.
- Sprinkle with Parmesan or herbs and serve hot with dip.


Leave a Reply