
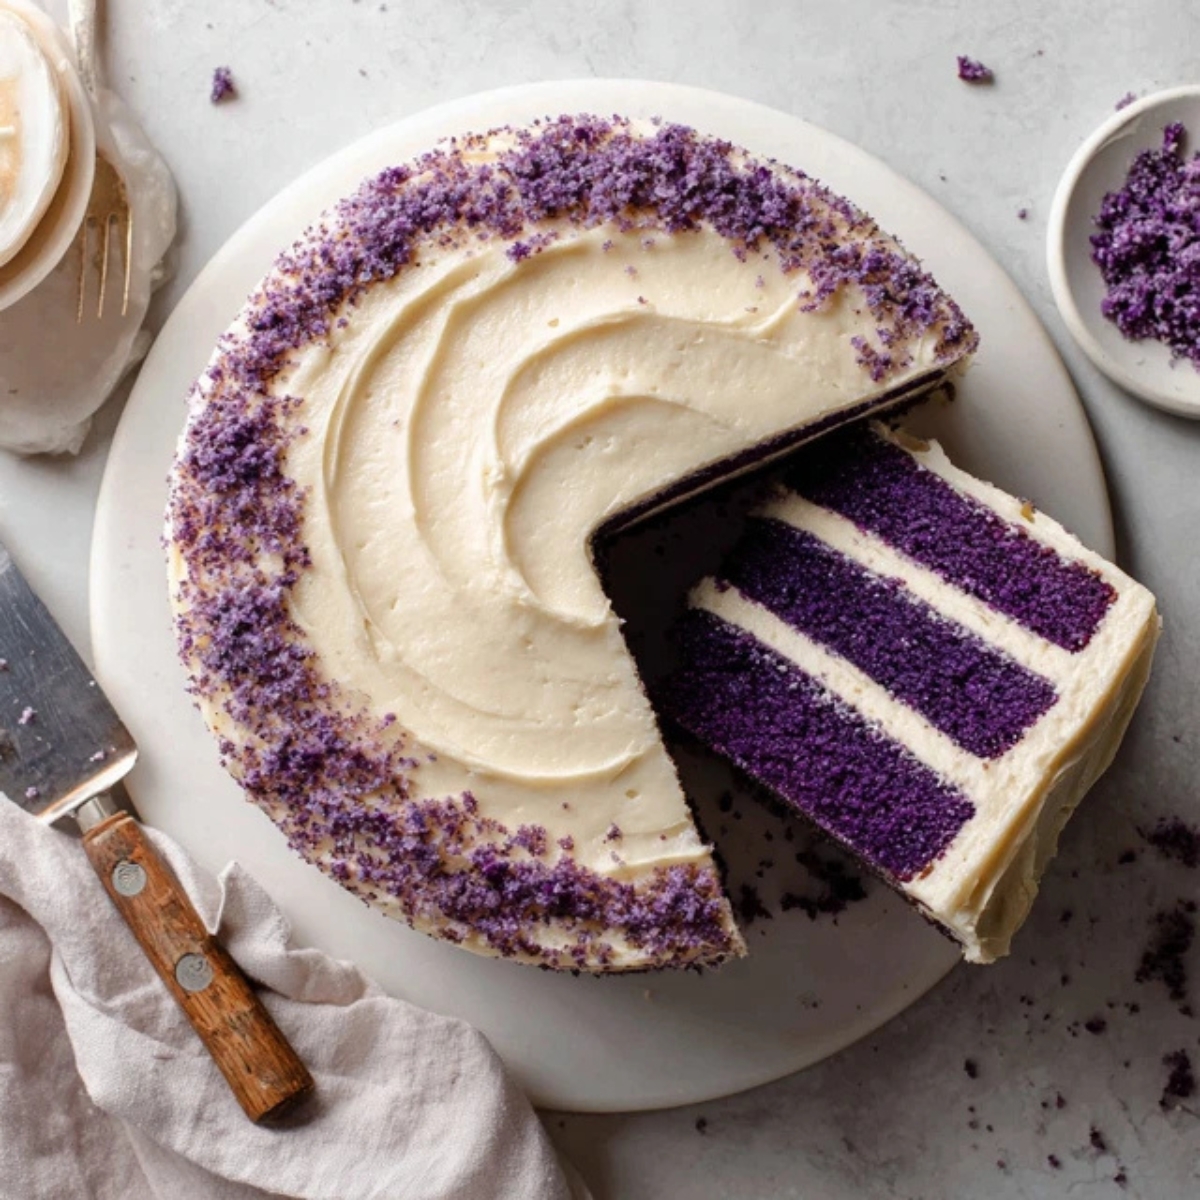
If you're searching for a show-stopping dessert that combines elegance with incredible flavor, this purple velvet cake recipe is exactly what you need. I still remember the first time I made this gorgeous purple velvet cake for my niece's birthday party; the room went silent when I brought it out, and everyone wanted to know my secret! This stunning purple velvet cake isn't just beautiful to look at; it's incredibly moist, tender, and has that signature velvety texture we all love. Whether you're planning a purple-themed celebration, a wedding, or just want to surprise someone special, this purple velvet cake recipe delivers bakery-quality results right from your home kitchen.
The best part? You don't need to be a professional baker to master this recipe. With simple ingredients and my foolproof method, you'll create a dessert that looks like it came from an upscale bakery but tastes even better because it's made with love.
Background & Why This Purple Velvet Cake Recipe Stands Out
Purple velvet cake has become incredibly popular in recent years, and for good reason. While red velvet cake has dominated celebrations for decades, this vibrant purple cousin brings fresh excitement to any dessert table. What makes this purple velvet cake recipe truly special is the perfect balance between its striking appearance and exceptional taste. Unlike some colored cakes that sacrifice flavor for looks, this purple velvet cake maintains that classic velvety crumb and subtle cocoa flavor that makes velvet cakes so beloved.
This recipe stands out because it uses a combination of buttermilk and vinegar to create that signature tender texture, while the purple food coloring transforms it into an eye-catching masterpiece. I've tested countless variations, and this purple velvet cake recipe consistently produces the most vibrant color without any bitter aftertaste. The cream cheese frosting adds the perfect tangy sweetness that complements the cake's subtle chocolate notes. Whether you're making purple velvet cupcakes for a birthday or a full layer cake for a wedding, this versatile recipe adapts beautifully to any occasion.
Jump to:
Ingredients
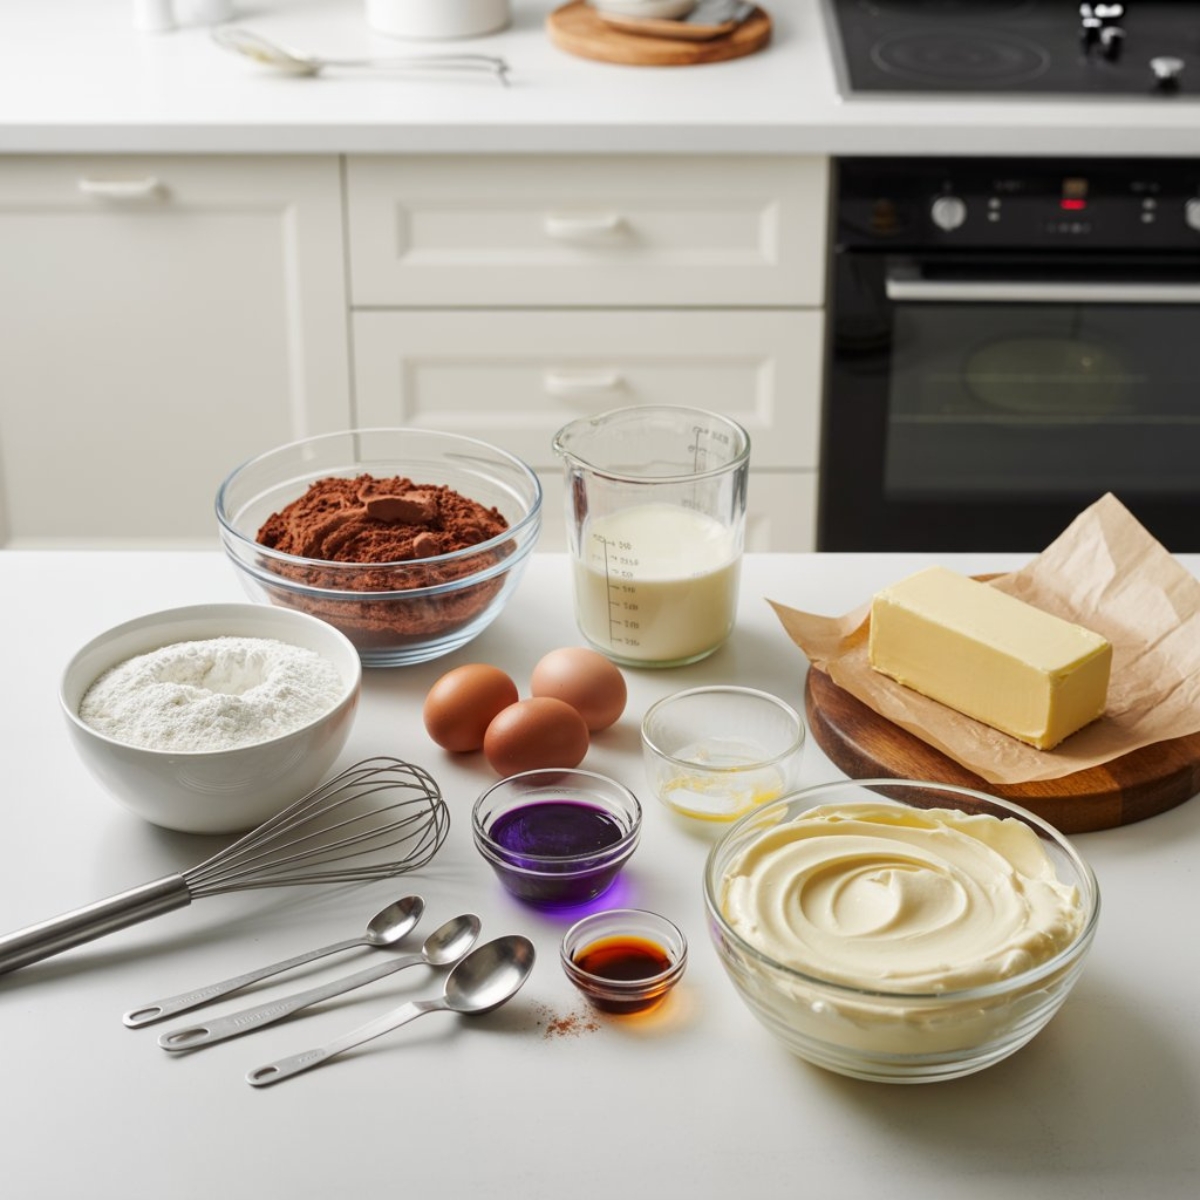
For the Purple Velvet Cake:
- All-purpose flour
- Cocoa powder (unsweetened)
- Baking soda
- Salt
- Granulated sugar
- Unsalted butter (softened, room temperature)
- Eggs (room temperature)
- Buttermilk (room temperature)
- Vegetable oil
- Vanilla extract
- White vinegar
- Purple gel food coloring (adjust for desired vibrancy)
For the Cream Cheese Frosting:
- Cream cheese (softened, room temperature)
- Unsalted butter (softened, room temperature)
- Powdered sugar (sifted)
- Vanilla extract
- Pinch of salt
Optional Add-ins:
- Ube extract (for enhanced purple flavor and natural color boost)
- Purple sprinkles or edible pearls for decoration
See recipe card for quantities.
Instructions
Step 1: Prepare Your Baking Setup
- Preheat your oven to 350°F (175°C) and position the rack in the center.
- Grease three 8-inch round cake pans with butter or cooking spray, then line the bottoms with parchment paper circles.
- Dust the pans lightly with flour and tap out the excess; this ensures your purple velvet cake releases perfectly.
- Gather all your ingredients and bring the eggs, buttermilk, butter, and cream cheese to room temperature if you haven't already.
Step 2: Mix the Dry and Wet Ingredients
- In a large mixing bowl, sift together the flour, cocoa powder, baking soda, and salt; set this aside.
- In your stand mixer bowl (or large bowl with hand mixer), cream the softened butter and sugar on medium-high speed for 3-4 minutes until light and fluffy.
- Add the eggs one at a time, beating well after each addition until fully incorporated.
- In a separate measuring cup, combine the buttermilk, vegetable oil, vanilla extract, and purple gel food coloring; stir until the color is evenly distributed.
- With your mixer on low speed, alternate adding the dry ingredients and the purple buttermilk mixture to the butter mixture, beginning and ending with the dry ingredients (dry, wet, dry, wet, dry).
- Add the vinegar last and mix for just 10-15 seconds; you'll see the batter become even more vibrant and slightly airier.
Step 3: Bake the Purple Velvet Cake Layers
- Divide the batter evenly among your three prepared pans, using a kitchen scale for precision if you have one (approximately 20 oz of batter per pan).
- Gently tap each pan on the counter 2-3 times to release any air bubbles.
- Bake for 25-30 minutes, or until a toothpick inserted in the center comes out with just a few moist crumbs.
- Let the cakes cool in the pans for 10 minutes on wire racks, then carefully turn them out onto the racks to cool completely before frosting (this takes about 1-2 hours).
Step 4: Make the Cream Cheese Frosting and Assemble
- While your cakes cool, prepare the frosting by beating the softened cream cheese and butter together on medium speed for 2-3 minutes until smooth and creamy.
- Gradually add the sifted powdered sugar, one cup at a time, beating on low speed after each addition.
- Add the vanilla extract and salt, then increase speed to medium-high and beat for 3-4 minutes until the frosting is light and fluffy.
- Once your cake layers are completely cool, place the first layer on your serving plate or cake board and spread about 1 cup of frosting evenly across the top.
- Add the second layer, frost it, then add the third layer and apply a thin crumb coat (a thin layer of frosting) over the entire cake.
- Refrigerate the crumb-coated cake for 20-30 minutes, then apply your final layer of frosting, smoothing it with an offset spatula or bench scraper for that professional finish.
Expert Cooking Tips
Getting your purple velvet cake absolutely perfect requires attention to a few key details that make all the difference between a good cake and an extraordinary one.
- Temperature matters more than you think. All your dairy ingredients; butter, cream cheese, eggs, and buttermilk; should be at room temperature (around 65-70°F). Cold ingredients don't emulsify properly, which can lead to a dense cake with poor texture. Take everything out of the fridge about 1-2 hours before you start baking.
- Don't overmix your batter. Once you add the flour mixture, mix just until the ingredients are combined. Overmixing develops gluten, which creates a tough, chewy cake instead of that signature tender crumb we want in our purple velvet cake.
- Use gel food coloring, not liquid. Gel food coloring provides much more vibrant color without adding excess liquid to your batter. You'll need less gel coloring to achieve that stunning purple hue, and it won't affect your cake's texture. Start with 2 tablespoons and add more if you want a deeper shade.
- The vinegar and buttermilk reaction is crucial. When vinegar meets the baking soda in your batter, it creates a chemical reaction that makes your cake incredibly tender and gives it that velvety texture. Don't skip the vinegar or substitute it; it's essential to the recipe's success.
- Check for doneness carefully. Velvet cakes should be moist, so your toothpick test should show a few moist crumbs, not come out completely clean. Overbaking is the number one cause of dry cake. Start checking at 25 minutes and watch carefully.
- Cool completely before frosting. I know it's tempting to frost a warm cake, but patience pays off here. Even slightly warm cake will melt your cream cheese frosting and create a mess. Wait until the layers are completely cool to the touch.
Recipe Variations & Substitutions
This purple velvet cake recipe is wonderfully adaptable to different dietary needs and creative variations.
- For a naturally colored version, you can use ube extract and ube powder (purple yam powder) instead of artificial food coloring. Use 2 tablespoons of ube extract and 3 tablespoons of ube powder mixed into your dry ingredients. This creates a more subtle purple color with a slightly nutty, vanilla-like flavor that's absolutely delicious.
- Making it gluten-free? Substitute the all-purpose flour with a 1:1 gluten-free baking flour blend that contains xanthan gum. Bob's Red Mill and King Arthur both make excellent options. Your cake will be just as moist and delicious.
- Dairy-free adaptation: Replace buttermilk with dairy-free milk mixed with 1 tablespoon lemon juice (let it sit for 5 minutes). Use dairy-free butter alternatives and replace the cream cheese frosting with a dairy-free buttercream or coconut cream frosting.
- Different frosting options: While cream cheese frosting is traditional, you can use vanilla buttercream, chocolate ganache, or even a purple-tinted white chocolate frosting for a different twist. Each pairing brings out different flavor notes in the cake.
- Size variations: This recipe works beautifully as cupcakes (makes about 24), a 9x13 sheet cake, or even mini cakes. Just adjust your baking time; cupcakes take 18-22 minutes, sheet cakes take 30-35 minutes.
- Flavor enhancements: Add 1 teaspoon of almond extract to complement the vanilla, or fold in ½ cup of mini chocolate chips to the batter for extra indulgence.
Equipment Recommendations
Having the right tools makes creating your purple velvet cake much easier and ensures professional results.
- Three 8-inch round cake pans are essential for this recipe. I recommend light-colored aluminum pans, as dark pans can cause over-browning. If you only have two pans, you can bake in batches.
- A stand mixer or high-quality hand mixer makes creaming butter and sugar effortless and ensures your cream cheese frosting reaches that perfect fluffy consistency. A stand mixer is especially helpful when you need to beat frosting for several minutes.
- Offset spatula and bench scraper are game-changers for frosting your cake smoothly and achieving that professional bakery look. An offset spatula helps you spread frosting evenly between layers and on the sides.
- Kitchen scale ensures accuracy when dividing batter evenly among pans, which means all your layers bake uniformly and your cake sits level.
- Cooling racks allow air to circulate around your cakes as they cool, preventing soggy bottoms and ensuring even cooling throughout.
- Parchment paper circles prevent sticking and make removing your cakes from the pans foolproof, protecting your beautiful purple layers.
Storage & Meal Prep Tips
Proper storage keeps your purple velvet cake fresh and delicious for days.
- Room temperature storage: If you plan to serve your cake within 2 days, you can keep it covered under a cake dome or large bowl at room temperature. The cream cheese frosting is stable for about 48 hours in temperatures under 70°F.
- Refrigerator storage: For longer storage, keep your frosted cake in the refrigerator in an airtight container or covered with plastic wrap for up to 5 days. Let it sit at room temperature for 30-45 minutes before serving to bring back that soft, tender texture.
- Freezing unfrosted layers: This is my favorite meal prep trick. Bake your cake layers, cool them completely, wrap each layer tightly in plastic wrap and then aluminum foil, and freeze for up to 3 months. Thaw in the refrigerator overnight before frosting.
- Freezing frosted cake: You can freeze the entire frosted cake by placing it uncovered in the freezer for 1 hour to firm up the frosting, then wrapping it carefully in plastic wrap and foil. Freeze for up to 2 months. Thaw in the refrigerator overnight.
- Make-ahead frosting: Prepare your cream cheese frosting up to 3 days in advance and store it in an airtight container in the refrigerator. Bring it to room temperature and re-whip it briefly before using.
- Individual slices: Wrap individual cake slices in plastic wrap and store in an airtight container in the fridge for up to 5 days or freeze for up to 2 months. This makes perfect portion control for busy weeks.
The Secret That Changed Everything
Want to know the real secret that transformed my purple velvet cake from good to absolutely spectacular? It's all about the reverse creaming method I learned from a pastry chef friend. Instead of the traditional method I shared above, try this: Mix your dry ingredients with the softened butter first until the mixture looks like wet sand, then add your wet ingredients gradually. This method coats the flour particles with fat before they encounter liquid, which prevents gluten development and creates an even more tender, fine-crumbed purple velvet cake that stays moist for days.
The second secret? Brush each cooled layer with a simple syrup (equal parts sugar and water, heated until dissolved) before frosting. This adds moisture and helps the layers stay incredibly soft, especially if you're making the cake a day ahead. Professional bakers use this trick for wedding cakes that need to look and taste perfect hours after assembly, and it works beautifully for this purple velvet cake recipe.
FAQ
What flavour is purple velvet?
Purple velvet cake has a subtle cocoa flavor with hints of vanilla and a slight tang from buttermilk, similar to red velvet. The purple velvet cake isn't chocolate-forward; instead, it offers a delicate, balanced sweetness with a unique velvety texture that melts in your mouth.
What is purple velvet made of?
Purple velvet cake is made of flour, cocoa powder, buttermilk, eggs, sugar, butter, and purple food coloring. The signature ingredients include vinegar and baking soda which create the tender crumb, while the purple gel coloring gives this purple velvet cake its stunning vibrant appearance.
How to make purple color in cake?
To make purple color in cake, use purple gel food coloring (2-3 tablespoons) added to your wet ingredients. For a natural approach, use ube extract and ube powder, which creates a beautiful purple hue in your purple velvet cake while adding a subtle, pleasant flavor.
How to make purple velvet color?
Purple velvet color is achieved by mixing purple gel food coloring into your cake batter, typically during the wet ingredient stage. Start with 2 tablespoons of gel coloring and adjust based on desired vibrancy. You can also combine red and blue food coloring to create custom purple shades for your purple velvet cake.
A Sweet Ending Worth Celebrating
This purple velvet cake recipe has become my go-to dessert for every special occasion, and I'm confident it'll become yours too. The combination of that stunning purple color, impossibly moist texture, and tangy cream cheese frosting creates a dessert experience that guests remember long after the celebration ends. Whether you're baking for a birthday, wedding, or just because you deserve something beautiful, this purple velvet cake delivers on both appearance and taste. The best part? Every time you make it, you'll gain more confidence and discover your own little tricks that make it uniquely yours.
If you loved this purple velvet cake recipe, you'll definitely want to try my Red Velvet Brownies recipe for another stunning dessert with that classic velvet texture in bite-sized form. And when you're ready for your next baking adventure, my Biscoff Cake Recipe offers another show-stopping option with irresistible cookie butter flavor. Both recipes use similar techniques, so once you've mastered this purple velvet cake, those will be a breeze. Now grab your mixing bowls, and let's create something absolutely magical together!
With love from my kitchen to yours,
Ashley Johnson
Related
Looking for other recipes like this? Try these:


Pairing
These are my favorite dishes to serve with this purple velvet cake recipe:


Purple Velvet Cake Recipe
Equipment
- 8 inch round cake pans Light colored aluminum preferred
- Parchment paper Circles for pan bottoms
- Stand mixer or hand mixer For batter and frosting
- Mixing bowls Separate wet and dry
- Kitchen scale Even layer division
- Measuring cups and spoons Standard set
- Offset spatula For frosting layers
- Bench scraper Smooth final coat
- Wire racks Cool layers completely
Ingredients
Purple Velvet Cake
- 2 ½ cups all purpose flour spooned and leveled
- 2 tablespoon unsweetened cocoa powder natural, not Dutch process
- 1 teaspoon baking soda fresh
- ½ teaspoon fine salt
- 1 ½ cups granulated sugar
- ½ cup unsalted butter, softened room temperature
- 2 large eggs room temperature
- 1 cup buttermilk room temperature
- ½ cup vegetable oil neutral
- 2 teaspoon vanilla extract
- 1 tablespoon white vinegar
- 2–3 tablespoon purple gel food coloring adjust for vibrancy
- 1 teaspoon ube extract optional flavor and color boost
Cream Cheese Frosting
- 16 oz cream cheese, softened full fat, room temperature
- 1 cup unsalted butter, softened room temperature
- 5 cups powdered sugar, sifted
- 2 teaspoon vanilla extract
- Pinch fine salt
- to taste purple sprinkles or edible pearls optional decoration
Instructions
- Heat oven to 350°F and position rack in the center.
- Grease three 8 inch pans, line with parchment, and lightly flour.
- Sift flour, cocoa, baking soda, and salt in a large bowl.
- Beat butter and sugar 3–4 minutes until pale and fluffy.
- Beat in eggs one at a time until fully incorporated.
- Combine buttermilk, oil, vanilla, and purple gel coloring.
- On low speed, alternate dry and wet additions, beginning and ending with dry.
- Blend in vinegar just 10–15 seconds until evenly colored.
- Portion batter evenly among pans, tap to release bubbles.
- Bake 25–30 minutes until a toothpick shows a few moist crumbs.
- Cool in pans 10 minutes, then turn out to racks to cool completely.
- Beat cream cheese and butter 2–3 minutes, add powdered sugar gradually, then vanilla and salt; whip 3–4 minutes.
- Place first layer on board, spread ~1 cup frosting; repeat with second layer.
- Coat cake thinly, chill 20–30 minutes to set.
- Apply final coat, smooth with bench scraper; decorate as desired.
- Brush cooled layers with simple syrup before frosting for extra moisture.


Leave a Reply