
Ready to make restaurant-quality sushi at home without all the rolling stress? This deconstructed sushi dish has taken over social media because it delivers all the amazing flavors of traditional sushi without the fussy technique. Whether you're craving a spicy tuna version; a creamy crab option; or something totally unique; you'll find that making this at home is fun; delicious; and impressive enough to serve at parties or family dinners. The best part; this recipe works for beginners and experienced cooks alike.
What makes this dish so special is the layered simplicity of the whole process. You're basically combining seasoned sushi rice with your favorite toppings; baking it until everything melds together beautifully; and then topping it with everything that makes sushi amazing. A good recipe brings together fresh ingredients; bold flavors; and a foolproof cooking method that takes minutes to prepare and even less time in the oven.

Why This Recipe Stands Out
The sushi bake trend exploded on TikTok and Instagram for good reason; and this recipe has become a staple in kitchens everywhere. Unlike traditional sushi that requires precise rolling skills and practice; this approach simplifies everything while keeping the authentic sushi taste you love. This Asian fusion creation has roots in Filipino cuisine but has become a global phenomenon because it's adaptable; quick; and absolutely delicious. Whether you want to make a classic California roll version; a spicy salmon style; or experiment with your own twist; this recipe gives you endless possibilities.
What really sets this approach apart is how it brings people together. It's the perfect party option; a great potluck dish; and honestly; a lifesaver when you're craving sushi but don't want to spend an hour hand-rolling. The creamy base mixed with your choice of proteins makes every version feel special and restaurant-quality. Plus; making this gives you that satisfying feeling of creating something from scratch without the intimidation factor that comes with traditional sushi making.
Jump to:
Ingredients
Core Sushi Rice Base
- Cooked sushi rice (seasoned with rice vinegar; salt; and sugar) ;
- Japanese mayo ;
- Sriracha mayo (adjust to taste) ;
- Furikake seasoning ;
- Sesame seeds ;
- Nori; cut into strips (optional)
Protein Options (Choose Your Favorite)
- For Spicy Tuna Sushi Bake: 1 can or 8 oz fresh sushi-grade tuna; flaked
- For Crab Sushi Bake: 8 oz imitation crab; shredded
- For Salmon Sushi Bake: 8 oz fresh or cooked salmon; flaked
- For Shrimp and Crab Combination: 6 oz cooked shrimp; 4 oz imitation crab
Creamy Layer
- Cream cheese; softened (optional for creamy sushi bake) ;
- Japanese mayo ;
- Sriracha (for spicy version)
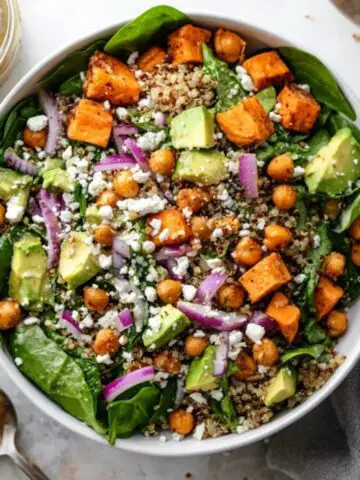
Toppings
- Fresh cucumber; sliced
- Avocado; sliced
- More sesame seeds
- Additional furikake seasoning
- Fresh green onions; chopped
- Pickled ginger (optional)

See recipe card for quantities.
Instructions
Step 1; Prepare Your Baking Dish and Rice Base
1. Preheat your oven to 375°F and grab a 9x9-inch baking dish or similar-sized oven-safe dish. Spread your seasoned sushi rice evenly across the bottom of the dish; pressing it down gently so it forms a solid layer. This is the foundation of your entire sushi bake recipe; so take a moment to make sure it's distributed evenly.
2. In a small bowl; mix together the Japanese mayo and sriracha mayo until well combined. Spread this mixture over your rice base using a spatula; covering it completely. This creamy layer is what makes a sushi bake so delicious and prevents the rice from drying out during baking.
Step 2; Add Your Protein Layer
3. Flake or chop your chosen protein and mix it with 2 tablespoons of Japanese mayo; 1 tablespoon of sriracha (or less if you prefer mild); and a pinch of furikake. Whether you're making a spicy tuna sushi bake; a crab sushi bake; or a salmon sushi bake; this flavorful protein mixture is what gives each version its unique character. Spread this mixture evenly over your mayo base.
4. If you're making a creamy sushi bake version; dot spoonfuls of softened cream cheese across the protein layer. This adds extra richness; but it's totally optional if you prefer your sushi bake lighter.
Step 3; Bake Your Sushi Bake
5. Sprinkle sesame seeds and furikake seasoning over the top of your sushi bake recipe creation. Pop the whole dish into your preheated oven and bake for 10 to 15 minutes; until everything is heated through and the top is slightly golden. You're not looking for the rice to crisp up too much; just enough for everything to meld together beautifully.
6. Remove your sushi bake from the oven and let it rest for 2 to 3 minutes. This short resting period is crucial for keeping your sushi bake from falling apart when you serve it.
Step 4; Top and Serve
7. Add your fresh toppings right before serving; including sliced cucumber; avocado; fresh green onions; and extra sesame seeds. The fresher toppings on top provide a nice contrast to the warm baked layers below. Drizzle with a little extra sriracha mayo if you like extra spice. Cut into squares and serve immediately while it's warm; or let it cool for a cold sushi bake version.
Expert Cooking Tips
Make Your Sushi Rice Perfect
Season your rice while it's hot; This helps the vinegar soak in properly and gives you that authentic sushi rice flavor ; Use a rice cooker or prepare rice the day before; This gives you time to focus on other ingredients ; Don't skip the sushi rice; It's the foundation and honestly makes all the difference
For the best results with this dish; make sure your rice is at room temperature before assembling. Hot rice can make cream cheese too soft and ruin your layering. If you're in a rush; you can spread your warm rice in a thin layer on a baking sheet to cool it down faster. Getting these details right from the start makes a real difference.
Protein Preparation Matters
; For canned tuna; drain it really well to prevent excess moisture ; Cook shrimp ahead of time so everything bakes evenly ; Use sushi-grade salmon or cooked salmon only; never use raw salmon ; Mix your protein with mayo before adding it for better flavor distribution
When you're creating your ideal version; the protein is your main event. Whether you're going with a classic imitation crab option or a premium spicy tuna style; treating your protein right ensures every bite tastes delicious. The key is preventing your dish from getting watery or unevenly cooked.
Temperature Control
; Use room-temperature ingredients when possible ; Don't skip preheating your oven for consistent baking ; Check your dish at 10 minutes to see how it's progressing ; The whole baking process typically takes 10 to 15 minutes
Temperature management is what separates a great result from a mediocre one. Too hot and your cream cheese melts unevenly; too cool and everything won't bind together. The sweet spot is a moderate 375°F; which gives you a perfectly heated through dish without burning anything on top.
Recipe Variations & Substitutions
Spicy vs. Mild Versions
The beautiful thing about this approach is how adaptable it is. If you want a mild version; simply reduce or eliminate the sriracha mayo and skip the spicy toppings. For a truly spicy option; double up on the sriracha mayo; add wasabi mayo; and top with sriracha drizzle right out of the oven. You can make a Hawaiian version by adding pineapple chunks to your protein mix; or a teriyaki style by drizzling teriyaki sauce over everything.
Popular combinations include:
California Roll Style; Imitation crab; cucumber; and avocado layers ; Spicy Tuna Version; Flaked tuna mixed with sriracha mayo and green onions ; Salmon and Crab Combination; Both proteins together for extra luxury ; Tofu Option; Crispy baked tofu for vegetarians ; Cold Version; Skip the oven and serve it chilled as a rice bowl ; Individual Portions; Bake in muffin tins for cupcake-style servings
Each variation brings something different to the table. A creamier version with extra mayo and cream cheese feels indulgent; while a lighter option with just rice and fresh toppings feels refreshing. Make this your own by experimenting with different proteins; mayo styles; and toppings until you find your perfect version.
Dietary Adaptations
For a dairy-free option; use vegan mayo instead of regular mayo and skip the cream cheese entirely. Your dish will still taste amazing because the sushi rice and protein are the real stars. A keto version can be made by replacing regular sushi rice with cauliflower rice; though the texture will be a bit different. A gluten-free option is naturally gluten-free as long as you use tamari instead of regular soy sauce and check your furikake label. Even a low-carb version works perfectly with cauliflower rice or by reducing portion sizes and loading up on vegetables.
Equipment Recommendations
9x9-inch baking dish; Perfect size for individual servings or family portions ; Oven thermometer; Ensures your oven is actually at 375°F for consistent results ; Muffin tin; Great for making mini portions or individual servings ; Sharp knife; Essential for slicing into clean; neat squares ; Spatula; Helps spread your mayo layers and mix your protein evenly ; Bamboo mat; Useful if you want to add nori strips in a decorative pattern ; Small mixing bowls; One for each layer keeps things organized
This approach doesn't require fancy equipment; but having the right tools makes the process smoother and your final product look more professional. If you don't have a 9x9-inch dish; a similar-sized round dish works just fine. The key is that your creation should be about 1 to 2 inches thick for optimal baking.
Storage & Meal Prep Tips
Refrigerator Storage
Your sushi bake stays fresh in the fridge for up to 3 days when stored in an airtight container. The best way to store your sushi bake recipe is to let it cool completely before covering it; then keep it on a shelf away from strong-smelling foods. You can serve it cold directly from the fridge or reheat individual portions in the microwave for 30 to 45 seconds. A sushi bake is excellent for meal prep because you can make one large batch and enjoy it throughout the week.
; Store in airtight containers to prevent the rice from drying out ; Keep fresh toppings separate until serving time ; Cool completely before refrigerating to prevent condensation ; Label with the date so you know exactly how long it's been stored
Freezing Your Sushi Bake
You can freeze a sushi bake for up to 2 weeks; though the texture of fresh toppings like avocado won't be ideal after thawing. The rice-based layers freeze beautifully; so consider freezing just the core sushi bake without the delicate toppings. When you're ready to eat; thaw in the fridge overnight and add fresh toppings before serving. This make-ahead method is perfect when you want homemade sushi bake readily available.
; Freeze without fresh toppings for best results ; Use a flat freezer-safe container to save space ; Thaw overnight in the refrigerator before reheating ; Add fresh toppings after thawing for maximum freshness
Grandma's Secret That Changed Everything
Here's the insider tip that separates an amazing sushi bake recipe from just an okay one; the mayo ratio is everything. Most people skimp on the creamy layer; but that's where the magic happens in your sushi bake. Using quality Japanese mayo instead of regular American mayo makes a huge difference in flavor and texture.
The richness of that layer is what binds everything together and keeps your sushi bake from being dry.The second game-changing secret for any sushi bake recipe is not skipping the resting time after baking. Those 2 to 3 minutes might seem unnecessary; but they allow the layers to set properly so when you cut into your sushi bake; it holds together beautifully instead of falling apart. This simple step transforms your sushi bake from messy to restaurant-quality presentation every single time.
FAQ
How Long Is a Sushi Bake Good for in the Fridge?
A properly stored sushi bake stays fresh and delicious for up to 3 days in an airtight container in the refrigerator. After that; the rice can start to dry out and the overall quality of your sushi bake recipe declines. For best results; enjoy your sushi bake within the first 2 days while all the layers are at their best. Always make sure your sushi bake is completely cooled before putting it in the fridge to prevent unwanted condensation.
Is Sushi Bake Supposed to Be Eaten Hot or Cold?
A sushi bake is traditionally served warm and fresh from the oven; which is when you get the best texture and flavor from your sushi bake recipe. However; many people enjoy it cold straight from the fridge as a refreshing meal. The choice really depends on your preference; but most agree that warm sushi bake feels more indulgent and comforting. You can reheat a cold sushi bake in the microwave; but eating it fresh is definitely the ideal way to enjoy this dish.
How Long Should You Bake Baked Sushi?
Your sushi bake typically bakes for 10 to 15 minutes at 375°F; depending on how thick you've made it and your specific oven. Check your sushi bake at the 10-minute mark; and it should be heated through with slightly golden toppings. If you're making a particularly thick sushi bake or using extra cream cheese; you might need the full 15 minutes. The goal with your sushi bake recipe is to heat everything through without burning the toppings or drying out the rice.
How Do I Prevent Sushi Bake From Getting Soggy?
The key to preventing a soggy sushi bake recipe is proper layering and using the right moisture balance. Don't overload your sushi bake with extra mayo; as excess liquid makes everything soggy. Drain any canned ingredients like tuna or crab really well before mixing into your sushi bake. Additionally; add fresh toppings right before serving rather than mixing them in early; as this keeps your sushi bake crispy and fresh. Using room-temperature ingredients and not overbaking also helps maintain the ideal texture in your sushi bake
Ready to Make Your Own Sushi Bake
Making this at home brings authentic sushi restaurant flavors to your kitchen without the complexity or stress. This approach works beautifully as a family dinner; a party showstopper; or a meal-prep powerhouse for your busy week. Once you master the basics; you'll find yourself making different versions constantly because the possibilities are endless.
Your next step is grabbing your ingredients and trying this for yourself. Share your creation on social media; tag us; and let us know which variation you loved most. Don't forget to check out our Easy Salmon Poke Recipe and California Roll Cucumber Salad Recipe for the perfect sides to complete your Asian fusion meal night!
With love from my kitchen to yours,
Kaitlyn Reed
Related
Looking for other recipes like this? Try these:


Pairing
These are my favorite dishes to serve with this Sushi Bake recipe:


Easy Sushi Bake Recipe
Equipment
- 1 9x9-inch baking dish Ideal size for family portions
- 1 Oven thermometer For precise baking temperature
- 1 Spatula To spread mayo and rice layers evenly
- 1 Sharp knife For clean, neat serving squares
- 1 Small mixing bowls Helps organize ingredients by layer
Ingredients
Core Sushi Rice Base
- 2 cups cooked sushi rice Seasoned with vinegar, salt & sugar
- 2 tablespoon Japanese mayo Mix with rice for creaminess
- 1 tablespoon sriracha mayo Adjust for spice level
- 1 teaspoon furikake seasoning Adds flavor and crunch
- 1 teaspoon sesame seeds Optional garnish
- 1 sheet nori Cut into strips (optional)
Protein Options (Choose One)
- 8 oz imitation crab Shredded for crab sushi bake
- 8 oz fresh or cooked salmon Flaked
- 8 oz sushi-grade tuna For spicy tuna sushi bake
- 6 oz cooked shrimp Combine with crab for variety
Creamy Layer
- 4 oz cream cheese Optional for creamy version
- 2 tablespoon Japanese mayo For smooth texture
- 1 tablespoon sriracha Adjust to spice level
Toppings
- 1 cucumber Thinly sliced
- 1 avocado Sliced fresh
- 1 tablespoon sesame seeds For garnish
- 1 tablespoon furikake For added crunch
- 2 tablespoon green onions Chopped
- 1 tablespoon pickled ginger Optional
Instructions
- Preheat oven to 375°F. Spread sushi rice evenly into baking dish and press gently.
- Mix Japanese mayo and sriracha mayo; spread over rice layer.
- Combine protein with mayo and sriracha; layer on top of rice.
- Add cream cheese dollops for creamy texture.
- Sprinkle furikake and sesame seeds; bake 10–15 minutes.
- Let rest for 2–3 minutes before slicing.
- Add toppings like avocado, cucumber, and drizzle of mayo. Serve warm.


Leave a Reply