
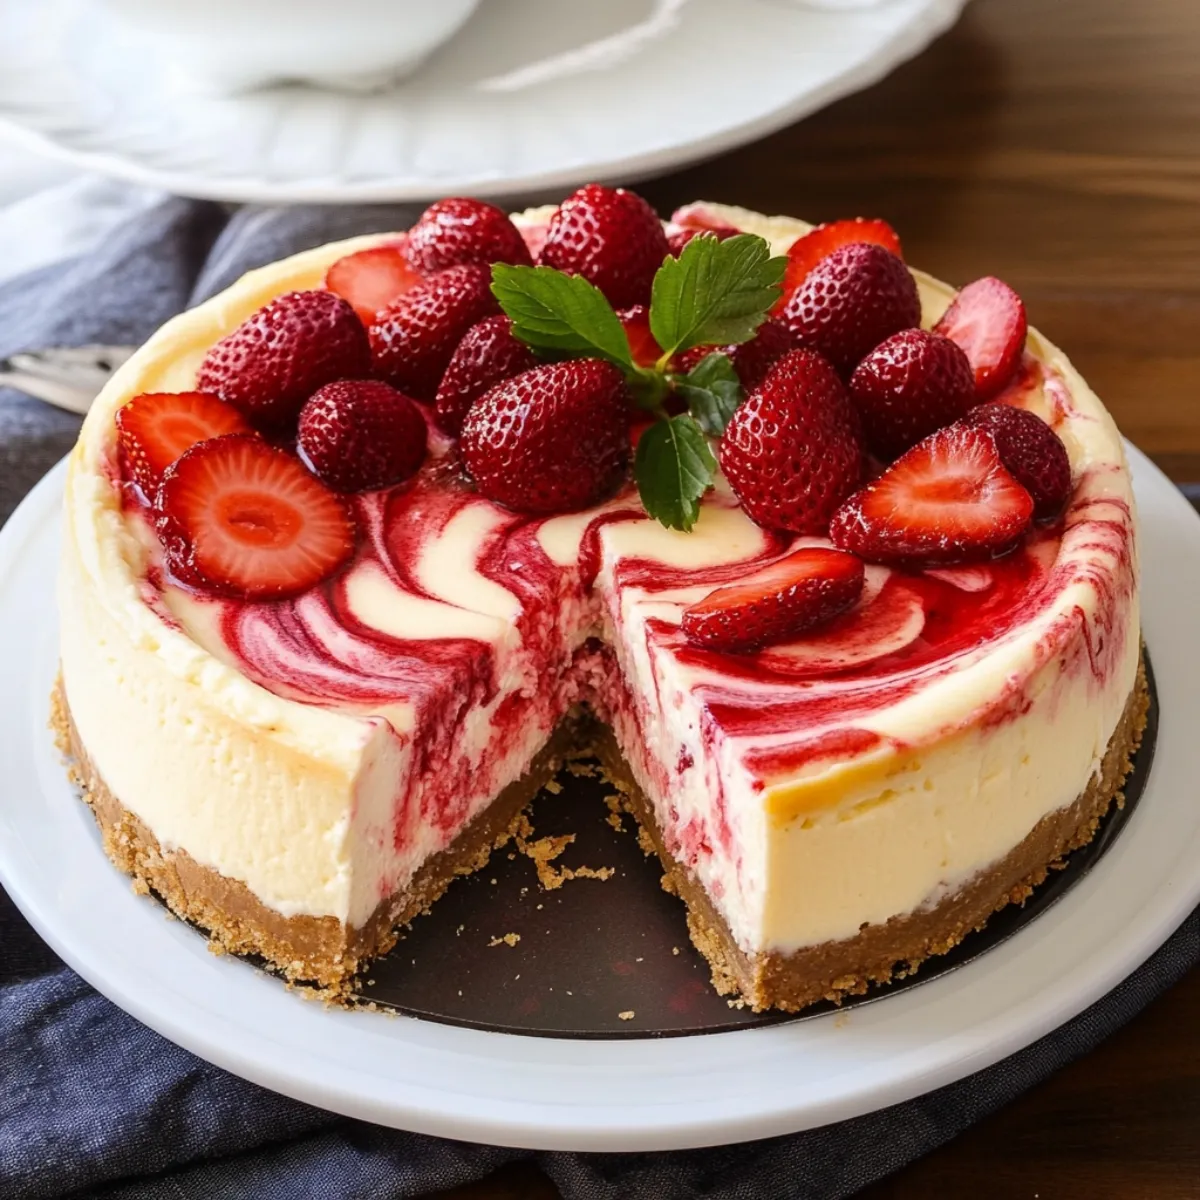
There’s something almost nostalgic about a good Strawberry Swirl Cheesecake—the kind that reminds you of family gatherings, summer afternoons, or that one perfect slice you had at a little café and never forgot. The rich, creamy texture of the cheesecake paired with ribbons of sweet, slightly tangy strawberry sauce creates a harmony that’s hard to resist. It’s not just dessert—it’s an experience.
This recipe brings you everything you love in a Strawberry Swirl Cheesecake: a buttery graham cracker crust, a velvety smooth filling, and a homemade strawberry swirl that looks like it came straight from a professional bakery. But here’s the secret—it’s actually very simple to make at home. You don’t need to be a seasoned baker or have fancy equipment to get it just right.
What I love most about this Strawberry Swirl Cheesecake is how it looks as stunning as it tastes. That gorgeous marbled top never fails to impress guests, and yet, every step is straightforward. Whether you're baking for a celebration or just want to treat yourself, this cheesecake delivers every time.
Let me guide you through each step of making this incredible Strawberry Swirl Cheesecake, just as I do in my own kitchen. You’ll not only end up with a beautiful dessert but also the confidence to make it again and again.
Why This Strawberry Swirl Cheesecake Is Worth Making
This isn’t just any cheesecake—it’s my go-to Strawberry Swirl Cheesecake for when I really want to impress without stressing in the kitchen. The way the smooth, rich filling melts in your mouth, paired with vibrant strawberry swirls, makes every bite feel special. It’s elegant enough for holidays and birthdays, but still simple enough for a cozy weekend baking session at home. The buttery graham cracker crust adds the perfect crunch to contrast the silky filling—an absolute must for any good cheesecake.
What really sets this Strawberry Swirl Cheesecake apart is the stunning look of those deep red swirls dancing across the creamy surface. Every time I serve it, someone asks if I bought it from a bakery. But nope—it’s homemade with love. The flavor strikes that perfect balance between sweet and tangy, and it always wins over both cheesecake newbies and die-hard fans alike. Whether you’re hosting or just treating yourself, this Strawberry Swirl Cheesecake is one recipe that belongs in your favorites list.
Jump to:
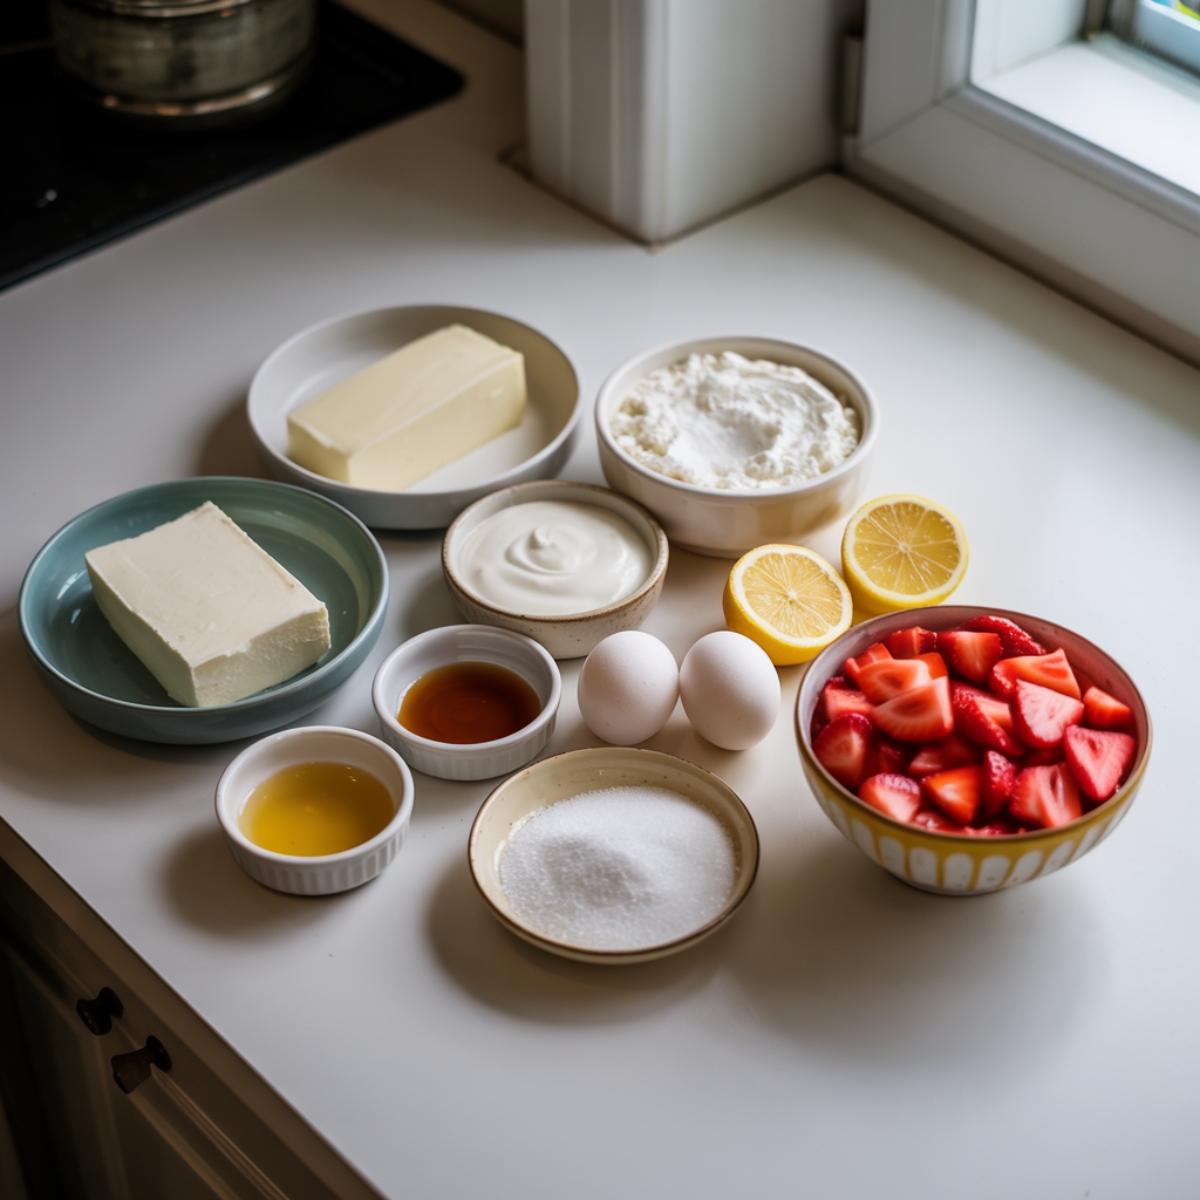
Ingredients
For the Graham Cracker Crust:
- Graham cracker crumbs (about 10 full sheets)
- Granulated sugar
- Unsalted butter, melted
For the Cheesecake Filling:
- Cream cheese, softened to room temperature
- Granulated sugar
- Sour cream, at room temperature
- Vanilla extract
- Eggs, at room temperature
- Fresh lemon juice
For the Strawberry Swirl:
- Fresh strawberries, hulled and chopped (frozen can work too)
- Granulated sugar
- Cornstarch
- Lemon juice
Don't have sour cream? You can substitute with plain Greek yogurt for a similar tangy flavor. For a gluten-free option, use gluten-free graham crackers or cookies for the crust.
See recipe card for quantities.
Instructions
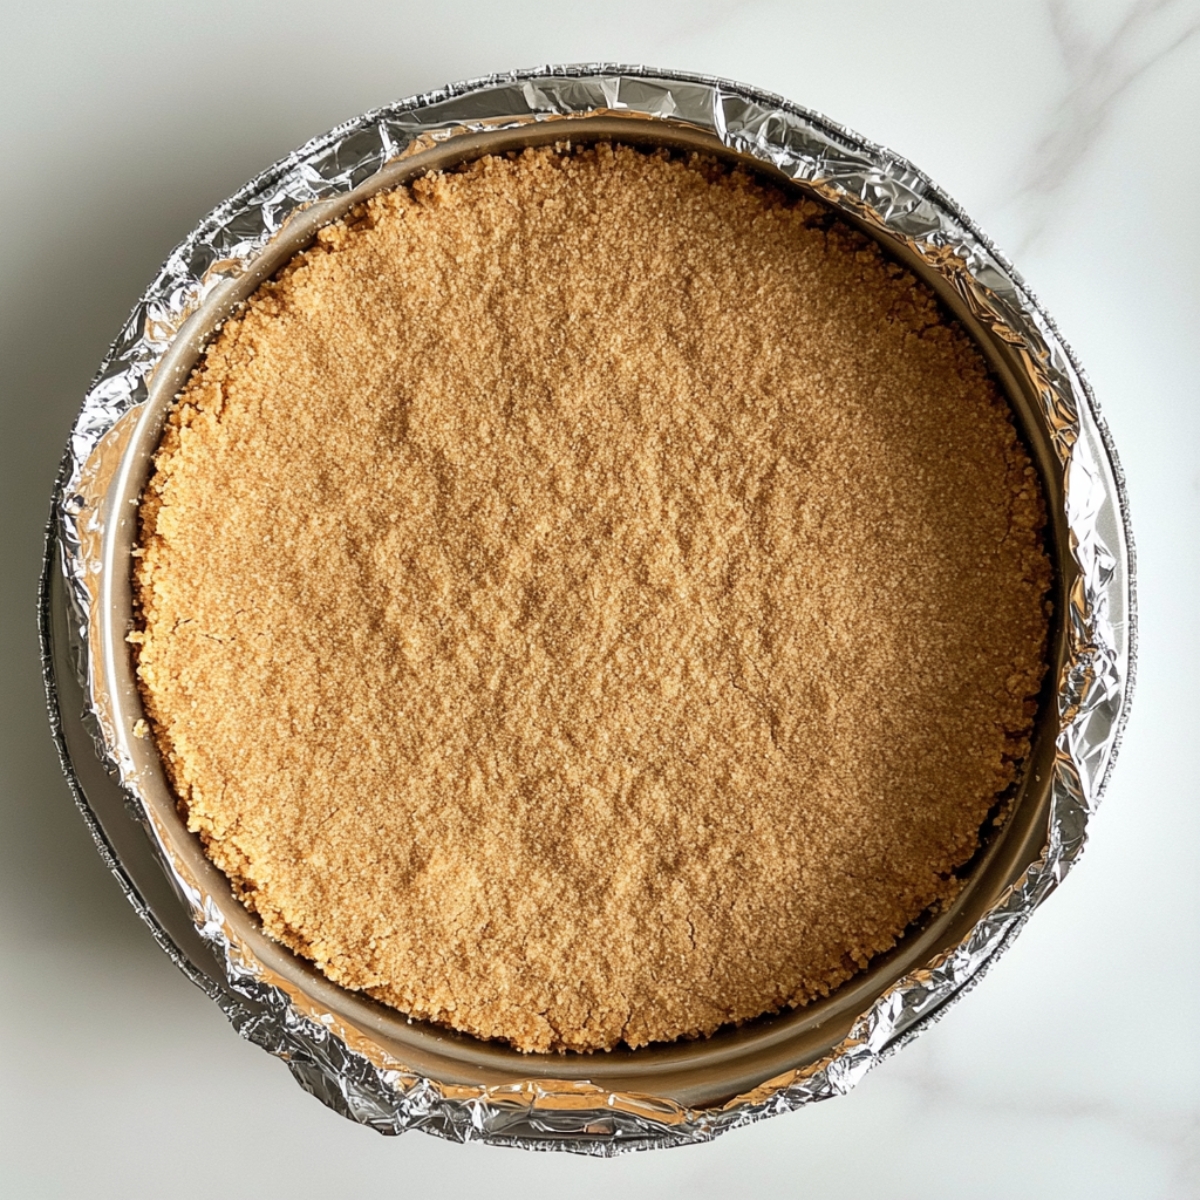
Prepare the Strawberry Sauce and Crust
- Make the strawberry sauce - Place chopped strawberries, sugar, cornstarch, and lemon juice in a small saucepan. Heat over medium heat, stirring frequently until thickened (8-10 minutes). Blend until smooth, strain if desired, and set aside to cool completely.
- Preheat your oven to 325°F (165°C). Wrap the outside of a 9-inch springform pan with aluminum foil to prevent water from seeping in during baking.
- Make the graham cracker crust - Combine graham cracker crumbs and sugar, then stir in melted butter until it resembles wet sand. Press firmly into the bottom and about 1 inch up the sides of your springform pan.
- Pre-bake the crust for 10 minutes, then remove from the oven to cool. Keep the oven on at 325°F.
Prepare the Cheesecake Filling
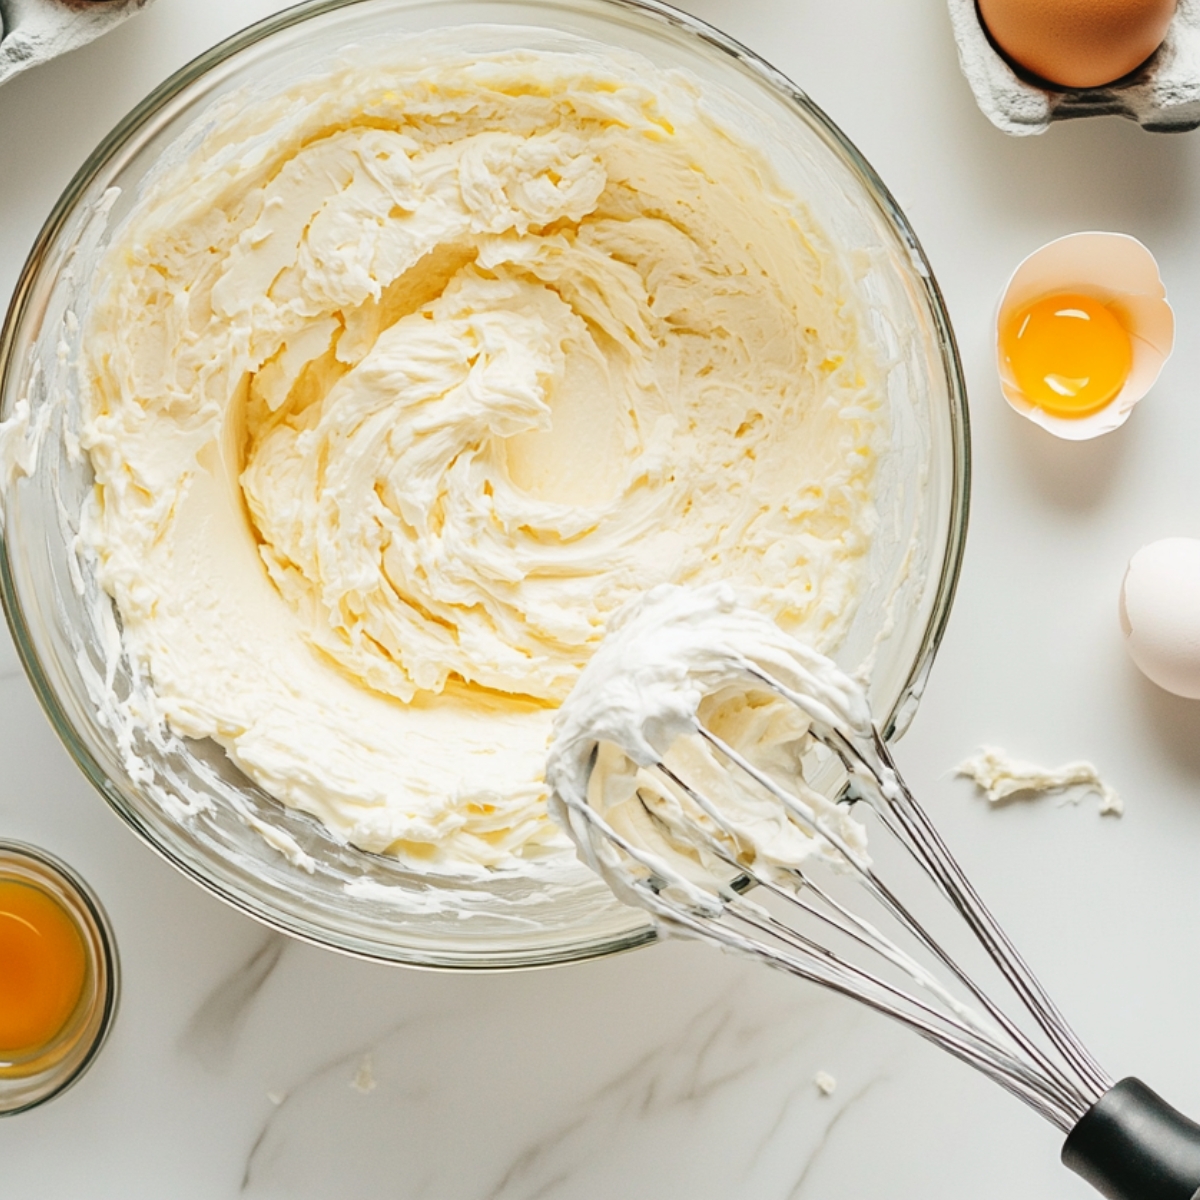
- Beat the cream cheese - Using a hand mixer or stand mixer with the paddle attachment, beat the cream cheese on medium speed until completely smooth, about 3 minutes.
- Add sugar and mix - Add the sugar and beat until combined, about 1 minute.
- Incorporate wet ingredients - Add the sour cream and vanilla, beat until smooth. Add the eggs one at a time, beating on low speed after each addition. Add the lemon juice and mix just until incorporated.
- Take care not to overmix - Overmixing can incorporate too much air, which may cause cracks during baking.
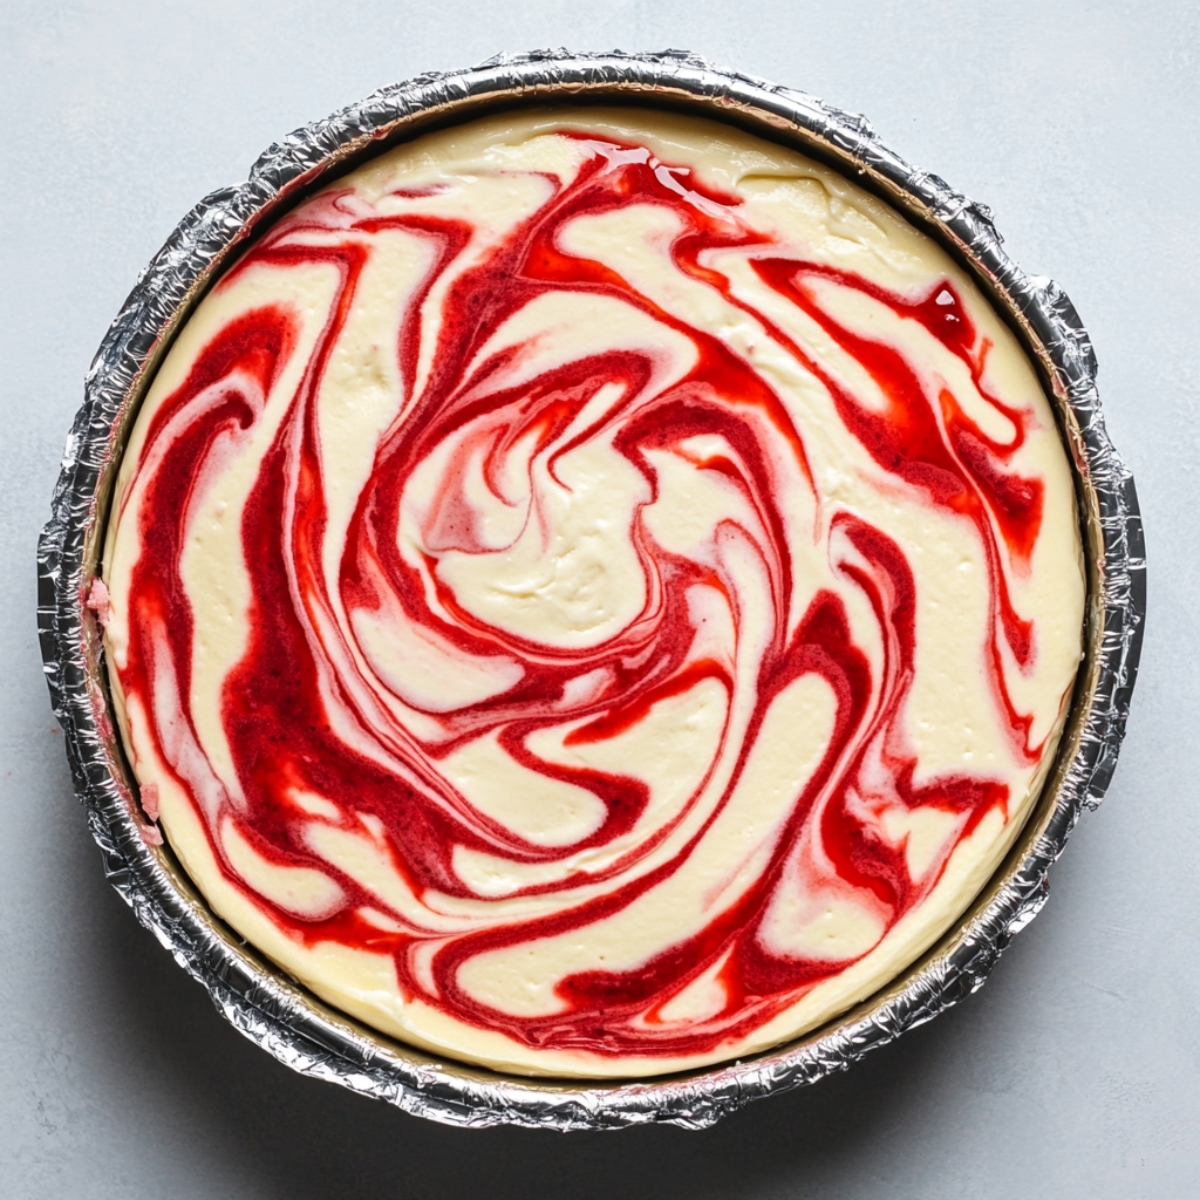
Assemble and Create the Swirl
- Pour the filling - Pour the cheesecake batter over the pre-baked crust, smoothing the top with a spatula.
- Add the strawberry sauce - Drop spoonfuls of the cooled strawberry sauce onto the top of the cheesecake batter.
- Create the swirl pattern - Use a skewer or knife to gently swirl the strawberry sauce into the cheesecake batter. Don't over-swirl or the pattern will become muddy.
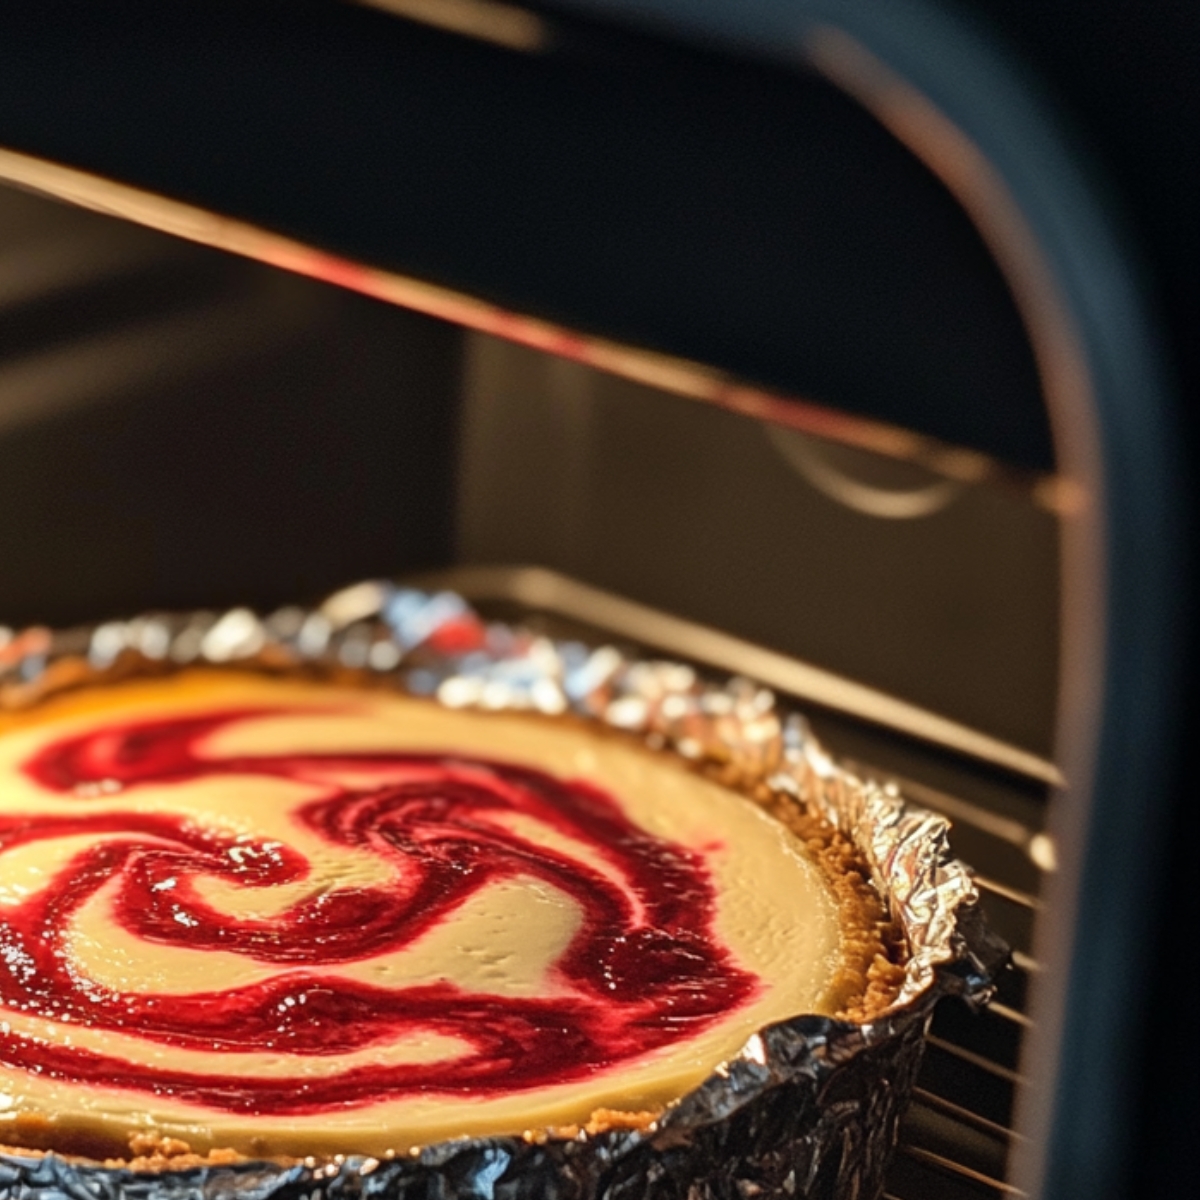
- Prepare the water bath - Place the foil-wrapped springform pan in a larger roasting pan. Fill the roasting pan with hot water about halfway up the sides of the springform pan.
Bake and Cool the Cheesecake
- Bake the cheesecake - Carefully transfer to the oven and bake for 65-75 minutes, or until the edges are set but the center still has a slight jiggle.
- Cool gradually - Turn off the oven and crack the door open. Let the cheesecake cool in the oven for 1 hour.
- Chill thoroughly - After cooling in the oven, remove the cheesecake and run a knife around the edges to loosen from the pan.
- Refrigerate for at least 6 hours or overnight before serving for the best flavor and texture.
- Step 1: Prepare the Strawberry Sauce and Crust
Cook strawberry sauce and prepare buttery graham cracker crust.
- Step 2: Prepare the Cheesecake Filling
Mix cream cheese, sugar, and other ingredients to make the cheesecake filling.
- Step 3: Assemble and Create the Swirl
Pour cheesecake batter, add strawberry sauce, and swirl gently.
- Step 4: Bake and Cool the Cheesecake
Bake the cheesecake in a water bath, then cool gradually.
Hints and Tips for the Best Strawberry Swirl Cheesecake
The key to a crack-free cheesecake is patience! Room temperature ingredients, a water bath, and slow cooling make all the difference. Don't rush these steps and your cheesecake will thank you with a perfectly smooth top.
For the best swirl effect, make sure your strawberry sauce is completely cooled before adding it to the cheesecake batter. If it's too warm, it will sink into the batter and won't create those beautiful swirls.
Dietary Benefits & Serving Suggestions
This strawberry swirl cheesecake is a rich indulgence that's perfect for special occasions. While it's definitely a treat, you're getting some vitamin C and antioxidants from the fresh strawberries!
For the perfect slice, dip your knife in hot water and wipe clean between cuts. Serve with additional fresh strawberries on top or a dollop of whipped cream for an extra special touch. This cheesecake pairs wonderfully with a glass of champagne or a cup of coffee for a delightful dessert experience.
Recipe Variations & Substitutions
- Chocolate Strawberry Swirl: Add ¼ cup of cocoa powder to the cheesecake batter for a chocolate version that pairs beautifully with the strawberry swirl.
- Mixed Berry Swirl: Replace half the strawberries with raspberries or blackberries for a mixed berry version.
- Mini Strawberry Swirl Cheesecakes: Use a muffin tin with liners to create individual servings – perfect for parties!
- No-Bake Option: If you're short on time, try adapting this to a no-bake version using gelatin to set the filling.
- Lighter Version: Use Neufchâtel cheese (⅓ less fat) in place of regular cream cheese.
Equipment
- 9-Inch Springform Pan
This is absolutely essential when making a Strawberry Swirl Cheesecake. A springform pan lets you release the cheesecake from the sides without damaging the delicate, creamy filling or those beautiful strawberry swirls. It gives you that clean, bakery-style presentation every home baker dreams of. - Stand Mixer or Hand Mixer
To get that velvety smooth cheesecake texture, you’ll need either a stand mixer or a strong hand mixer. Mixing cream cheese by hand can leave lumps, and a mixer helps blend everything evenly—especially important for that signature silky filling in this Strawberry Swirl Cheesecake. - Large Roasting Pan (for Water Bath)
A water bath is key to preventing cracks and keeping the cheesecake ultra-creamy. Place your springform pan into a larger roasting pan and surround it with hot water—this creates gentle, even heat while it bakes. It’s a small step that makes a big difference in the final result. - Heavy-Duty Aluminum Foil
You’ll want to tightly wrap the outside of your springform pan with a couple of layers of foil before placing it in the water bath. This keeps water from leaking into your crust and ruining your cheesecake. Trust me—this step saves a lot of heartache. - Optional: Deep Dish Pie Plate (If You Don’t Have a Springform Pan)
If you don’t have a springform pan on hand, you can use a deep pie dish as a backup. Just know that while the cheesecake will still taste amazing, you won’t be able to lift it out cleanly. You’ll need to serve it straight from the dish—and that’s perfectly fine for casual gatherings.
Storage Instructions
- Refrigerator Storage (Up to 5 Days)
Your homemade Strawberry Swirl Cheesecake will keep beautifully in the fridge for up to 5 days. Just make sure it’s covered—either tightly wrapped in plastic wrap or placed in an airtight container. This helps preserve its creamy texture and keeps it from picking up any stray flavors from nearby leftovers (no one wants their cheesecake tasting like garlic pasta!). I usually store mine right on the cake base and gently cover the top with wrap to keep the swirls looking pristine. - Freezer Storage (Up to 3 Months)
Want to enjoy your Strawberry Swirl Cheesecake weeks down the road? It freezes like a dream. Once your cheesecake is completely chilled and set, carefully remove it from the springform pan. Then wrap the entire cheesecake tightly in a layer of plastic wrap, followed by a layer of aluminum foil to protect against freezer burn. You can also slice it first and freeze individual portions for easy treats anytime. When you're ready to serve, just thaw it overnight in the refrigerator—no microwave needed. - Serving After Storage
After refrigeration or freezing, I recommend letting your Strawberry Swirl Cheesecake sit at room temperature for 20–30 minutes before serving. It brings out the creaminess and softens the crust just enough for that perfect bite. Trust me, it’s worth the wait.
My Secret to a Perfectly Creamy Strawberry Swirl Cheesecake (Every Time)
I still remember the first time I tried to make a Strawberry Swirl Cheesecake on my own. I was so proud—until I opened the oven door and saw deep cracks running right through that gorgeous swirl I’d worked so hard on. The taste was good, sure, but it didn’t look anything like the picture in my head. I felt like I had failed, and for a while, I avoided cheesecake recipes altogether.
Everything changed one afternoon when I was chatting with my neighbor Linda—an incredible home baker who used to bring the most stunning cheesecakes to our potlucks. When I told her about my cracked cheesecake saga, she smiled and said, “Ah, you skipped the water bath, didn’t you?” I hadn’t even known what that was. She walked me through it right there at her kitchen table, sharing not just the how, but the why behind it.
The water bath, she explained, isn’t just a fancy technique—it’s the heart of a great Strawberry Swirl Cheesecake. That gentle, moist heat helps the cheesecake bake slowly and evenly, so the center stays creamy and the top doesn’t crack. Ever since that day, I’ve never baked a Strawberry Swirl Cheesecake without it. I always wrap my springform pan in two layers of heavy-duty foil—just like Linda taught me—to keep the water out and the crust dry. It’s a small step, but it feels like a little moment of care and intention in the baking process.
Now, when I pull my Strawberry Swirl Cheesecake out of the oven—smooth, creamy, and swirl-perfect—I think of that conversation and how one shared tip turned my baking around. If you’ve ever struggled with cheesecake texture or cracks, I promise you: this simple water bath trick will change the game. It’s my secret to making cheesecakes that don’t just taste amazing—they look like they came from a bakery, too.
FAQ
How long can strawberry cheesecake sit out?
Strawberry cheesecake should not sit out for more than 2 hours at room temperature. Since it contains dairy and eggs, it’s important to refrigerate it promptly to keep it safe and creamy. If you’re serving it at a party, keep it chilled until right before dessert time, then pop it back into the fridge if needed.
Can you swirl jam into a cheesecake?
Yes! You can absolutely swirl jam into cheesecake for a beautiful and flavorful touch. Use a few spoonfuls of softened strawberry jam on top of the batter, then gently swirl it in with a skewer or knife before baking. Just be sure not to over-swirl, so you keep those lovely, distinct patterns and don’t muddle the layers.
How do you keep cheesecake from caving in?
To prevent cheesecake from caving in, avoid overmixing the batter, especially after adding the eggs. Overmixing incorporates too much air, which causes it to puff during baking and collapse while cooling. Also, don’t skip the water bath—it helps bake the cheesecake evenly and gently. Letting it cool slowly in the oven afterward is also key.
What not to do when making cheesecake?
Don’t rush the process—cheesecake loves patience. Avoid using cold ingredients, skipping the water bath, or opening the oven door too often. Overbaking and overmixing are also common mistakes that can lead to cracks or a dense texture. Follow each step with care, and you’ll end up with a smooth, creamy, bakery-worthy cheesecake every time.
Final Thoughts: Why This Strawberry Swirl Cheesecake Deserves a Spot in Your Recipe Box
Baking a Strawberry Swirl Cheesecake isn’t just about making dessert—it’s about creating a moment. Whether you’re swirling that bright red sauce into creamy filling or slicing into your masterpiece for the first time, it’s a recipe that brings joy, beauty, and a little wow factor to any table. It’s become one of my most requested desserts from friends and family, and I hope it becomes a favorite in your home too.
If you’re as smitten with strawberry desserts as I am, don’t miss my Strawberry Crunch Cupcakes—they’re like a bite-sized version of summer. And if you’re planning a full dinner that ends with this cheesecake, try pairing it with my Marry Me Shrimp Pasta for a romantic, crowd-pleasing meal that’s as stunning as it is satisfying.
No matter the occasion, this Strawberry Swirl Cheesecake is a sweet reminder that homemade doesn’t have to mean complicated—it just has to be made with care. Happy baking, friend!
Related
Looking for other recipes like this? Try these:


Pairing
These are my favorite dishes to serve with this Strawberry Swirl Cheesecake recipe:


Strawberry Swirl Cheesecake Recipe
Equipment
- 1 9-inch springform pan Allows for clean release and easy slicing
- 1 Stand or hand mixer For smooth, lump-free cream cheese filling
- 1 Roasting pan For water bath to ensure even baking and no cracks
- 2 Sheets of foil Wrap springform pan to protect against water seepage
- 1 Medium saucepan To cook strawberry swirl sauce
- 1 Knife or skewer Used to create the swirl effect in the cheesecake
Ingredients
Crust
- 1 ½ cups Graham cracker crumbs About 10 full crackers
- ¼ cup Granulated sugar For sweetening the crust
- ⅓ cup Unsalted butter Melted
Strawberry Swirl
- 2 cups Strawberries Fresh or frozen, hulled and chopped
- ¼ cup Sugar For the swirl sauce
- 1 tablespoon Cornstarch Helps thicken the sauce
- 1 tablespoon Lemon juice Brightens flavor
Cheesecake Filling
- 32 oz Cream cheese Softened to room temperature
- 1 ¼ cups Granulated sugar Sweetens the filling
- ½ cup Sour cream Or substitute plain Greek yogurt
- 2 teaspoon Vanilla extract Adds depth of flavor
- 4 Large eggs Room temperature
- 1 tablespoon Lemon juice Adds brightness
Instructions
- Preheat oven to 325°F (165°C)
- Prepare strawberry sauce and let cool
- Wrap springform pan in foil
- Combine crust ingredients and press into pan
- Pre-bake crust for 10 minutes
- Beat cream cheese until smooth
- Add sugar, then sour cream, vanilla, and lemon juice
- Beat in eggs one at a time on low speed
- Pour filling into crust
- Drop strawberry sauce and swirl with knife
- Place springform in roasting pan, add hot water
- Bake 65–75 minutes until edges set
- Cool in oven 1 hour with door cracked
- Chill at least 6 hours or overnight


Leave a Reply