
There's something magical about biting into a perfect chocolate marshmallow treat. The combination of smooth, rich chocolate coating a pillowy soft marshmallow creates a moment of pure happiness that takes you right back to childhood campfires and cozy winter nights. I've been making this chocolate marshmallow recipe for years, and it never fails to bring smiles to everyone who tries it. Whether you're looking for a quick dessert for unexpected guests or planning a special treat for your family, this chocolate marshmallow creation delivers every single time. The best part? You don't need fancy equipment or professional baking skills; just a few simple ingredients and about 20 minutes of your time to create something truly special.

Why This Chocolate Marshmallow Recipe Will Become Your Go-To Dessert
This chocolate marshmallow recipe stands out because it strikes that perfect balance between being incredibly easy and impressively delicious. Unlike complicated desserts that require hours of preparation, this treat comes together quickly without sacrificing any of that wow factor. I developed this recipe after countless kitchen experiments, trying to capture that perfect texture where the chocolate stays smooth and glossy while the marshmallow remains soft and chewy.
What makes this chocolate marshmallow version special is the technique of tempering the chocolate just right; not too hot that it melts the marshmallow completely, but warm enough to create that beautiful coating. You can customize these treats endlessly, adding nuts, sprinkles, or even a drizzle of caramel. Friends always ask me for this recipe at parties, and I've watched even picky eaters reach for seconds. The versatility means you can make them for Valentine's Day with pink sprinkles, Halloween with orange chocolate, or Christmas with peppermint pieces.
Jump to:
- Why This Chocolate Marshmallow Recipe Will Become Your Go-To Dessert
- Ingredients
- Instructions
- Step 1; Prepare Your Workspace and Ingredients
- Expert Cooking Tips
- Recipe Variations & Substitutions
- Equipment Recommendations
- Storage & Meal Prep Tips
- The Secret That Changed Everything
- FAQ
- More Chocolate Delights to Try
- Related
- Pairing
- Chocolate Covered Marshmallow Treats Recipe
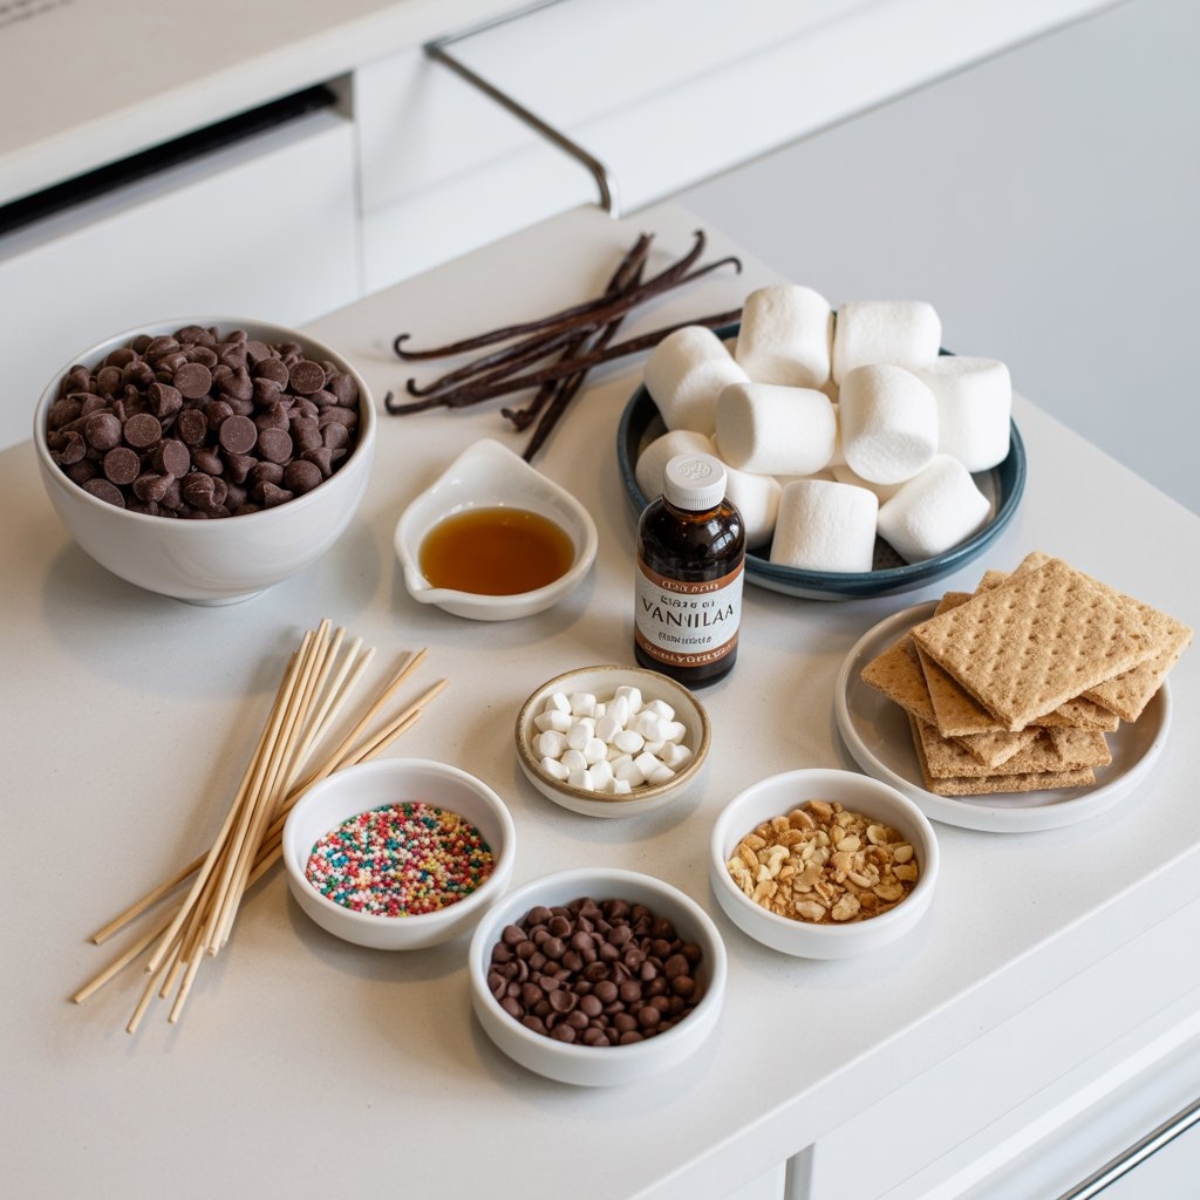
Ingredients
For the Chocolate Coating
- Semi-sweet chocolate chips (or dark chocolate for a richer flavor)
- Coconut oil (helps create a smooth, glossy finish)
- Vanilla extract
For the Marshmallow Base
- Marshmallows (fresh ones work best for optimal texture)
- Wooden skewers or toothpicks for dipping
Optional Toppings
- Crushed graham crackers
- Chopped nuts (pecans, almonds, or peanuts)
- Colorful sprinkles
- Sea salt flakes for a gourmet touch
- Mini chocolate chips
See recipe card for quantities.
Instructions
Step 1; Prepare Your Workspace and Ingredients
- Line a large baking sheet with parchment paper or a silicone baking mat to prevent sticking.
- Insert a wooden skewer or toothpick into each marshmallow, pushing it about halfway through for a secure grip.
- Arrange all your toppings in small bowls within easy reach for quick decorating.
- Set up your workspace near the refrigerator for efficient transfer once the chocolate marshmallow treats are dipped.
Step 2; Melt the Chocolate to Perfection
- Combine the chocolate chips and coconut oil in a microwave-safe bowl.
- Microwave in 30-second intervals, stirring thoroughly after each burst to ensure even melting.
- Once smooth and fully melted, stir in the vanilla extract for added depth of flavor.
- Let the chocolate cool for 2-3 minutes; it should be warm but not hot to touch, which prevents the marshmallow from melting too quickly.
Step 3; Dip and Coat Each Marshmallow
- Hold a marshmallow by its skewer and dip it completely into the melted chocolate, swirling gently to coat all sides.
- Lift the chocolate marshmallow out and let excess chocolate drip back into the bowl for a few seconds.
- If using toppings, immediately roll or sprinkle them over the wet chocolate before it sets.
- Place the finished treat on your prepared baking sheet and repeat with remaining marshmallows.
Step 4; Set and Store Your Treats
- Transfer the baking sheet to the refrigerator and let the treats chill for 15-20 minutes until the chocolate is completely firm.
- Once set, carefully remove the skewers by gently twisting and pulling.
- Store your finished treats in an airtight container with parchment paper between layers.
- Keep them in a cool place; they'll stay fresh for up to one week.
Expert Cooking Tips
Getting your chocolate marshmallow treats perfect every time comes down to a few key techniques I've learned over the years.
- Temperature Control Is Everything The single most important factor in this recipe is managing your chocolate temperature correctly. If your chocolate gets too hot, it will melt the marshmallow's outer layer, creating a sticky mess instead of a clean coating. I always test the temperature by dipping my finger in; it should feel warm but comfortable to touch. If it's too hot, let it sit for a minute or two before dipping. On the flip side, if your chocolate starts to thicken while working, pop it back in the microwave for just 10 seconds to restore that perfect dipping consistency.
- Choose Quality Chocolate The type of chocolate you select dramatically impacts your final result. I prefer using good quality chocolate chips or chopped chocolate bars rather than candy melts because they deliver superior flavor and a more satisfying snap when you bite through the coating. Semi-sweet chocolate offers a nice balance that appeals to most people, but dark chocolate creates a more sophisticated treat with less sweetness. White chocolate works beautifully too, though it requires even more careful temperature monitoring since it scorches more easily.
- Fresh Marshmallows Make a Difference Always use fresh, soft marshmallows for the best texture in your treats. Stale marshmallows that have started to harden won't provide that wonderful contrast between the crispy chocolate shell and pillowy center. If your marshmallows have been sitting in the pantry for a while, place them in a sealed bag with a slice of fresh bread overnight to restore some moisture.
- Topping Application Timing Work quickly when adding toppings to your treats. You have about 10-15 seconds after dipping before the chocolate begins to set, so have everything ready and within arm's reach. For toppings that need to stick securely like nuts or cookie pieces, press them gently into the chocolate rather than just sprinkling them on top.
- The Coconut Oil Secret Adding coconut oil to your chocolate isn't just for flavor; it creates a thinner, more pourable consistency that coats marshmallows smoothly without thick clumps. It also gives your finished treats that beautiful glossy shine that looks professionally made. You can substitute with vegetable oil if needed, but coconut oil adds a subtle flavor enhancement that complements chocolate perfectly.
Recipe Variations & Substitutions
This chocolate marshmallow recipe adapts beautifully to different preferences and dietary needs, making it perfect for any occasion.
- Dietary Adaptations For those avoiding dairy, use dairy-free chocolate chips and ensure your marshmallows are vegan-friendly (brands like Dandies work great). If you're watching sugar intake, sugar-free chocolate chips work in this recipe without any modification to the technique. Coconut oil already makes these naturally dairy-free on the chocolate side, so you're halfway there with minimal effort.
- Flavor Variations to Try Transform your basic recipe into something extraordinary by stirring additions into your melted chocolate. A half teaspoon of peppermint extract creates refreshing peppermint chocolate marshmallow treats perfect for holidays. Orange extract or a tablespoon of orange zest delivers a sophisticated chocolate-orange combination. For coffee lovers, dissolve a teaspoon of instant espresso powder into the melted chocolate for mocha-flavored treats. A pinch of cinnamon or cayenne pepper adds unexpected warmth and complexity.
- Creative Coating Options Move beyond basic toppings with these fun ideas. Crushed candy canes during winter holidays, crushed Oreos for cookies and cream flavor, toasted coconut flakes for tropical vibes, or crushed pretzels for that sweet-salty combination. You can even drizzle contrasting chocolate over the set coating; white chocolate drizzle over dark chocolate looks stunning and adds another layer of flavor.
- Size Variations While this recipe calls for large marshmallows, you can absolutely use mini marshmallows for bite-sized treats perfect for parties. Thread 3-4 mini marshmallows onto each skewer before dipping. Alternatively, use jumbo marshmallows for an extra impressive dessert that makes a real statement on a dessert table.
- S'mores Style Transformation Create homemade s'mores by sandwiching your chocolate marshmallow between two graham cracker squares before the chocolate sets completely. Press gently so the crackers stick to the chocolate coating. This variation brings summer campfire vibes indoors and makes for an excellent kid-friendly treat.
Equipment Recommendations
Creating perfect chocolate marshmallow treats requires just a few basic tools that most kitchens already have.
- Essential Items A microwave-safe glass bowl works best for melting chocolate since you can monitor the melting process easily. Metal bowls can create hot spots that burn chocolate. Wooden skewers or sturdy toothpicks provide the best grip for dipping; avoid flimsy toothpicks that bend under the marshmallow's weight. A quality baking sheet lined with parchment paper prevents sticking and makes cleanup effortless.
- Optional But Helpful A double boiler offers more controlled, gentle heating if you prefer stovetop melting over microwave method. A candy thermometer takes the guesswork out of chocolate temperature; aim for 88-90°F for perfect dipping consistency. A cooling rack set over your baking sheet allows excess chocolate to drip away more thoroughly, creating a neater final product. Small portion cups or a muffin tin work wonderfully for organizing different topping options.
Storage & Meal Prep Tips
Proper storage keeps your chocolate marshmallow treats fresh and delicious for days after making them.
- Short-Term Storage Store finished treats in an airtight container at room temperature in a cool, dry place for up to 3 days. In warmer climates or during summer months, refrigerate them to prevent the chocolate from softening. Always place parchment paper between layers to prevent sticking. Before serving refrigerated treats, let them sit at room temperature for 5-10 minutes so the chocolate isn't too hard and the marshmallow softens slightly.
- Longer Storage Options These treats freeze surprisingly well for up to 2 months when stored properly. Place them in a freezer-safe container with parchment paper between layers, removing as much air as possible before sealing. Freeze them in single layers first on a baking sheet, then transfer to a container once solid. This prevents them from sticking together. Thaw frozen treats in the refrigerator overnight, then bring to room temperature before serving.
- Make-Ahead Strategy You can prepare these up to a week before an event if stored correctly. For parties, make them 1-2 days ahead so they taste their freshest. If you're making large batches, work in smaller groups of 6-8 marshmallows at a time so the chocolate stays at the right temperature. Reheat your chocolate between batches if needed. Having a helper for topping application makes the process much faster when making dozens of treats.
- Travel Tips When transporting treats to parties or giving them as gifts, keep them cool especially in warm weather. Pack them in a cooler with ice packs if traveling more than 30 minutes. For gift giving, arrange them in clear cellophane bags tied with ribbons, or pack them in decorative tins with parchment paper separating layers.
The Secret That Changed Everything
Here's something I discovered completely by accident that transformed my chocolate marshmallow game forever. One day I was rushing to make treats for a bake sale and accidentally left my marshmallows in the freezer for about 15 minutes before dipping them. The frozen marshmallows created the most incredible result; the chocolate set almost instantly into a perfect thin shell, and the marshmallows stayed completely intact without any melting or squishing. This technique gives you that professional candy-shop look with a crisp chocolate snap and a marshmallow center that stays perfectly fluffy.
Now I always freeze my marshmallows on their skewers for 10-15 minutes before dipping. The frozen center prevents any heat transfer from the melted chocolate, meaning you get flawless coverage every single time. This simple step eliminated all those common problems like saggy marshmallows or chocolate that's too thick. Your chocolate marshmallow treats will look like they came from an expensive chocolatier, but you'll know the simple secret behind them. Trust me, once you try this frozen marshmallow method, you'll never go back to room temperature dipping again.
FAQ
Are chocolate marshmallows a thing?
Yes, chocolate marshmallows are definitely a thing and they're incredibly popular. You can buy chocolate-flavored marshmallows at stores, but making chocolate marshmallow treats at home by dipping regular marshmallows in melted chocolate gives you much better flavor and texture control.
What are chocolate covered marshmallows called?
Chocolate covered marshmallows go by several names depending on their style. They're often called chocolate marshmallow pops when served on sticks, marshmallow treats when coated and decorated, or sometimes included in rocky road candy when combined with nuts. Some people simply call them chocolate marshmallows or dipped marshmallows.
Is marshmallow healthy or unhealthy?
Marshmallows are primarily sugar and gelatin, so they're a treat food rather than a health food. They contain minimal nutritional value but can be enjoyed in moderation as part of a balanced diet. When making chocolate marshmallow treats, remember they're an occasional indulgence rather than an everyday snack.
What chocolate to use for marshmallows?
The best chocolate to use for marshmallows is high-quality semi-sweet or dark chocolate chips with at least 60% cocoa content. These provide good flavor balance and melt smoothly. Avoid cheap chocolate or pure baking chocolate; the former doesn't taste great and the latter is too bitter. Adding coconut oil to any chocolate helps create that perfect coating consistency.
More Chocolate Delights to Try
Now that you've mastered this chocolate marshmallow recipe, you're ready to explore more incredible chocolate creations. These treats are just the beginning of your chocolate journey, and I have two more amazing recipes that will keep that chocolate craving satisfied. Each one brings something unique to your dessert repertoire while building on the skills you've developed here.
The Chocolate Covered Strawberry Brownies Recipe combines rich, fudgy brownies with fresh strawberries and a glossy chocolate coating that rivals any bakery creation. The Chocolate Orange Cheesecake delivers a sophisticated flavor combination with creamy cheesecake infused with bright orange notes and a chocolate cookie crust. Both recipes use similar chocolate-working techniques you've learned with this chocolate marshmallow recipe, making them perfect next steps in your baking adventure. Your family and friends will be amazed at your expanding dessert skills, and you'll love having these go-to recipes for any occasion. Give them a try and let me know which becomes your new favorite; I'm always excited to hear about your chocolate marshmallow successes and discoveries in the kitchen.
With love from my kitchen to yours,
Aubrey James
Related
Looking for other recipes like this? Try these:


Pairing
These are my favorite dishes to serve with this chocolate marshmallow recipe:


Chocolate Covered Marshmallow Treats Recipe
Equipment
- Microwave-safe bowl
- Wooden skewers or toothpicks
- Baking sheet
- Parchment paper or silicone mat
- Small bowls (for toppings)
Ingredients
Chocolate Coating
- 2 cups semi-sweet chocolate chips or dark chocolate for richer flavor
- 2 tablespoon coconut oil for smooth glossy finish
- 1 teaspoon vanilla extract
Marshmallow Base
- 24 large marshmallows fresh for best texture
- wooden skewers or toothpicks for dipping
Optional Toppings
- 0.5 cup crushed graham crackers
- 0.5 cup chopped nuts pecans, almonds, or peanuts
- 0.25 cup colorful sprinkles
- sea salt flakes for a gourmet touch
- 0.25 cup mini chocolate chips
Instructions
- Line a baking sheet with parchment paper. Skewer each marshmallow. Set out bowls with your desired toppings.
- In a microwave-safe bowl, combine chocolate chips and coconut oil. Microwave in 30-second bursts, stirring between, until smooth. Stir in vanilla extract.
- Dip each marshmallow into the chocolate, letting excess drip off. Roll in toppings and place on prepared baking sheet.
- Refrigerate for 15–20 minutes until chocolate is set.
- Remove skewers before serving if desired. Store in an airtight container.


Leave a Reply