
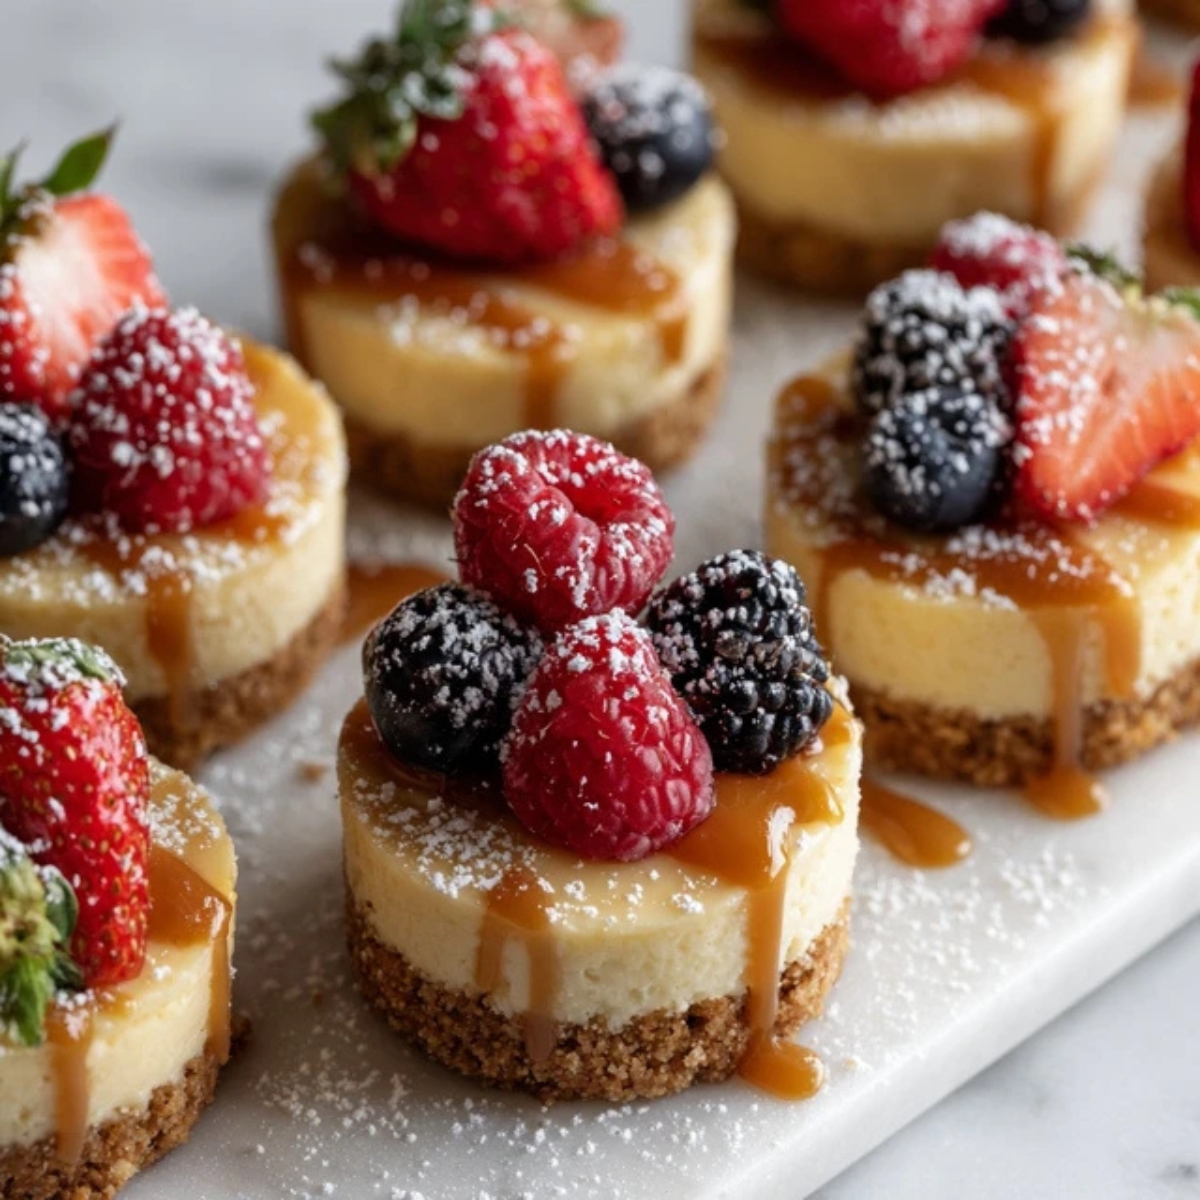
Creamy, dreamy cheesecake in perfect little portions that everyone at your party can enjoy, no matter their dietary needs. These gluten free cheesecake bites are my go-to dessert when I want something that looks fancy but comes together without any stress. I started making these for my niece's birthday party last year, and now they're requested at every family gathering. The best part? Each gluten free cheesecake bite takes just one delicious mouthful, and you won't believe how simple they are to whip up.
Whether you're planning a holiday spread, need a quick dessert for unexpected guests, or just want something sweet to keep in the fridge, these gluten free cheesecake bites check every box. They're portable, perfectly portioned, and honestly taste better than most full-sized cheesecakes I've tried.
Background & Why This Gluten Free Cheesecake Bites Recipe Stands Out
Let me tell you why these gluten free cheesecake bites have become my secret weapon in the kitchen. Traditional cheesecake can be tricky with all that water bath business and worrying about cracks. These mini versions skip the drama while delivering all the rich, tangy flavor you crave. The gluten free cheesecake bites technique means you can make a batch on Sunday and have dessert ready all week long.
What really makes these special is their versatility. I've served gluten free cheesecake bites at fancy dinner parties and casual movie nights, and they always disappear first. The individual portions mean no messy cutting, no fighting over slice sizes, and everyone gets their own perfect little treat. Plus, using quality gluten free graham crackers for the base means your celiac friends can finally join the cheesecake party without any worries.
Jump to:
Ingredients
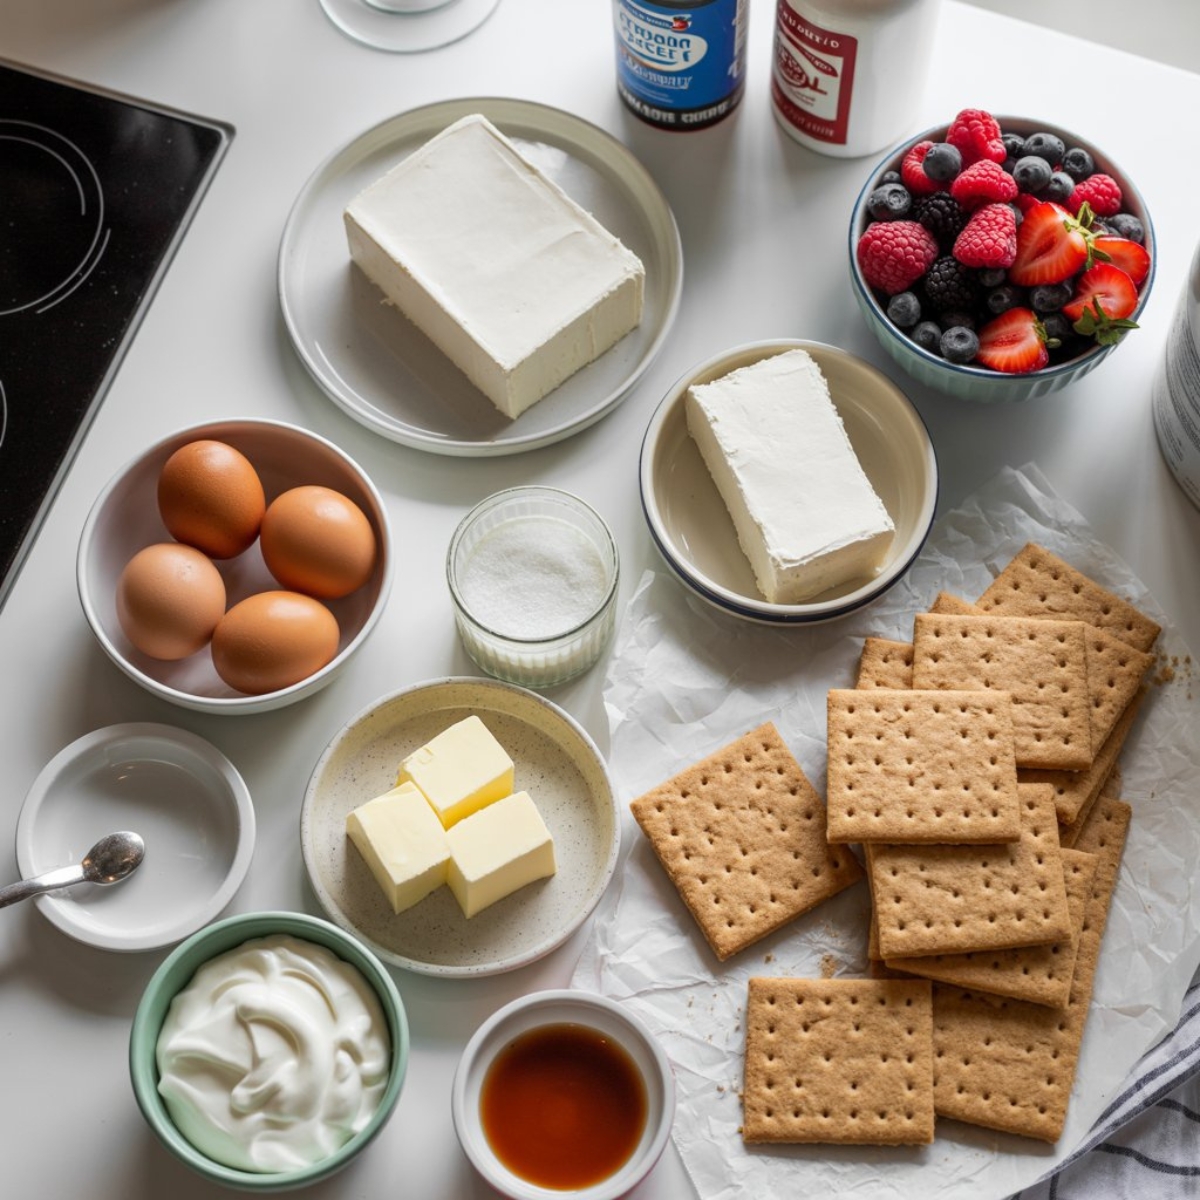
For the Crust:
- Gluten free graham crackers, finely crushed
- Granulated sugar
- Melted butter
- Pinch of salt
For the Filling:
- Cream cheese, softened to room temperature
- Granulated sugar
- Eggs
- Pure vanilla extract
- Sour cream
- All-purpose gluten free flour blend
Optional Toppings:
- Fresh berries (strawberries, blueberries, raspberries)
- Chocolate ganache
- Caramel sauce
- Whipped cream
- Lemon curd
See recipe card for quantities.
Instructions
Step 1: Prep Your Pan and Make the Crust
- Preheat your oven to 325°F and line a 24-cup mini muffin tin with paper liners.
- Crush your gluten free graham crackers until they're fine crumbs; a food processor works great here.
- Mix the crumbs with sugar, melted butter, and salt until the mixture looks like wet sand.
- Press about 1 tablespoon of crust mixture into the bottom of each liner, packing it down firmly with your fingers or the back of a spoon.
- Pop the pan in the oven for 5 minutes to set the crusts, then let them cool while you make the filling.
Step 2: Create the Creamy Filling
- Beat the softened cream cheese with an electric mixer on medium speed until it's completely smooth with no lumps.
- Add the sugar and beat for another 2 minutes until light and fluffy.
- Mix in the eggs one at a time, making sure each one is fully blended before adding the next.
- Stir in the vanilla extract, sour cream, and gluten free flour until just combined.
- Give the bowl a good scrape down to make sure everything is evenly mixed.
Step 3: Fill and Bake
- Pour or spoon the cheesecake filling over each crust, filling them about three-quarters full.
- Gently tap the pan on the counter a few times to release any air bubbles.
- Bake for 15-18 minutes; the centers should still jiggle slightly when you shake the pan.
- Turn off the oven and crack the door open, letting the gluten free cheesecake bites cool inside for 10 minutes.
- Remove from the oven and let them cool completely at room temperature.
Step 4: Chill and Serve
- Once cooled, cover the pan with plastic wrap and refrigerate for at least 4 hours or overnight.
- When ready to serve, remove the bites from the muffin tin and peel away the paper liners.
- Add your favorite toppings right before serving to keep everything fresh.
- Arrange them on a pretty platter and watch them disappear.
Expert Cooking Tips
- Temperature Matters for Perfect Texture Room temperature ingredients are the secret to silky smooth cheesecake filling. Take your cream cheese and eggs out of the fridge about an hour before you start baking. Cold cream cheese creates lumps no matter how long you beat it, and those lumps won't magically disappear in the oven.
- Don't Overmix After Adding Eggs Once those eggs go into the batter, mix just until you can't see any yellow streaks. Overmixing adds too much air, which can cause cracks and a weird texture. Think of it like you're gently folding the eggs in rather than beating them to death.
- The Wobble Test Is Your Friend Your mini gluten free cheesecake bites are done when the edges look set but the centers still wobble like Jell-O when you gently shake the pan. They'll firm up as they cool, so don't wait until they're completely solid or you'll end up with dry, overcooked bites.
- Line Your Pan Properly Use paper liners instead of trying to grease the muffin cups. Trust me on this one. The liners make removal so much easier, and your gluten free cheesecake bites will look professional instead of broken and sad.
- Chill Time Is Non-Negotiable I know waiting is hard, but these need at least 4 hours in the fridge to set properly. Overnight is even better. The flavor develops, the texture gets perfectly creamy, and they'll hold together when you bite into them.
- Water Bath Alternative Place a shallow pan of water on the rack below your muffin tin while baking. This creates steam in the oven, which helps prevent cracks and keeps your bites moist without the hassle of an actual water bath.
Recipe Variations & Substitutions
Transform Into No Bake Gluten Free Cheesecake Bites Skip the oven entirely by using the same crust pressed into the liners, then make a no-bake filling with cream cheese, powdered sugar, and whipped cream folded together. Chill for 2 hours and they're ready. Perfect for hot summer days when you don't want to heat up the kitchen.
Gluten Free Oreo Cheesecake Bites Swap the graham cracker crust for crushed gluten free Oreos (yes, they make them now!). Mix the cookie crumbs with just 3 tablespoons of melted butter since the cookies already have filling. Throw some chopped Oreos into the batter too for cookies and cream magic.
Flavor Variations to Try:
- Gluten Free Strawberry Cheesecake Bites: Swirl 2 tablespoons of strawberry jam into the filling before baking and top with fresh strawberries
- Gluten Free Chocolate Cheesecake Bites: Add ¼ cup cocoa powder and 2 oz melted dark chocolate to the filling
- Gluten Free Lemon Cheesecake Bites: Mix in 2 tablespoons fresh lemon juice and 1 tablespoon lemon zest for a bright, tangy twist
- Gluten Free Pumpkin Cheesecake Bites: Blend ½ cup pumpkin puree and 1 teaspoon pumpkin pie spice into the filling; perfect for fall gatherings
- Gluten Free Peanut Butter Cheesecake Bites: Add ½ cup creamy peanut butter to the filling and drizzle with chocolate
Dairy-Free Version Use dairy-free cream cheese and replace butter with coconut oil in the crust. The texture will be slightly different but still delicious. Make sure your gluten free graham crackers are also dairy-free if needed.
Sugar Alternatives Replace granulated sugar with the same amount of coconut sugar or a 1:1 sugar substitute. Keep in mind that coconut sugar will give your gluten free cheesecake bites a slight caramel flavor and darker color.
Equipment Recommendations
You don't need fancy tools to make perfect gluten free cheesecake bites, but a few key items make the job easier. A standard 24-cup mini muffin tin is essential; make sure it's a good quality one that won't warp in the oven. I prefer the non-stick variety from Nordic Ware. Paper liners are a must-have for easy removal and cleanup.
An electric hand mixer or stand mixer saves your arm from getting tired while beating the cream cheese. A food processor makes crushing those gluten free graham crackers incredibly quick, though a rolling pin and plastic bag work just fine too. A rubber spatula helps you scrape down the bowl and get every bit of that precious filling into your muffin cups.
Storage & Meal Prep Tips
- Refrigerator Storage Keep your gluten free cheesecake bites in an airtight container in the fridge for up to 5 days. Layer them between sheets of parchment paper if you're stacking them so they don't stick together. I like to store them without toppings and add fresh fruit or sauces right before serving to keep everything looking fresh.
- Freezer Instructions These freeze beautifully for up to 3 months. Flash freeze them on a baking sheet for 2 hours, then transfer to a freezer bag with all the air pressed out. Thaw in the refrigerator overnight before serving. The texture stays perfectly creamy, making them ideal for make-ahead party planning.
- Make-Ahead Strategy Bake your baked gluten free cheesecake bites up to 3 days before your event. Store them plain in the fridge, then add toppings the day of your party. This spreads out the work and actually improves the flavor as the ingredients have time to meld together.
- Transporting Tips If you're bringing these to a potluck or party, keep them in the muffin tin covered with plastic wrap. They'll stay in place and won't get damaged during transport. Bring your toppings in separate containers and assemble at the destination.
The Secret That Changes Everything
Here's something I learned from my aunt who worked in a fancy bakery for years: the difference between good gluten free cheesecake bites and absolutely incredible ones comes down to one simple trick. After you turn off the oven, leave the bites inside with the door cracked for 10 minutes. This gradual temperature change prevents those annoying cracks and creates the smoothest, creamiest texture you've ever experienced in a mini cheesecake.
The second secret? Don't skimp on the vanilla extract. I know it seems like a small detail, but using pure vanilla instead of imitation makes a noticeable difference in flavor. Your gluten free cheesecake bites will taste richer and more complex with just that one upgrade. Sometimes the smallest changes create the biggest impact in baking.
FAQ
Are cheesecake bites gluten-free?
Regular cheesecake bites are not automatically gluten-free because they typically use standard graham crackers for the crust. However, you can easily make gluten free cheesecake bites by substituting gluten free graham crackers or using an almond flour crust. The filling itself is naturally gluten-free as long as you add a small amount of gluten free flour blend to stabilize it.
Are junior mini cheesecakes from Costco gluten-free?
No, the Junior's mini cheesecakes sold at Costco contain wheat flour in their graham cracker crust and are not considered gluten-free. If you're following a gluten-free diet, you'll need to make your own gluten free cheesecake bites at home or look for certified gluten-free brands. Always check the packaging labels as ingredients can change.
What can I use for a gluten free cheesecake base?
You have several great options for a gluten free cheesecake crust! Crushed gluten free graham crackers mixed with butter are the closest to traditional, but you can also use almond flour mixed with melted butter and sugar, crushed gluten free Oreos, or even coconut flour for a lighter base. Each creates a slightly different flavor profile, so pick what sounds best to you.
Why is cheesecake not gluten-free?
Traditional cheesecake isn't gluten-free because the crust is made with regular graham crackers, which contain wheat flour. Some recipes also add a tablespoon of all-purpose flour to the filling to prevent cracking. The good news is that making gluten free cheesecake bites is super simple; just swap in gluten free graham crackers and use a gluten free flour blend in the filling.
Time to Treat Yourself
You've just discovered the easiest way to bring bakery-quality desserts into your home. These gluten free cheesecake bites prove that accommodating dietary restrictions doesn't mean sacrificing flavor or fun. Whether you're making them for someone special with celiac disease or just want perfectly portioned treats for yourself, this recipe delivers every single time.
The beauty of these mini gluten free cheesecake bites is how they fit into any occasion. Morning coffee? Grab one from the fridge. Hosting friends? Arrange them on a platter with different toppings and let everyone customize. Need a thoughtful homemade gift? Pack them in a pretty box. Once you master this basic recipe, you'll find yourself making batch after batch with different flavors. Don't forget to check out our Gluten-Free Pancake Bites Recipe for another bite-sized breakfast treat, and try our Gluten Free Zucchini Bread Recipe when you're ready to expand your gluten-free baking skills.
With love from my kitchen to yours,
Taylor Monroe
Related
Looking for other recipes like this? Try these:


Pairing
These are my favorite dishes to serve with this gluten free cheesecake bites recipe:


Gluten-Free Cheesecake Bites Recipe
Equipment
- 24-cup mini muffin tin
- paper liners
- Mixing bowls
- Electric hand mixer or stand mixer
- Rubber spatula
- Food Processor optional
Ingredients
Crust
- 1.5 cups gluten free graham cracker crumbs finely crushed
- 0.25 cup granulated sugar
- 6 tablespoon melted butter unsalted
- 1 pinch salt optional
Filling
- 16 oz cream cheese softened to room temperature
- 0.5 cup granulated sugar
- 2 large eggs
- 1 teaspoon pure vanilla extract
- 2 tablespoon sour cream
- 1 tablespoon gluten free all-purpose flour blend
Optional Toppings
- fresh berries strawberries, blueberries, or raspberries
- chocolate ganache optional drizzle
- caramel sauce optional drizzle
- whipped cream optional
- lemon curd optional
Instructions
- Preheat oven to 325°F and line mini muffin tin with paper liners.
- Combine gluten free graham cracker crumbs, sugar, butter, and salt until mixture resembles wet sand.
- Spoon 1 tablespoon of crust into each liner and press firmly. Bake 5 minutes.
- Beat cream cheese until smooth, then add sugar, eggs, vanilla, sour cream, and gluten free flour.
- Spoon filling into each liner, about three-quarters full. Tap to remove air bubbles.
- Bake 15–18 minutes until centers jiggle slightly. Cool with oven door cracked for 10 minutes.
- Cool completely, then refrigerate at least 4 hours or overnight.
- Top with fresh fruit, ganache, or whipped cream before serving.


Leave a Reply