
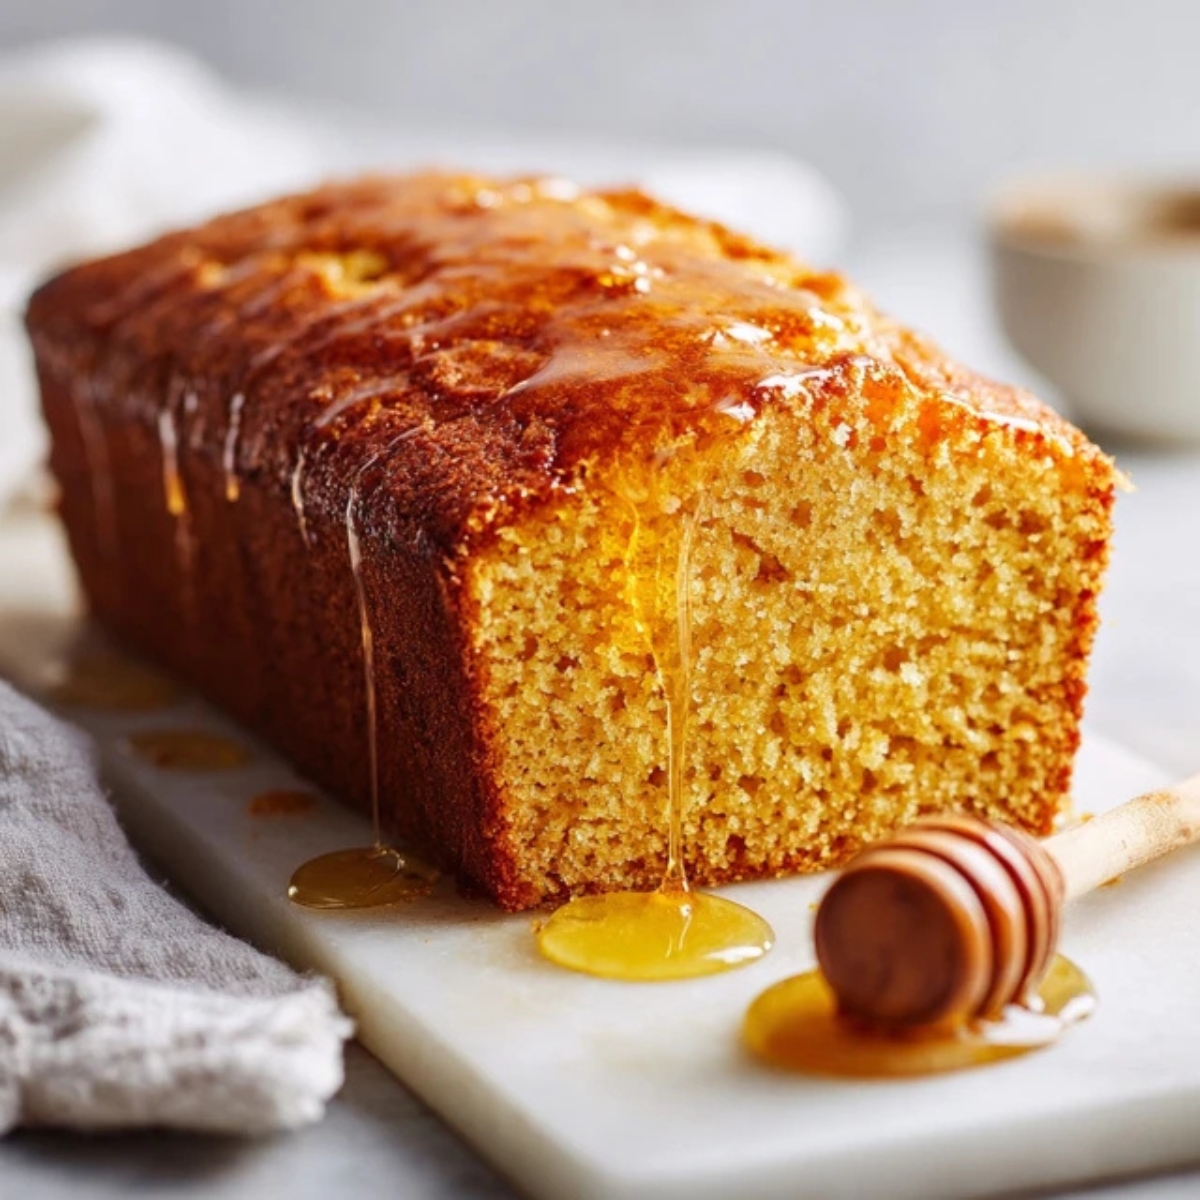
There's something magical about slicing into a perfectly golden honey cake, watching that tender crumb practically melt on your fork. I've been baking this honey cake recipe for years, and every single time, it fills my kitchen with the most wonderful warm, sweet aroma that has my family racing to the table. This isn't just any ordinary cake; it's the kind of dessert that brings people together, whether you're celebrating a holiday or simply treating yourself to something special on a quiet afternoon. The beauty of honey cake lies in its simplicity and that deep, caramelized sweetness that only real honey can provide.
What makes this honey cake recipe truly special is how incredibly moist and flavorful it turns out, thanks to the natural moisture from honey combined with just the right balance of spices and butter. You don't need fancy equipment or complicated techniques; just good ingredients, a little patience, and you'll have a stunning honey cake that tastes like it came from a European bakery. Trust me, once you master this recipe, it'll become your go-to for every occasion.
Background & Why This Recipe Stands Out
The tradition of honey cake stretches back centuries across Eastern Europe, the Mediterranean, and Jewish communities worldwide, where it's been a beloved part of celebrations and family gatherings. What started as a simple way to use honey as a natural sweetener has evolved into countless regional variations, from the multi-layered Russian Medovik to the dense, spiced loaves served during Rosh Hashanah. This honey cake recipe captures the best of these traditions while keeping things accessible for home bakers who want that authentic taste without spending hours in the kitchen.
What really sets this honey cake apart is the way it balances moisture with a light, tender texture that so many other recipes miss. I've tested dozens of variations over the years, and this version uses a combination of oil and butter to keep the crumb incredibly soft while the honey provides natural moisture that keeps the cake fresh for days. The subtle warmth from cinnamon and a hint of lemon zest brightens up the deep honey flavor, creating layers of taste that make each bite interesting. Whether you're making honey cake for a special holiday or just because you're craving something comforting and sweet, this recipe delivers that perfect golden color and irresistible flavor every single time.
Jump to:
Ingredients
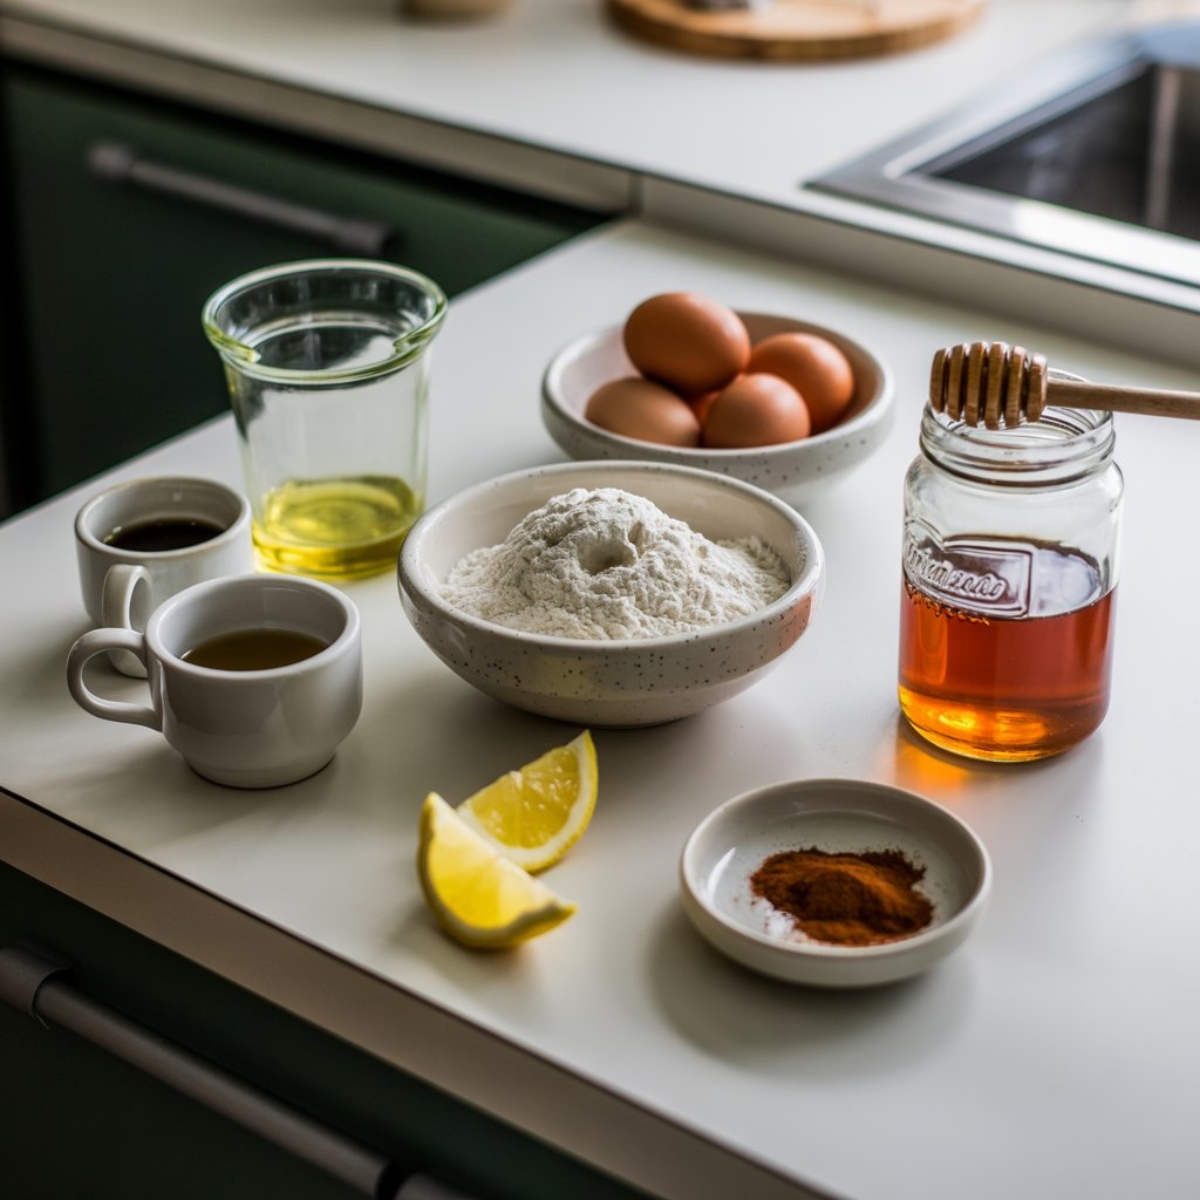
For the Cake:
- All-purpose flour
- Baking powder
- 1 teaspoon baking soda
- Salt
- Ground cinnamon
- Ground ginger
- Honey (preferably a mild variety like clover or wildflower)
- Granulated sugar
- Vegetable oil
- Strong brewed coffee or tea, cooled
- Eggs, room temperature
- Vanilla extract
- Zest of 1 lemon
For the Honey Glaze (Optional):
- Honey
- Unsalted butter
- Water
See recipe card for quantities.
Instructions
Step 1: Prepare Your Ingredients and Pan
- Preheat your oven to 350°F (175°C) and position the rack in the center.
- Grease a 9x13-inch baking pan or two 9-inch round cake pans with butter or cooking spray, then dust lightly with flour.
- In a large bowl, whisk together the flour, baking powder, baking soda, salt, cinnamon, and ginger until well combined.
- Set your dry ingredients aside while you prepare the wet mixture.
Step 2: Mix the Wet Ingredients
- In a separate large mixing bowl, combine the honey, sugar, and vegetable oil, whisking vigorously until the mixture becomes smooth and slightly lighter in color.
- Add the eggs one at a time, beating well after each addition to make sure everything is fully incorporated.
- Pour in the cooled coffee or tea, vanilla extract, and lemon zest, stirring until the mixture is uniform.
- The batter should look glossy and smell absolutely incredible at this point.
Step 3: Combine and Bake
- Gradually add the dry ingredients to the wet mixture, folding gently with a spatula or wooden spoon until just combined; don't overmix or your honey cake will turn out dense.
- Pour the batter into your prepared pan(s), smoothing the top with a spatula to create an even surface.
- Bake for 45-55 minutes for a 9x13-inch pan, or 35-40 minutes for round pans, until a toothpick inserted in the center comes out with just a few moist crumbs.
- Remove from the oven and let the cake cool in the pan for 15 minutes before transferring to a wire rack.
Step 4: Add the Finishing Touch
- While your honey cake is still slightly warm, prepare the honey glaze by combining honey, butter, and water in a small saucepan over low heat.
- Stir the glaze constantly until the butter melts and everything blends into a smooth, pourable consistency.
- Brush the warm glaze over the top of your cake, allowing it to soak in and create that beautiful glossy finish.
- Let the cake cool completely before slicing to allow the flavors to develop and the texture to set perfectly.
Expert Cooking Tips
Getting your honey cake to turn out perfectly every single time comes down to a few key techniques that make all the difference.
- Temperature Matters: Always bring your eggs to room temperature before mixing; cold eggs don't incorporate as smoothly and can create a denser texture. I usually take mine out of the fridge about 30 minutes before I start baking.
- Don't Overmix: Once you add the flour mixture to the wet ingredients, mix only until you can't see any more dry streaks. Overmixing develops too much gluten and results in a tough, heavy cake instead of that tender crumb we're after.
- Choose Your Honey Wisely: Different honeys have dramatically different flavor profiles. Mild varieties like clover or wildflower work beautifully for this recipe because they add sweetness without overpowering the other flavors. If you want a more robust taste, try buckwheat honey, but use it sparingly.
- The Coffee Secret: That small amount of coffee in the batter doesn't make your cake taste like coffee; it actually deepens the honey flavor and adds a subtle complexity that makes people wonder what your secret ingredient is.
- Test for Doneness Properly: Start checking your cake about 5 minutes before the minimum baking time. The top should spring back lightly when touched, and a toothpick should come out with a few moist crumbs but no wet batter.
- Cool Before Slicing: I know it's tempting to cut into that gorgeous cake right away, but patience pays off. Cooling allows the structure to set and makes slicing cleaner and easier.
Recipe Variations & Substitutions
One of the best things about this honey cake recipe is how adaptable it is to different tastes and dietary needs.
- Make It Gluten-Free: Swap the all-purpose flour with a 1:1 gluten-free baking flour blend that contains xanthan gum. The texture will be slightly denser but still delicious.
- Reduce the Sugar: Since honey provides plenty of sweetness on its own, you can reduce the granulated sugar to ¾ cup or even ½ cup if you prefer a less sweet cake. Just keep in mind this might slightly affect the texture.
- Add Nuts: Fold in 1 cup of chopped walnuts, almonds, or pecans after mixing the batter for added crunch and richness. Toasted nuts work especially well as they bring out deeper flavors.
- Spice Variations: While cinnamon and ginger are traditional, you can experiment with cardamom, nutmeg, or even a pinch of cloves for different flavor profiles that complement the honey beautifully.
- Dairy-Free Version: Replace the butter in the glaze with coconut oil or additional vegetable oil. The cake batter itself is already dairy-free if you skip the optional butter glaze.
- Layer Cake Style: If you're feeling fancy, bake the batter in three 8-inch round pans for 25-30 minutes each, then stack them with honey cream cheese frosting between the layers for an impressive presentation.
- Add Fresh Fruit: Fold in 1 cup of diced apples or pears to the batter for extra moisture and a lovely texture contrast. Berries work too, though they might bleed slightly into the batter.
Equipment Recommendations
You don't need a lot of fancy tools to make an amazing honey cake, but a few key pieces of equipment will make your baking experience smoother.
- Mixing Bowls: A set of large mixing bowls is absolutely necessary; I prefer glass or stainless steel because they don't retain odors and are easy to clean.
- Whisk and Spatula: A good balloon whisk helps incorporate air into your wet ingredients, while a flexible silicone spatula makes folding in the dry ingredients gentle and efficient.
- Measuring Tools: Accurate measurements are crucial in baking, so invest in a set of dry measuring cups, liquid measuring cups, and measuring spoons. For the honey, I spray my measuring cup with a little cooking spray first so the honey slides right out.
- Baking Pans: A quality 9x13-inch metal baking pan distributes heat evenly and gives you perfect results. If you're making layer cakes, two or three 9-inch round pans work beautifully.
- Cooling Rack: A wire cooling rack allows air to circulate around your honey cake as it cools, preventing soggy bottoms and helping it cool faster.
- Pastry Brush: If you're adding the honey glaze, a silicone or natural bristle pastry brush helps you apply it evenly without tearing the delicate cake surface.
Storage & Meal Prep Tips
The wonderful thing about honey cake is that it actually gets better over time as the flavors meld and the honey keeps everything incredibly moist.
- Room Temperature Storage: Store your cooled honey cake in an airtight container at room temperature for up to 5 days. The natural antimicrobial properties of honey help keep it fresh longer than most cakes.
- Refrigeration: If your kitchen is particularly warm or humid, you can refrigerate the cake in an airtight container for up to 1 week. Just let it come to room temperature before serving for the best texture and flavor.
- Freezing Instructions: This honey cake freezes beautifully for up to 3 months. Wrap individual slices or the whole cake tightly in plastic wrap, then in aluminum foil, and store in a freezer-safe bag. Thaw overnight in the refrigerator or at room temperature for a few hours.
- Make-Ahead Tips: You can bake this honey cake up to 2 days in advance; it actually tastes even better on the second day as the honey flavor becomes more pronounced. Just store it covered at room temperature until you're ready to serve.
- Portion Control: I like to slice the cake and wrap individual portions in plastic wrap for easy grab-and-go snacks throughout the week. They're perfect with a cup of tea or coffee.
Grandma's Secret That Changed Everything
Here's something I learned from my grandmother that completely transformed how I make honey cake: the secret is in warming the honey slightly before adding it to your batter. When you gently warm honey (just 10-15 seconds in the microwave or in a bowl set over warm water), it becomes thinner and mixes more easily with the other ingredients, creating a smoother, more evenly distributed sweetness throughout the cake. Cold honey can create little pockets in the batter that don't mix properly, leading to inconsistent texture and flavor.
The other game-changing tip is letting your honey cake rest overnight before serving. I know it sounds crazy when you have a beautiful, fresh-baked cake sitting on your counter, but the flavors need time to develop and meld together. The honey continues to work its magic, making the entire cake more moist and intensifying that signature caramelized sweetness. Every baker in my family swears by this trick, and once you try it, you'll understand why it's worth the wait for the most incredible honey cake you've ever tasted.
FAQ
What is honey cake made of?
Honey cake is made primarily of flour, honey, eggs, oil or butter, sugar, and warm spices like cinnamon and ginger. The honey serves as both a sweetener and a natural moisturizer, which gives this cake its characteristic tender, moist texture that stays fresh for days.
Is honey cake Russian or Ukrainian?
Honey cake has roots in both Russian and Ukrainian culinary traditions, with each culture having its own variation. The Russian version, called Medovik, typically features multiple thin layers with cream between them, while Ukrainian honey cake tends to be a denser, spiced loaf similar to what's baked for Jewish holidays.
Is honey cake Russian or Armenian?
While honey cake is popular in both Russian and Armenian cuisines, it's most strongly associated with Russian baking traditions, particularly the famous Medovik. However, Armenian bakers also have their own honey-sweetened cakes that incorporate local ingredients and spices, so both cultures can claim this delicious dessert as part of their heritage.
What do honey cakes remind Jews of?
Honey cakes hold deep symbolic meaning in Jewish tradition, particularly during Rosh Hashanah, the Jewish New Year. The sweetness of honey cake represents the hope for a sweet year ahead, and eating it during the holiday is a way of expressing wishes for health, happiness, and prosperity in the coming year.
A Sweet Ending Worth Savoring
Making this honey cake recipe has become one of my favorite baking traditions, and I hope it becomes one of yours too. There's something deeply satisfying about creating a dessert that's both simple and spectacular, filling your home with warmth and bringing smiles to everyone who tastes it. The golden color, the tender crumb, and that unmistakable honey sweetness make this cake perfect for any occasion, from holiday celebrations to casual weekend treats.
Once you've mastered this honey cake, you'll find yourself reaching for this recipe again and again. If you're looking for more delicious desserts to add to your baking repertoire, check out my Buster Bar Ice Cream Cake Recipe for a cool, creamy treat that's perfect for summer gatherings, or try my Blueberry Breakfast Cake Recipe for a fruity morning option that pairs beautifully with coffee. Both recipes share that same homemade goodness and are just as easy to make as this honey cake, giving you plenty of options to satisfy any sweet craving that comes your way.
With love from my kitchen to yours,
Aubrey James
Related
Looking for other recipes like this? Try these:


Pairing
These are my favorite dishes to serve with this honey cake recipe:


Honey Cake Recipe
Equipment
- Mixing bowls
- Whisk
- Spatula
- Measuring cups and spoons
- 9x13 inch baking pan
- Wire cooling rack
- Pastry brush
Ingredients
For the Cake
- 3 cups all-purpose flour sifted
- 2 teaspoons baking powder
- 1 teaspoon baking soda
- ½ teaspoon salt
- 2 teaspoons ground cinnamon
- ¼ teaspoon ground ginger
- 1 cup honey clover or wildflower recommended
- 1 cup granulated sugar
- ¾ cup vegetable oil
- ½ cup strong brewed coffee or tea cooled
- 4 large eggs room temperature
- 1 teaspoon vanilla extract
- 1 lemon zest from 1 lemon
For the Honey Glaze (Optional)
- ¼ cup honey
- 2 tablespoons unsalted butter melted
- 1 tablespoon water
Instructions
- Preheat oven to 350°F (175°C) and grease baking pan.
- Combine dry ingredients in a large bowl.
- Whisk honey, sugar, and oil until smooth; add eggs, coffee, vanilla, and lemon zest.
- Fold in dry ingredients gently until just mixed.
- Pour batter into pan and bake 45–55 minutes until golden and set.
- Warm honey, butter, and water; brush over cake while warm.
- Let cake rest completely before slicing for best flavor.


Leave a Reply