
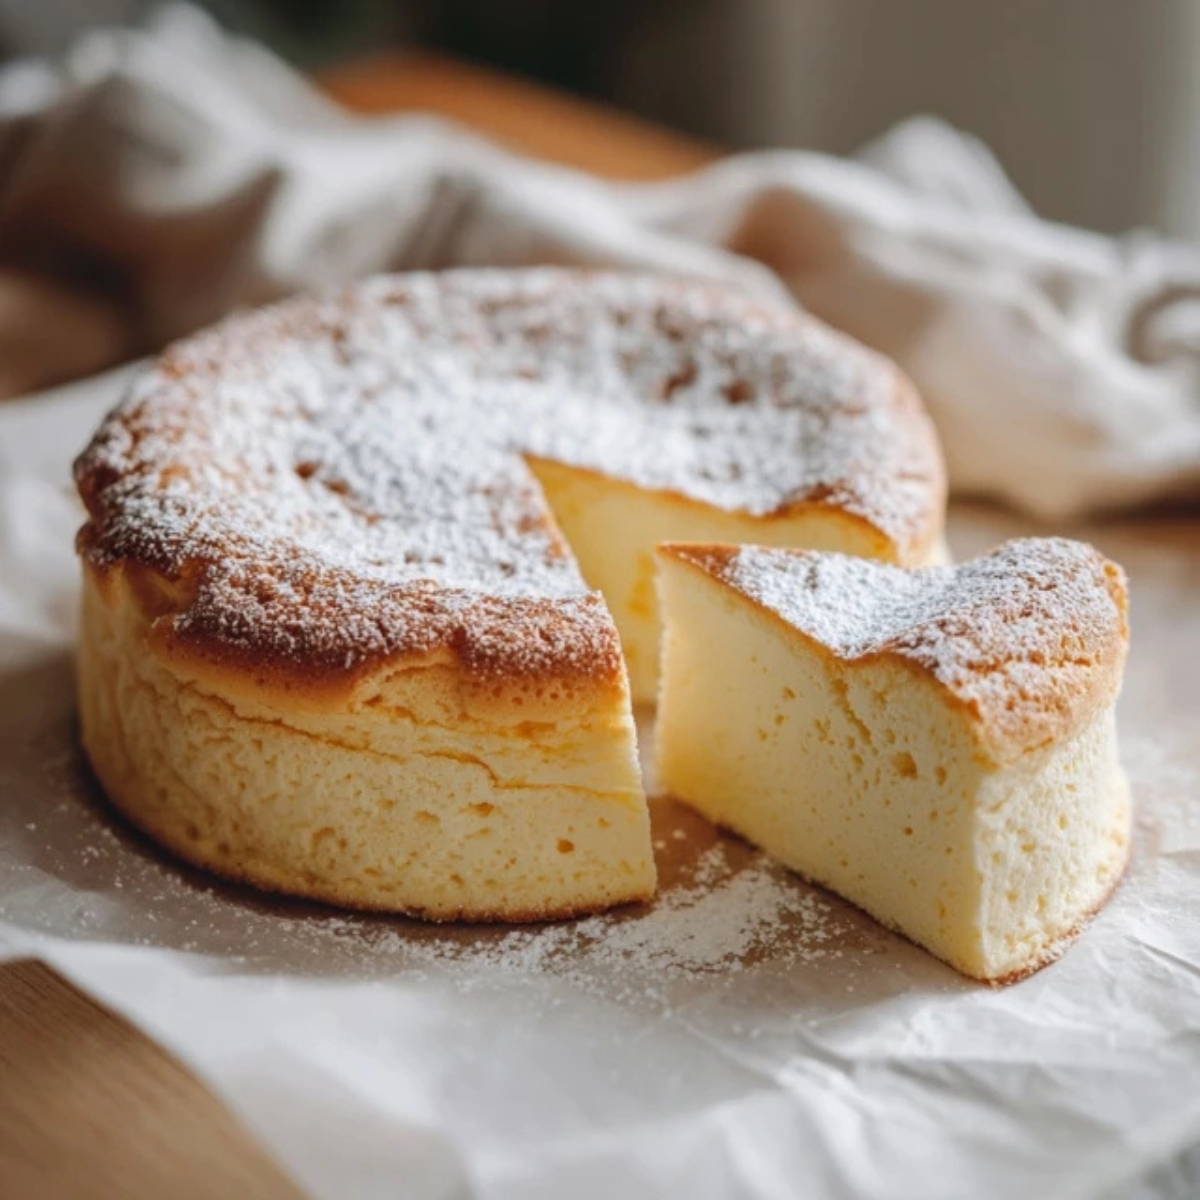
You cut into a cloud-like cake that jiggles with every gentle shake, releasing the most heavenly aroma of vanilla and cream cheese. That's the magic of Japanese cheesecake, and I'm thrilled to share this foolproof recipe with you today. Unlike dense American-style versions, this Japanese cheesecake practically melts on your tongue, creating an experience that's part soufflé, part traditional cheesecake, and completely unforgettable.
I've spent countless hours perfecting this Japanese cheesecake in my kitchen, learning from both triumphs and (let's be honest) a few sunken disasters along the way. The result? A recipe that delivers that signature wobble and cotton-soft texture every single time. Whether you're celebrating a special occasion or simply treating yourself to something wonderful, this Japanese cheesecake will become your go-to impressive dessert that's surprisingly simple to master.
Background & Why This Recipe Stands Out
The Japanese cheesecake originated in the 1960s when a Japanese chef tasted German käsekuchen and decided to create a lighter, less sweet version for Japanese palates. This genius adaptation resulted in what we now call cotton cheesecake or soufflé cheesecake; a dessert that conquered hearts across Asia and is now winning fans worldwide. What makes this particular Japanese cheesecake so beloved is its delicate balance between rich cream cheese flavor and an almost ethereal lightness that never feels heavy.
This recipe stands apart because it focuses on technique without overcomplicating things. While some Japanese cheesecake recipes require specialty ingredients or complicated methods, mine uses simple ingredients you probably have right now and breaks down each critical step so you understand the "why" behind every action. The water bath method keeps moisture locked in, the careful folding preserves those precious air bubbles from your meringue, and the gradual cooling prevents that dreaded collapse. Trust me, once you nail this Japanese cheesecake, you'll find yourself baking it for every gathering because it's that good and that reliable.
Jump to:
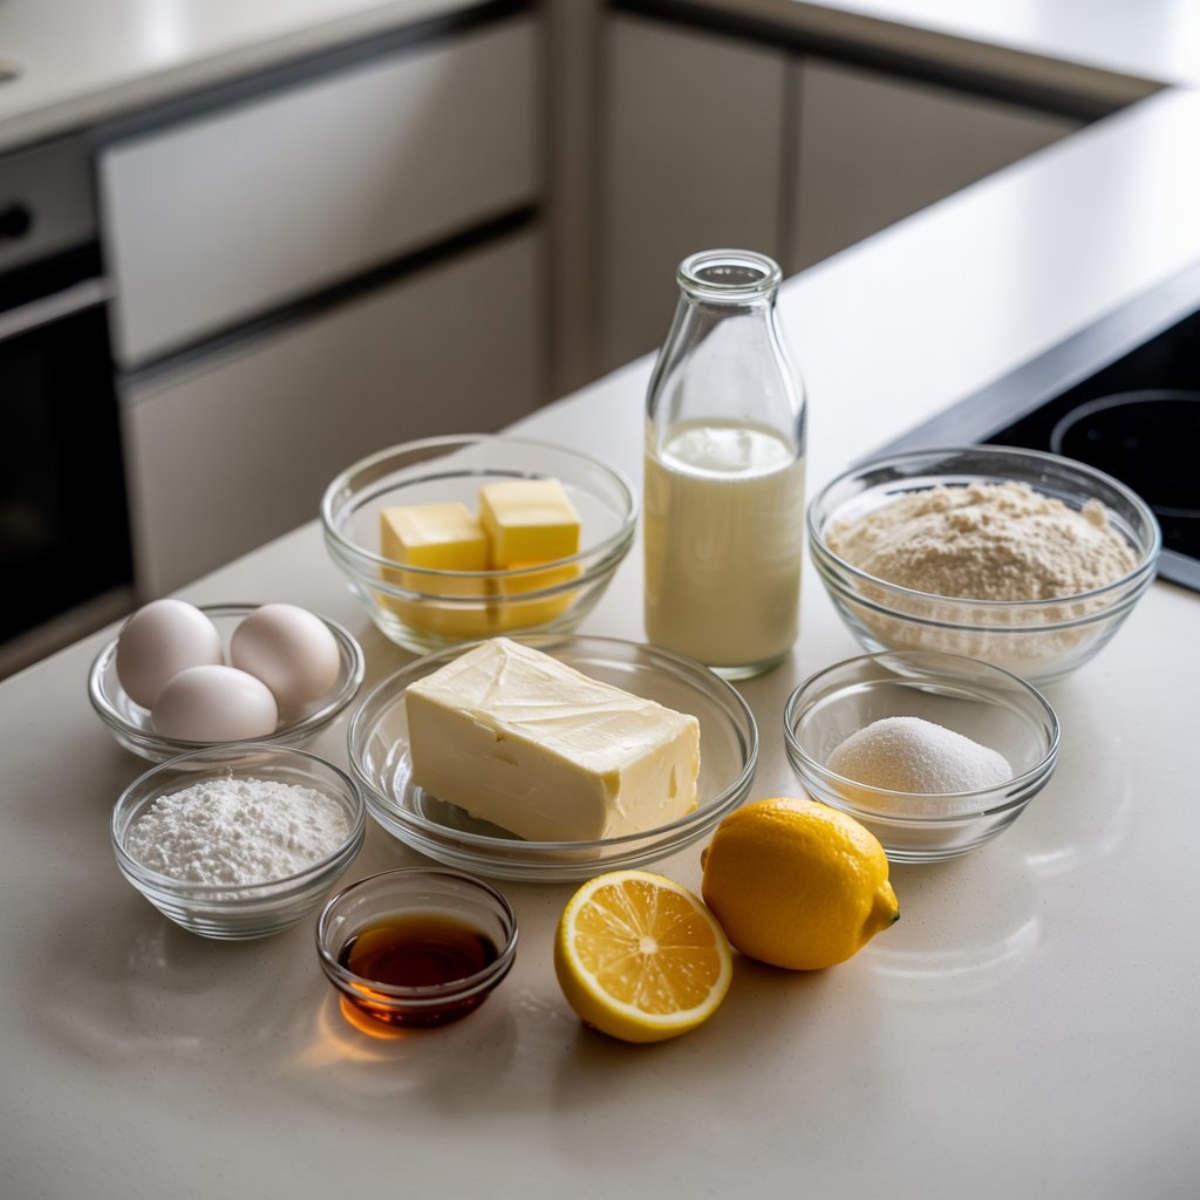
Ingredients
For the Cake:
- Cream cheese, softened to room temperature
- Eggs, separated (whites and yolks divided)
- Whole milk, warmed slightly
- Unsalted butter
- Cake flour, sifted twice
- Cornstarch
- Salt
- Granulated sugar, divided
- Lemon juice
- Vanilla extract
- Cream of tartar (or substitute ½ teaspoon lemon juice)
For the Pan:
- Butter for greasing
- Parchment paper
Substitution Notes: Can't find cake flour? Make your own by measuring ½ cup all-purpose flour, removing 1 tablespoon, and replacing it with 1 tablespoon cornstarch. For a dairy-free version, swap butter with coconut oil and use cashew cream instead of milk. The cream cheese is non-negotiable though; it's what gives our Japanese cheesecake its signature tang and creaminess.
See recipe card for quantities.
Instructions
Step 1: Prep Your Pan and Oven Setup
- Preheat your oven to 320°F (160°C) and position the rack in the lower third of the oven.
- Line an 8-inch round cake pan with parchment paper on the bottom and sides, ensuring the paper extends about 2 inches above the rim.
- Wrap the outside of your pan completely with two layers of aluminum foil to prevent water from seeping in during the water bath.
- Place a larger roasting pan on the oven rack and fill it with about 1 inch of hot water; this creates your water bath.
- Set your prepared cake pan aside while you make the batter.
Step 2: Create the Cream Cheese Base
- Melt the butter and cream cheese together in a double boiler or microwave in 30-second intervals, stirring until completely smooth.
- Remove from heat and whisk in the warm milk until the mixture is silky and lump-free.
- Add egg yolks one at a time, whisking vigorously after each addition until fully incorporated.
- Stir in vanilla extract and lemon juice, mixing well.
- Sift the cake flour, cornstarch, and salt directly into the cream cheese mixture, folding gently with a spatula until just combined with no visible flour streaks.
- Set this base aside at room temperature while you work on the meringue.
Step 3: Whip Up Perfect Meringue
- In a spotlessly clean metal or glass bowl, beat egg whites with an electric mixer on medium speed until foamy (about 1 minute).
- Add cream of tartar and continue beating until soft peaks form.
- Gradually add sugar one tablespoon at a time while beating, allowing each addition to incorporate fully.
- Increase speed to high and beat until stiff, glossy peaks form; the meringue should stand straight up when you lift the beaters.
- Test by turning the bowl upside down; if the meringue doesn't move, you've nailed it.
Step 4: Combine, Bake, and Cool
- Scoop about one-third of the meringue into your cream cheese base and fold gently using a rubber spatula in a sweeping motion from bottom to top.
- Add another third and repeat the folding process, being careful not to deflate the mixture.
- Pour this lightened batter back into the remaining meringue and fold until just combined; some white streaks are fine.
- Pour the batter into your prepared pan, tap it gently on the counter twice to release air bubbles, and smooth the top.
- Place the pan in the water bath and bake for 70-75 minutes until the top is golden brown and the cake jiggles slightly when gently shaken.
- Turn off the oven, crack the door open about 4 inches, and let the Japanese cheesecake cool inside for 30 minutes.
- Remove from oven and water bath, then cool completely on a wire rack for another hour before refrigerating for at least 4 hours or overnight.
Expert Cooking Tips
Temperature Control is Everything Room temperature ingredients blend more smoothly and create a better texture in your Japanese cheesecake. Take your eggs and cream cheese out of the fridge at least an hour before baking. Cold ingredients can cause the batter to seize up, leading to lumps that won't disappear no matter how much you mix.
The Folding Technique Makes or Breaks Your Cake
- Never stir the meringue into the base; always fold using a gentle sweeping motion
- Work quickly but carefully; the longer you fold, the more air you lose
- Under-folding is better than over-folding; a few white streaks will disappear during baking
- Use a wide rubber spatula for maximum efficiency
- Rotate the bowl as you fold to ensure even incorporation
Water Bath Wisdom The water bath isn't optional; it's what gives your Japanese cheesecake that signature silky texture. The steam creates a moist environment that prevents cracks and promotes even cooking. Make sure your foil wrap is watertight, and add boiling water to the roasting pan just before you put the cake in. If the water level drops below halfway during baking, carefully add more hot water.
Preventing the Dreaded Collapse That gradual cooling period in the oven with the door cracked isn't just a suggestion. Sudden temperature changes cause the cake to deflate dramatically. Let it cool slowly in the turned-off oven, then at room temperature, then in the fridge. Patience here pays off with a beautifully tall Japanese cheesecake.
Meringue Mastery Clean bowls are critical; even a tiny bit of grease or egg yolk will prevent your whites from whipping properly. I always wipe my bowl with a bit of lemon juice or vinegar before starting. Beat to stiff peaks but not beyond; over-beaten meringue becomes grainy and won't fold in smoothly.
Recipe Variations & Substitutions
Matcha Japanese Cheesecake Sift 2 tablespoons of high-quality matcha powder with your flour for an earthy, sophisticated twist. The green tea flavor pairs beautifully with the tangy cream cheese and adds a stunning jade color to your Japanese cheesecake. Reduce sugar by 2 tablespoons since matcha has a slight bitterness that balances the sweetness.
Chocolate Swirl Version
- Melt 3 oz of dark chocolate and cool slightly
- Reserve 1 cup of your finished batter and mix with the melted chocolate
- Pour the plain batter into the pan first, then dollop the chocolate batter on top
- Swirl gently with a knife for a marbled effect
Lemon Zest Variation Add 1 tablespoon of fresh lemon zest to your cream cheese base for a bright, citrusy Japanese cheesecake that's perfect for spring and summer. The extra lemon amplifies the already-present tang and makes the cake taste even lighter.
Mini Individual Cheesecakes Divide the batter among lined muffin tins and bake at 300°F for 25-30 minutes. These adorable single-serve portions are perfect for parties and gift-giving.
Gluten-Free Option Replace cake flour with a 1:1 gluten-free flour blend designed for baking. The texture will be nearly identical since the Japanese cheesecake relies more on eggs and meringue than flour for structure.
Lower Sugar Version You can reduce the sugar to ½ cup total if you prefer a less sweet dessert. The Japanese cheesecake will still taste delicious, though it may brown slightly less in the oven.
Equipment Recommendations
- 8-inch round springform pan: This makes unmolding incredibly easy; the removable bottom means no flipping required for your Japanese cheesecake
- Electric hand mixer or stand mixer: Essential for achieving the stiff peaks your meringue needs
- Fine-mesh sieve: For sifting flour to prevent lumps
- Large rubber spatula: The flexible edge makes folding gentle and efficient
- Aluminum foil: Heavy-duty foil prevents water bath leaks
- Large roasting pan: Must be bigger than your cake pan to hold the water bath
- Instant-read thermometer: Optional but helpful; the center should read 160-165°F when done
Don't have a springform pan? A regular 8-inch round pan works fine; just line it very well with parchment paper and expect to turn it out after cooling. The Japanese cheesecake should release easily if you've lined it properly.
Storage & Meal Prep Tips
Refrigerator Storage Your Japanese cheesecake stays fresh in the refrigerator for up to 5 days when stored properly. Cover the top with plastic wrap pressed directly against the surface to prevent it from drying out, or keep it in an airtight cake container. The texture actually improves after a day in the fridge as the flavors meld together beautifully.
Freezing Instructions
- Wrap cooled Japanese cheesecake tightly in plastic wrap, then in aluminum foil
- Freeze for up to 2 months
- Thaw overnight in the refrigerator, still wrapped
- Bring to room temperature for 30 minutes before serving for the best texture
Make-Ahead Strategy You can bake this Japanese cheesecake a full day ahead, which actually makes it taste even better. The texture settles into that perfect cotton-soft consistency overnight. This is a huge advantage when planning for dinner parties or special occasions.
Portion Control Tip Slice your Japanese cheesecake into individual portions and wrap each piece separately before freezing. This way, you can enjoy a single slice without thawing the entire cake.
Grandma's Secret That Changed Everything
Here's what transformed my Japanese cheesecake from good to absolutely phenomenal: reverse creaming. Instead of just melting the cream cheese and butter together, I started beating them until completely smooth before adding any liquid. This extra step creates microscopic air pockets that make the final texture even more cloud-like. The second game-changer? Sifting the flour twice. Yes, twice. I know it seems fussy, but those few extra seconds eliminate every possible lump and help the flour blend seamlessly into your batter.
The third secret my grandmother shared is all about that final cooling period. She always said to leave the Japanese cheesecake in the pan until it's completely cold; never rush the unmolding process. When you try to remove it while still warm, you risk tearing that delicate surface. Patience here rewards you with a pristine, professional-looking cake that wobbles perfectly when you give it that satisfying gentle shake.
FAQ
What's the difference between a regular cheesecake and a Japanese cheesecake?
Regular cheesecake is dense, rich, and typically made with a cookie crust, while Japanese cheesecake is incredibly light, fluffy, and crustless. The key difference is the technique: Japanese cheesecake incorporates whipped egg whites (meringue) that get folded into the batter, creating that signature airy, soufflé-like texture. It's also baked in a water bath at a lower temperature, resulting in a moist, jiggly cake that's less sweet than traditional versions.
What is so special about Japanese cheesecake?
Japanese cheesecake stands out for its unique texture; it's simultaneously creamy like cheesecake and light as a soufflé. The signature "jiggle" when you shake the pan has become iconic, and the cotton-soft interior literally melts in your mouth. It's also less sweet than Western cheesecakes, allowing the delicate cream cheese flavor to shine through. The impressive wobble and cloud-like appearance make Japanese cheesecake a showstopper dessert.
What is the Japanese cheesecake called?
Japanese cheesecake goes by several names: cotton cheesecake, soufflé cheesecake, or Japanese cotton cheesecake. In Japan, it's often called "sufure chizukeki" (soufflé cheesecake). Some bakeries market it as "jiggly cheesecake" because of its distinctive wobble. All these names refer to the same style of light, fluffy Japanese cheesecake.
What is the famous cheesecake in Japan?
The most famous Japanese cheesecake comes from Uncle Tetsu's, a bakery that started in Fukuoka in 1985 and has since expanded worldwide. Their version sparked the global craze for this style of dessert. Another renowned spot is LeTAO in Hokkaido, famous for their "Double Fromage" that layers Japanese cheesecake with a denser cheese layer. However, this homemade Japanese cheesecake recipe delivers that same authentic texture and flavor right in your own kitchen.
Your New Signature Dessert Awaits
Congratulations! You now have everything you need to create a stunning Japanese cheesecake that will have everyone asking for your secret. This dessert proves that sometimes the most impressive recipes are built on simple techniques done right. The combination of that satisfying wobble, the cloud-soft texture, and the delicate cream cheese flavor makes this Japanese cheesecake absolutely irresistible.
Once you've mastered this recipe, I encourage you to explore other Japanese-inspired treats that bring that same elegance and lightness to your dessert table. Try making Japanese Cotton Cheesecake Cupcakes Recipe for individual portions that are perfect for sharing, or pair your Japanese cheesecake with a comforting Japanese Royal Milk Tea Recipe for an authentic afternoon tea experience. There's something magical about these delicate desserts that turn ordinary moments into special memories. Now get baking, and don't forget to do that satisfying shake to show off your perfectly jiggly Japanese cheesecake masterpiece!
With love from my kitchen to yours,
Kaitlyn Reed
Related
Looking for other recipes like this? Try these:


Pairing
These are my favorite dishes to serve with this Japanese cheesecake recipe:


Japanese Cheesecake Recipe
Equipment
- 1 8-inch round springform pan Lined with parchment paper
- 1 Electric Hand Mixer For whipping the meringue
- 1 Rubber spatula For gentle folding
- 1 Fine-mesh sieve For sifting flour and matcha
- 1 Roasting pan Used for the water bath
- 2 Sheets of aluminum foil To wrap the pan and prevent leaks
- 1 Mixing bowl set Separate for yolks and whites
Ingredients
- 8 oz cream cheese Softened to room temperature
- 6 large eggs Separated
- 0.5 cup whole milk Warmed slightly
- 0.33 cup unsalted butter Melted
- 0.5 cup cake flour Sifted twice
- 2 tablespoon cornstarch Adds structure
- 0.25 teaspoon salt Enhances flavor
- 0.67 cup granulated sugar Divided for meringue and base
- 1 tablespoon lemon juice Adds brightness
- 1 teaspoon vanilla extract For aroma
- 0.25 teaspoon cream of tartar Stabilizes meringue
- 1 tablespoon butter For greasing the pan
- parchment paper Line bottom and sides of pan
Instructions
- Preheat oven to 320°F (160°C). Prepare an 8-inch pan with parchment and wrap it in foil for the water bath.
- Melt butter and cream cheese together; whisk until smooth. Add milk, yolks, vanilla, and lemon juice.
- Sift in flour, cornstarch, and salt; fold gently until smooth.
- Whip egg whites with cream of tartar; add sugar gradually until stiff peaks form.
- Fold meringue into cream cheese base in three additions; mix gently to keep air.
- Bake in a water bath for 70–75 minutes until golden and jiggly.
- Cool in oven with door cracked for 30 minutes, then at room temp before chilling.
- Chill for 4 hours or overnight for best texture.


Leave a Reply