
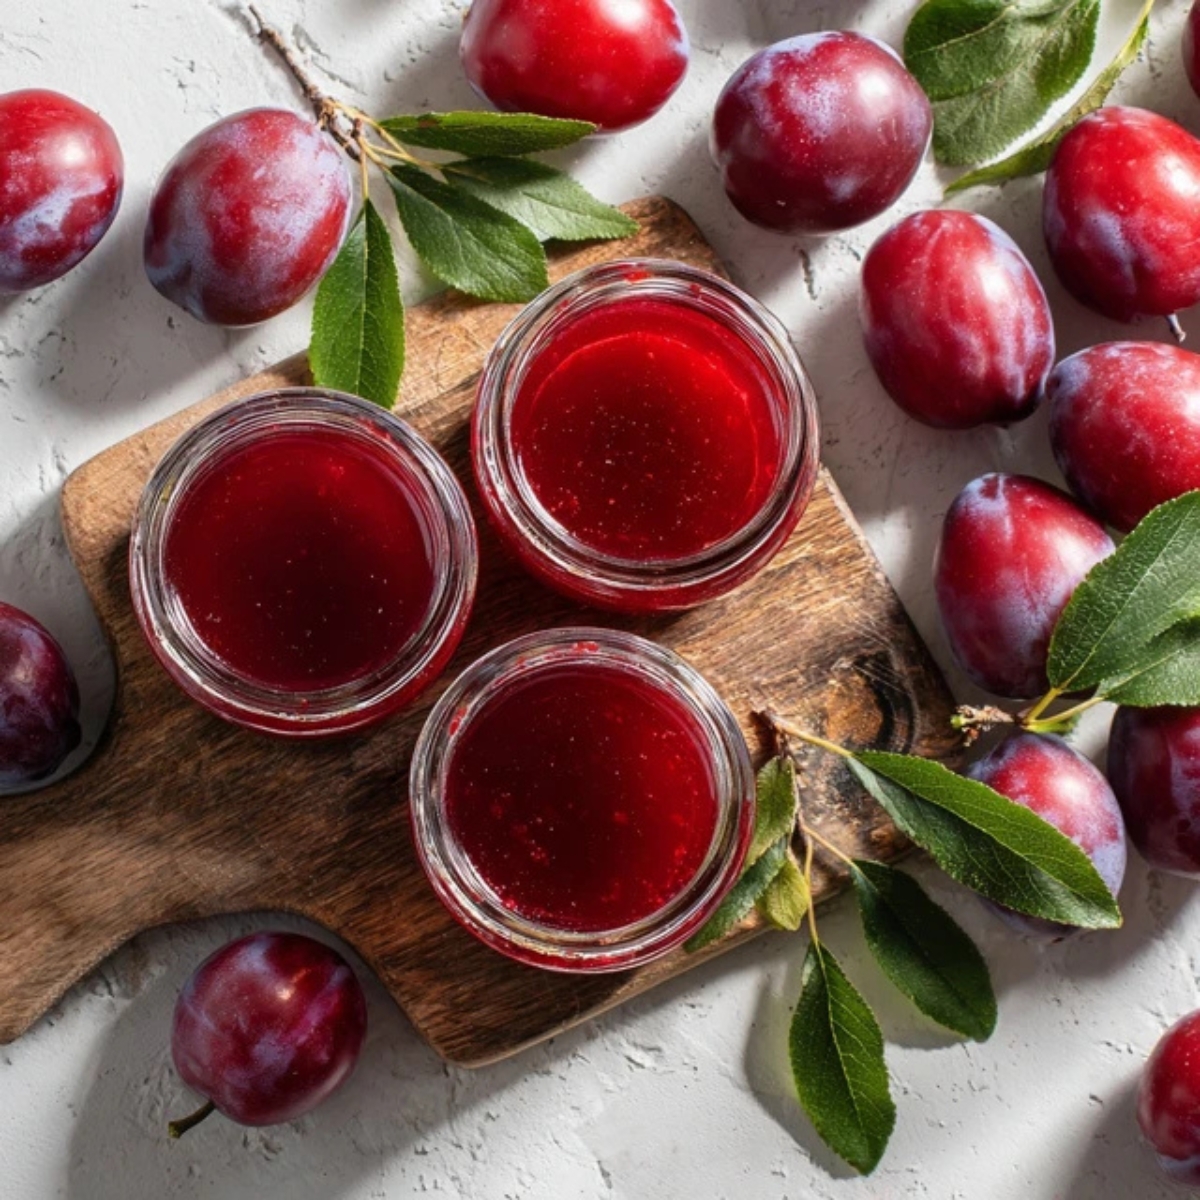
Nothing beats the sweet, tangy taste of homemade plum jelly spread on warm toast or biscuits. This plum jelly recipe transforms fresh, ripe plums into a glossy, smooth preserve that captures summer's essence in every jar. Making your own plum jelly allows you to control the sweetness and avoid artificial additives found in store-bought versions.
Whether you're dealing with an abundant plum harvest or simply want to create something special for your pantry, this plum jelly recipe delivers consistent, delicious results every time. The natural pectin in plums makes this process straightforward, and you'll be amazed at how simple it is to create this beautiful, jewel-toned preserve that's perfect for gifting or enjoying throughout the year.
Background & Why This Plum Jelly Recipe Stands Out
This plum jelly recipe has been passed down through generations, refined to achieve the perfect balance of sweetness and tartness. Unlike many modern recipes that rely heavily on commercial pectin, this method harnesses the natural pectin found in plums, creating a more authentic flavor profile. The key to exceptional plum jelly lies in using the right combination of ripe and slightly underripe plums, which provides the ideal pectin content for proper setting.
What makes this plum jelly recipe truly special is its versatility and foolproof technique. The process involves extracting pure plum juice through gentle cooking and straining, resulting in a crystal-clear jelly with intense fruit flavor. This traditional approach ensures your plum jelly will have the perfect consistency and vibrant color that makes it stand out from commercial alternatives. The natural fruit sugars concentrate during cooking, creating a preserve that's both sweet and complex in flavor.
Jump to:
Ingredients
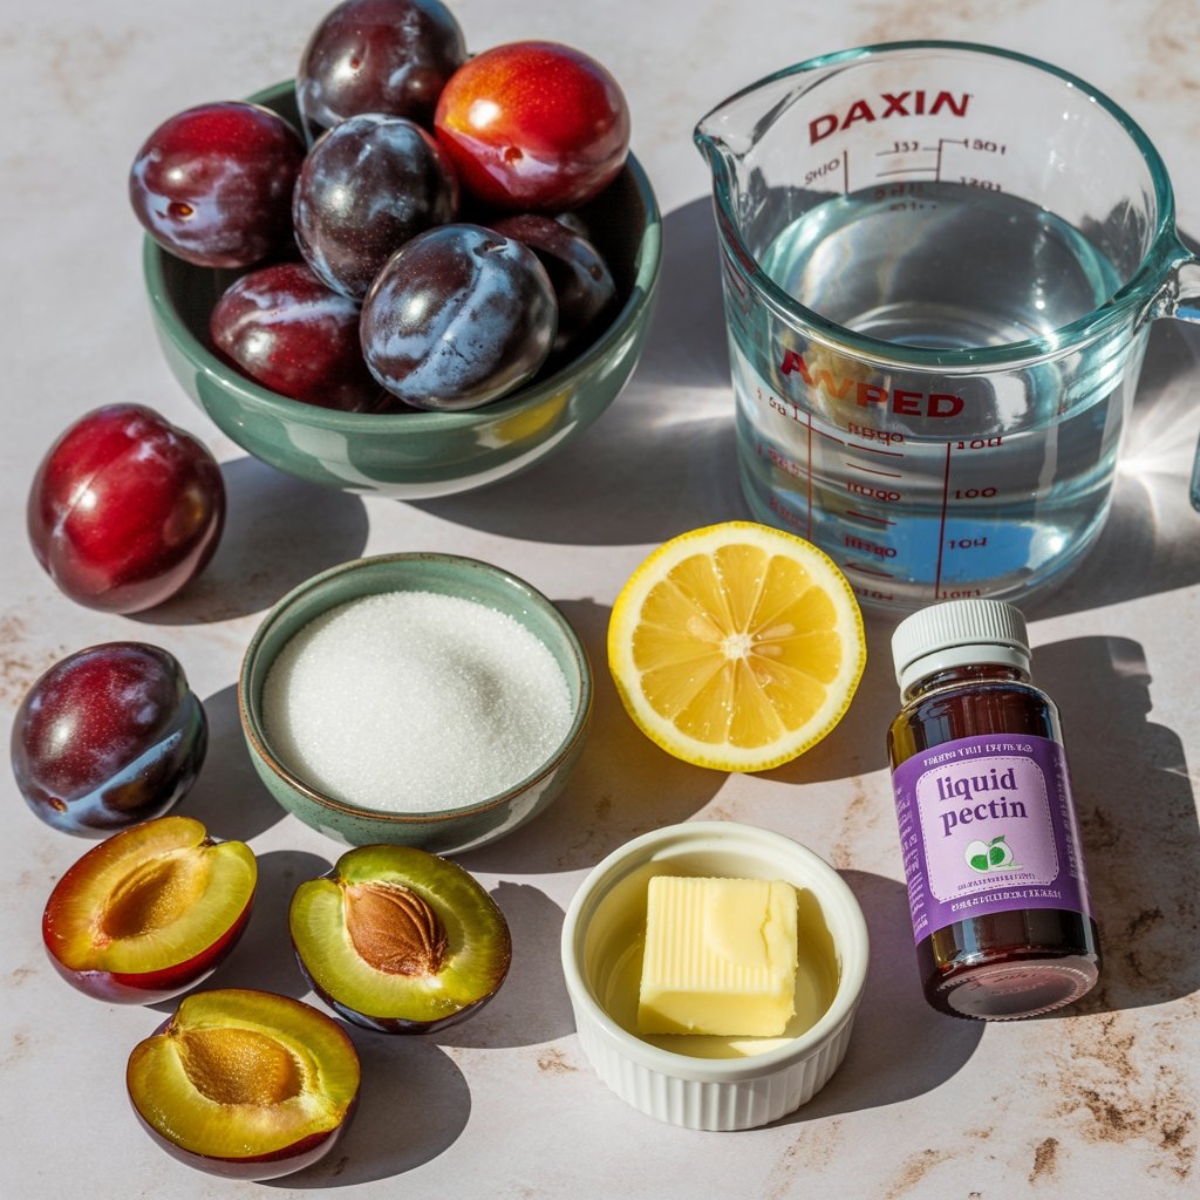
Main Ingredients
- Fresh plums (mix of ripe and slightly underripe)
- Granulated sugar
- Fresh lemon juice
- Water
Optional Ingredients
- liquid pectin (if desired for firmer set)
- Butter (to reduce foaming)
See recipe card for quantities.
Instructions
Prepare the Plums
- Wash plums thoroughly under cold running water
- Remove any stems but leave pits intact (they add natural pectin)
- Cut larger plums in half to speed cooking process
- Place prepared plums in a large, heavy-bottomed pot
Cook and Extract Juice
- Add water to the pot with plums
- Bring mixture to a rolling boil over medium-high heat
- Reduce heat and simmer for 15-20 minutes until plums are soft and broken down
- Stir occasionally to prevent sticking and promote even cooking
Strain the Juice
- Set up a fine-mesh strainer lined with cheesecloth over a large bowl
- Pour cooked plum mixture into strainer
- Allow juice to drain naturally for 2-3 hours without pressing solids
- Measure extracted juice; you should have approximately 4 cups
Make the Jelly
- Pour strained plum juice into a clean, heavy-bottomed pot
- Add sugar and lemon juice, stirring until sugar dissolves
- Bring mixture to a hard boil that cannot be stirred down
- Boil for 8-12 minutes until jelly reaches 220°F or passes the plate test
- Remove from heat and skim any foam from surface

- Step 1: Prepare the Plums
Wash, halve, and prepare the plums in a large pot.
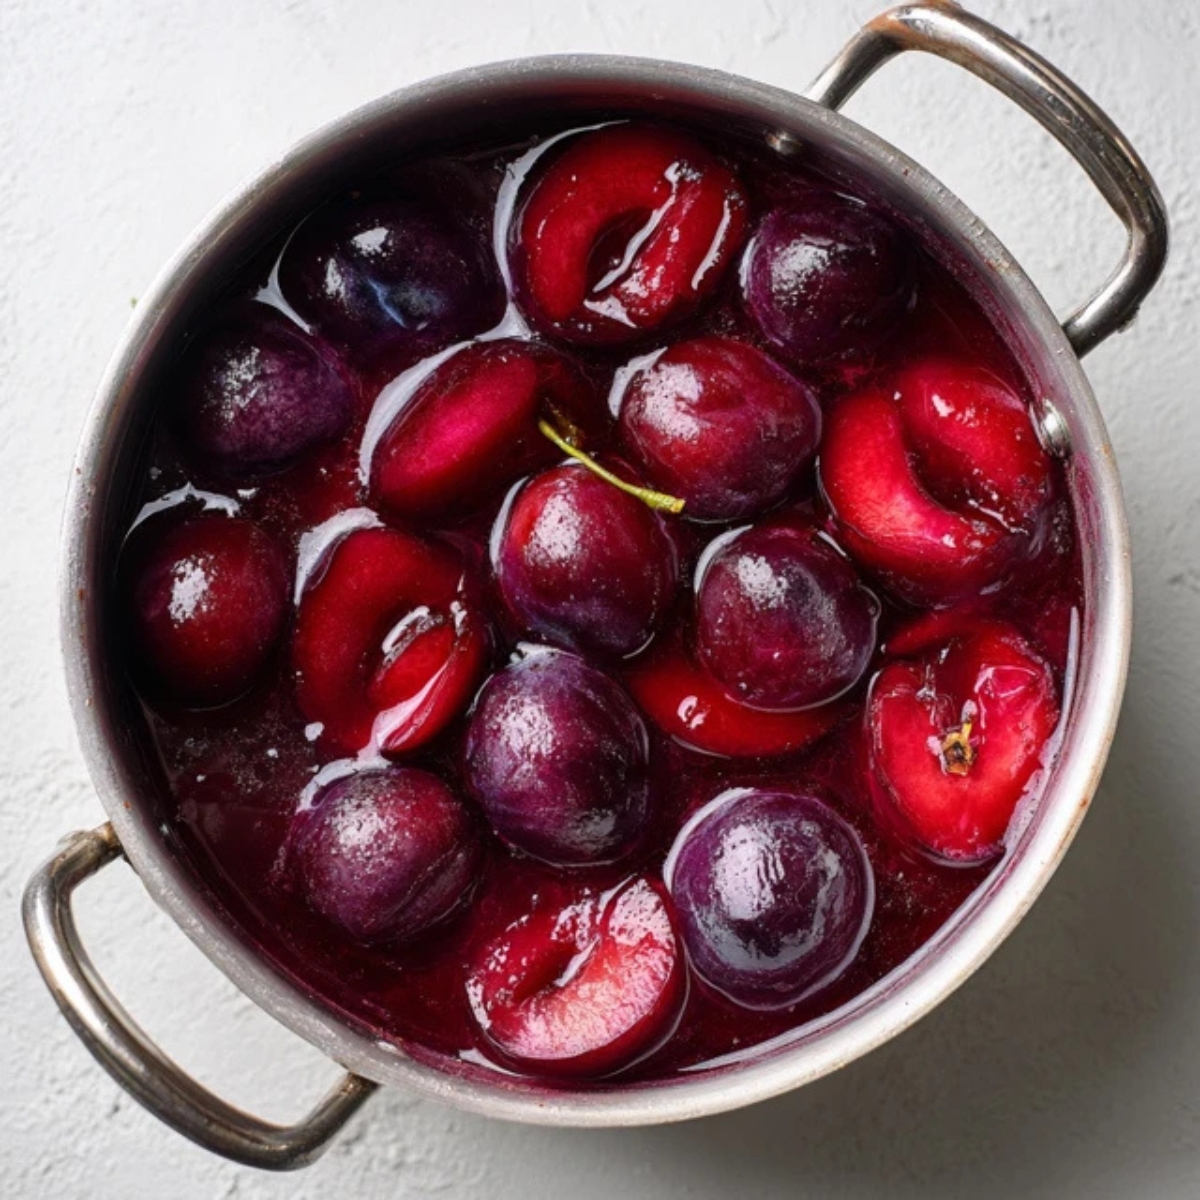
- Step 2: Cook and Extract Juice
Simmer the plums in water until soft and juicy.
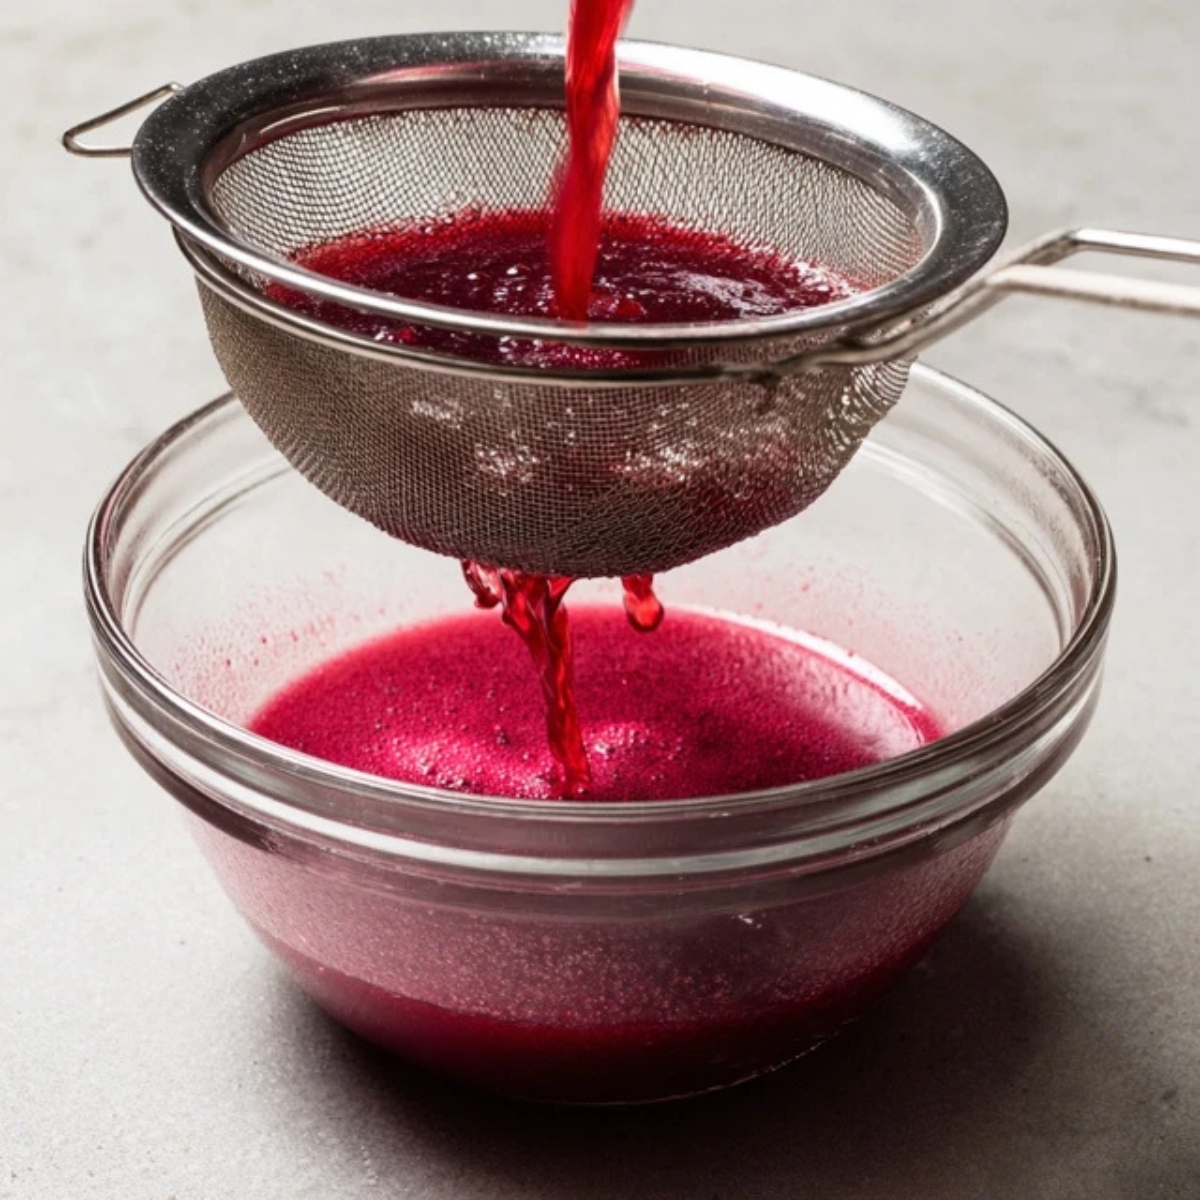
- Step 3: Strain the Juice
Strain the cooked plum mixture to extract clear juice.
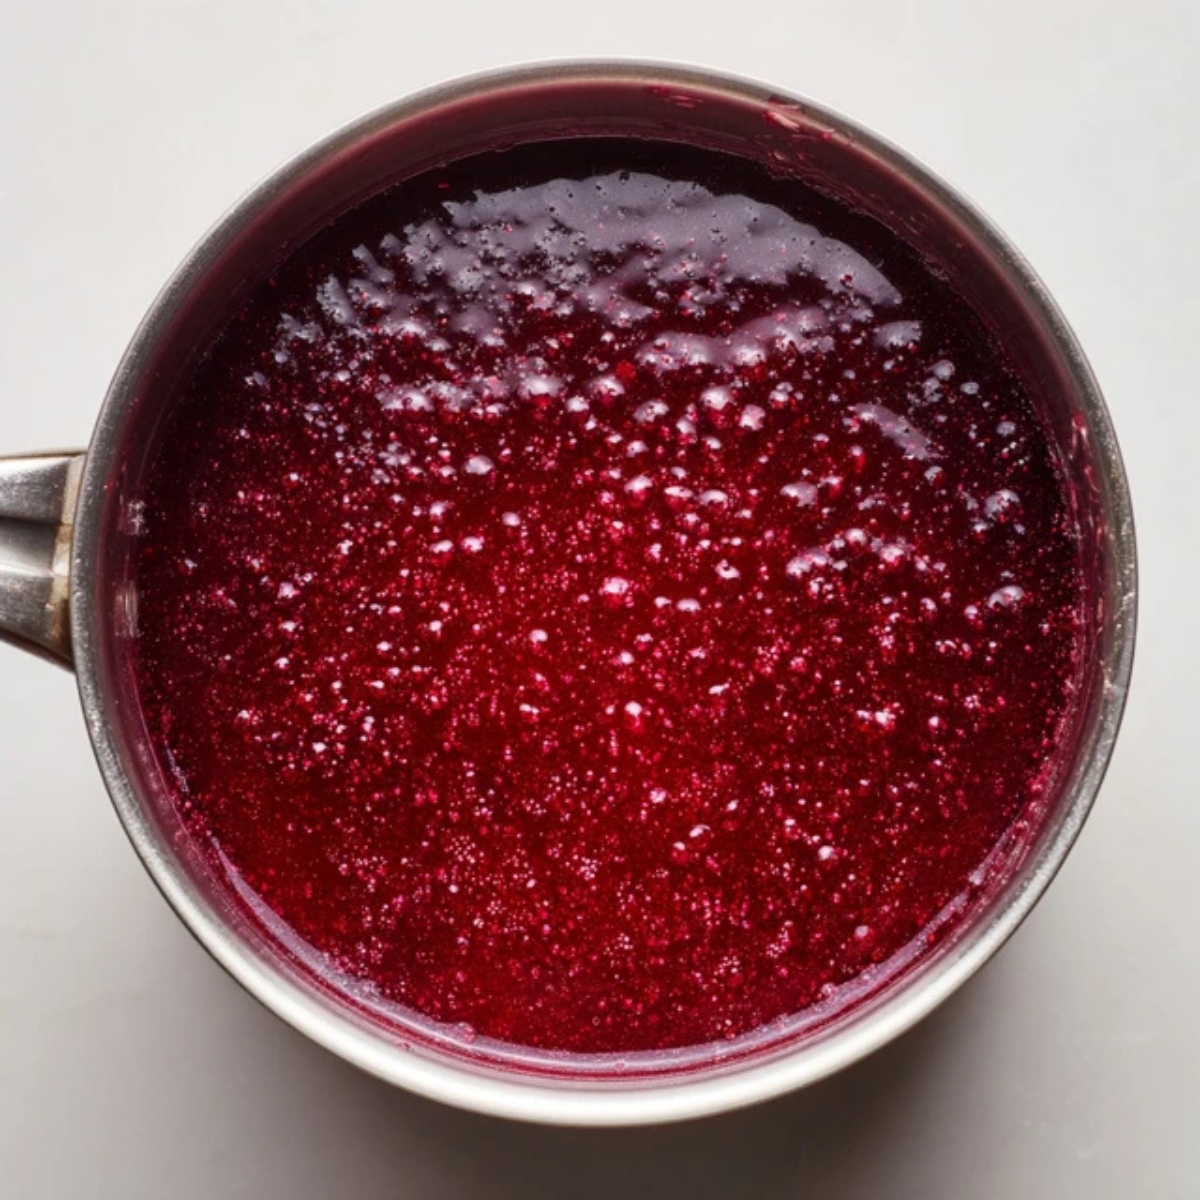
- Step 4: Make the Jelly
Boil juice with sugar and lemon until it sets into jelly.
Expert Cooking Tips
Achieving perfect plum jelly requires attention to detail and proper technique. Here are essential tips to ensure success:
Fruit Selection and Preparation
- Use a mix of ripe and slightly underripe plums for optimal pectin content
- Don't remove pits during initial cooking as they contain natural pectin
- Choose plums with good color and firm texture for best flavor
Cooking Techniques
- Maintain a steady boil during the final cooking phase
- Test for doneness using the plate test: drop a small amount on a chilled plate
- If it wrinkles when pushed with your finger, the jelly is ready
- Avoid overcooking as this can break down pectin and prevent proper setting
Quality Control
- Skim foam regularly during cooking for crystal-clear results
- Use a candy thermometer for accuracy; jelly sets at 220°F
- Work quickly when filling jars to maintain proper temperature
Recipe Variations & Substitutions
This versatile plum jelly recipe can be adapted to suit different tastes and dietary needs:
Flavor Variations
- Spiced Plum Jelly: Add 1 cinnamon stick and 3 whole cloves during cooking
- Herb-Infused: Include fresh thyme or rosemary sprigs for a savory twist
- Wine Plum Jelly: Replace ½ cup water with red wine for depth
Dietary Modifications
- Low-Sugar Version: Reduce sugar to 2 cups and add low-sugar pectin
- Honey Alternative: Substitute 1 cup sugar with ¾ cup honey
- Artificial Sweetener: Use sugar substitute designed for canning following package directions
Fruit Combinations
- Apple-Plum Jelly: Add 2 cups chopped apples for extra pectin
- Mixed Stone Fruit: Combine plums with peaches or apricots
- Wild Plum Variation: Perfect for foraged wild plums with their intense flavor
Equipment Recommendations
Essential tools for making perfect plum jelly include a heavy-bottomed pot that distributes heat evenly and prevents scorching. A fine-mesh strainer and cheesecloth are crucial for achieving crystal-clear results, while a candy thermometer ensures accurate temperature readings for proper setting.
- Large heavy-bottomed pot (at least 6-quart capacity)
- Fine-mesh strainer and cheesecloth or jelly bag
- Candy thermometer
- Wooden spoon for stirring
- Ladle for filling jars
- Canning jars with new lids and rings
- Large bowl for collecting strained juice
- Small plates chilled in freezer for testing
Storage & Meal Prep Tips
Proper storage ensures your plum jelly maintains quality and safety for months:
Short-Term Storage
- Refrigerate opened jars for up to 3 weeks
- Store unopened jars in cool, dark pantry for up to 1 year
- Check seals regularly; properly sealed jars should not flex when pressed
Long-Term Preservation
- Process filled jars in boiling water bath for 10 minutes for shelf stability
- Label jars with contents and date for easy identification
- Store processed jars in cool, dry location away from direct sunlight
Freezing Options
- Freeze jelly in freezer-safe containers for up to 1 year
- Leave ½ inch headspace to allow for expansion
- Thaw gradually in refrigerator before use
Grandma's Secret That Changed Everything
The secret to exceptional plum jelly lies in the timing of when you add the sugar. My grandmother taught me to let the plum juice reach a full boil before gradually adding sugar, stirring constantly until completely dissolved. This technique prevents the sugar from sinking to the bottom and scorching, which can create a bitter taste in your finished plum jelly.
Another game-changing tip involves the cooling process. After removing your plum jelly from heat, let it rest for exactly 5 minutes before skimming the final foam and filling jars. This brief cooling period allows the jelly to thicken slightly, making it easier to handle while still maintaining the proper pouring consistency for smooth, professional-looking results.
FAQ
What to use plum jelly for?
Plum jelly is incredibly versatile and perfect for spreading on toast, biscuits, or scones. It also makes an excellent glaze for meats, especially pork and poultry, and can be used as a filling for pastries or as a topping for cheesecake and ice cream.
What's the difference between plum jam and jelly?
The main difference is texture and preparation method. Plum jelly is made from strained fruit juice, resulting in a smooth, clear preserve, while jam contains fruit pieces and has a chunkier texture with visible fruit remnants throughout.
Is plum jelly good for you?
Plum jelly contains beneficial antioxidants from plums, including vitamin C and phenolic compounds. However, it's high in sugar, so enjoy it in moderation as part of a balanced diet. Homemade versions allow you to control sugar content better than commercial varieties.
Do you have to pit plums when making jelly?
No, you don't need to pit plums when making plum jelly since the mixture is strained. The pits actually add beneficial natural pectin that helps the jelly set properly, making the process easier and more effective.
Sweet Success with Homemade Preserves
Making your own plum jelly connects you to generations of home cooks who understood the value of preserving seasonal abundance. This plum jelly recipe delivers consistent, delicious results that far surpass anything you can buy in stores, with the added satisfaction of knowing exactly what ingredients went into your preserve.
Once you've mastered this plum jelly technique, you'll want to explore other stone fruit preserves that use similar methods. Consider trying your hand at Nectarine Jam for a smooth, peachy alternative, or Peach Jam for another classic summer preserve. Both recipes follow similar principles to this plum jelly recipe, making them perfect next steps in your preserve-making journey.
With love from my kitchen to yours,
Kaitlyn Reed
Related
Looking for other recipes like this? Try these:


Pairing
These are my favorite dishes to serve with this plum jelly recipe:


Plum Jelly Recipe
Equipment
- Heavy-bottomed pot At least 6-quart capacity
- Fine-mesh strainer Use with cheesecloth or jelly bag
- Cheesecloth For straining juice
- Candy Thermometer For accurate temperature reading
- Wooden Spoon For stirring during cooking
- Ladle For filling jars
- Half-pint jars With new lids and rings
- Large bowl For collecting strained juice
- Small plates Chilled, for plate test
Ingredients
- 4 lbs Plums Mix of ripe and slightly underripe
- 3 cups Sugar Granulated
- 2 tablespoon Lemon juice Fresh
- 1 cup Water
- 1 pkg Liquid pectin Optional, for firmer set
- 0.25 teaspoon Butter Optional, reduces foaming
Instructions
- Wash plums
- Cook plums
- Simmer mixture
- Strain juice
- Add sugar
- Boil jelly
- Test for doneness
- Skim foam
- Fill jars
- Process jars


Leave a Reply