
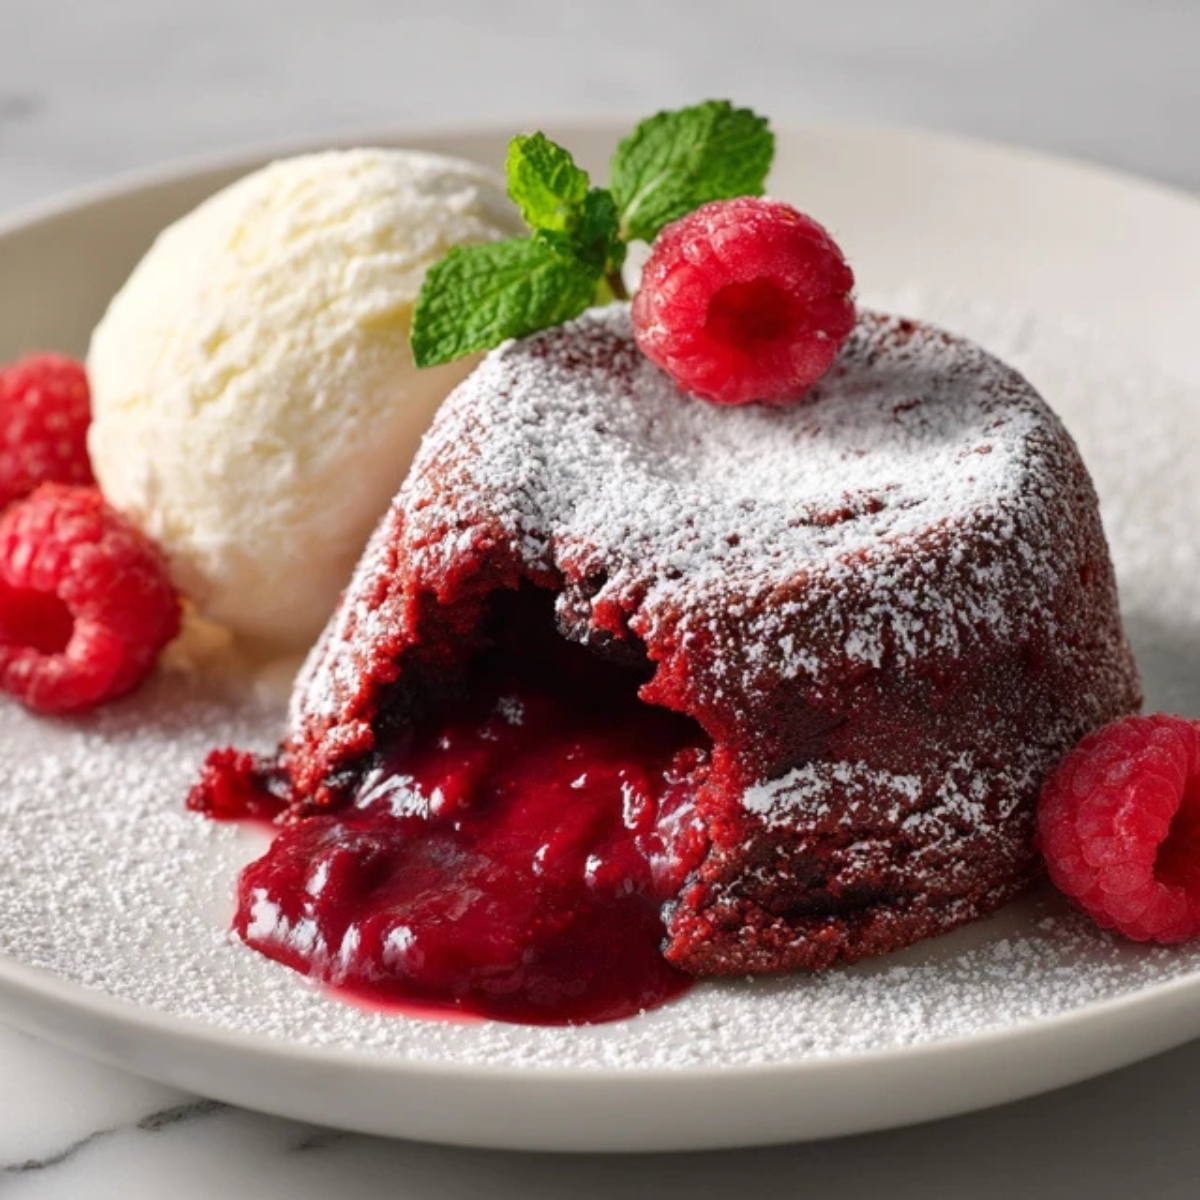
There's something magical about cutting into a warm cake and watching that molten center flow out like liquid velvet. This red velvet lava cake combines the classic Southern charm of red velvet with the show-stopping drama of a molten lava cake. I've been making this red velvet lava cake for years, and it never fails to impress dinner guests or make ordinary Tuesday nights feel special.
What makes this red velvet lava cake truly special is how simple it is to create restaurant-quality dessert right in your own kitchen. You don't need fancy equipment or professional training; just a handful of ingredients and about 7 minutes of baking time. The result is a decadent red velvet lava cake with a perfectly gooey center that melts in your mouth with every bite.
Background & The Secret Behind This Show-Stopping Dessert
Red velvet lava cake represents the perfect marriage between two beloved desserts. Traditional red velvet cake originated in the American South during the 1800s, prized for its subtle cocoa flavor and striking crimson color. Molten lava cakes, on the other hand, became a fine-dining sensation in the 1980s when chef Jean-Georges Vongerichten accidentally underbaked a chocolate cake and discovered magic. This red velvet lava cake recipe brings both worlds together in individual portions that bake in minutes.
What sets this red velvet lava cake apart from other molten cake recipes is the delicate balance of flavors. Unlike heavy chocolate lava cakes, the red velvet version offers a lighter cocoa taste with hints of vanilla and buttermilk tang. The gooey center isn't just underbaked batter; it's carefully timed perfection that creates that signature lava flow. Whether you're planning a romantic Valentine's Day dessert or simply treating yourself to something special, this recipe delivers consistent results every single time.
Jump to:
Ingredients
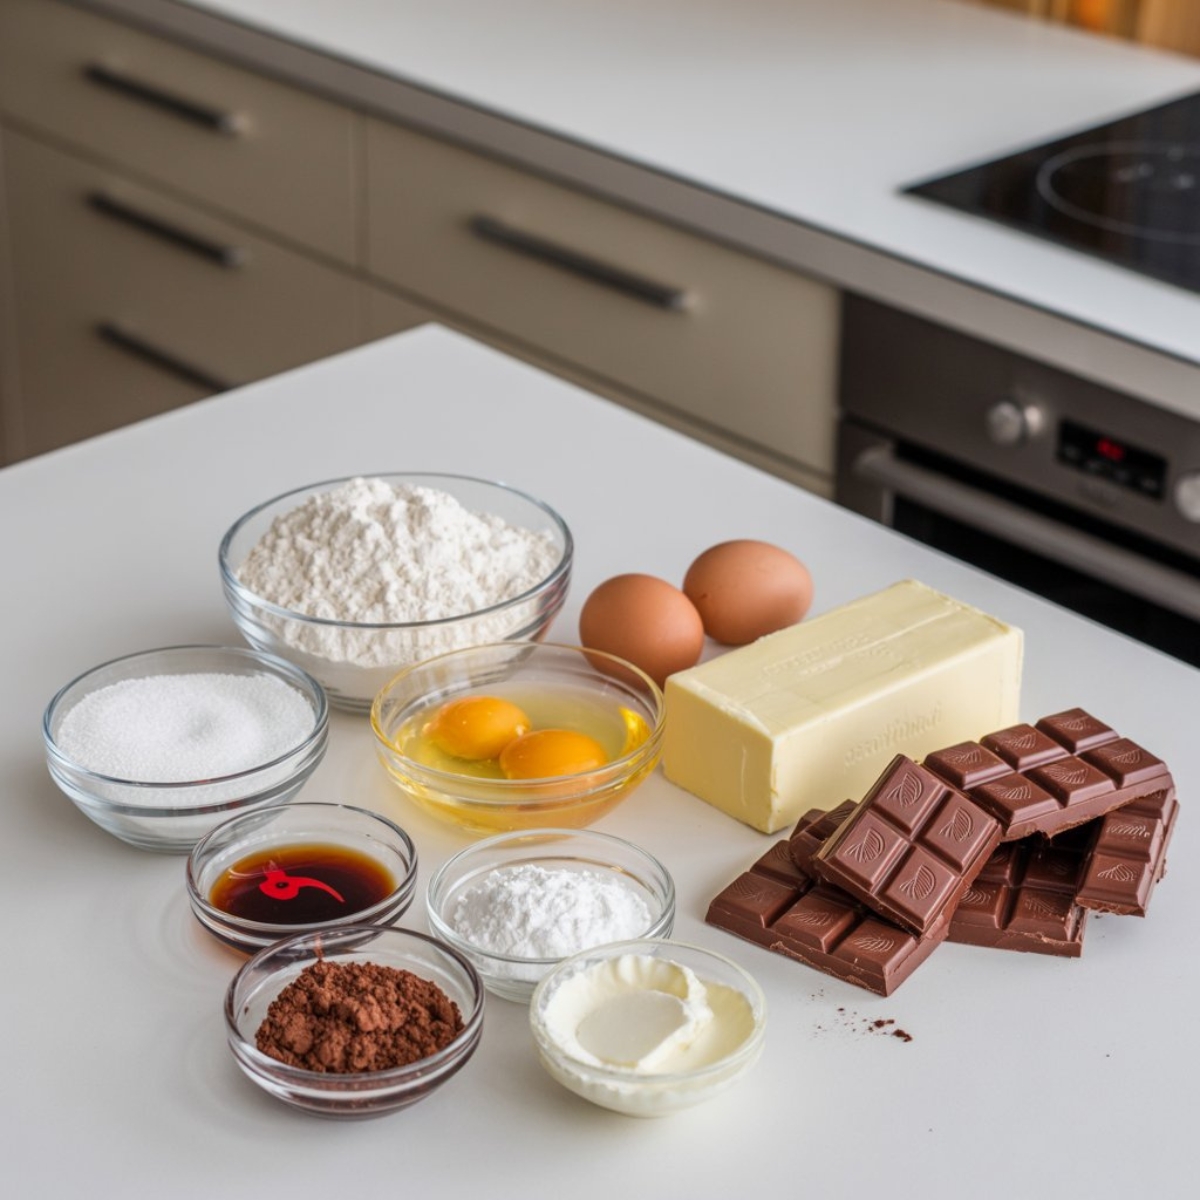
For the Red Velvet Lava Cake Batter
- Unsalted butter, plus extra for greasing ramekins
- Semi-sweet chocolate, chopped
- All-purpose flour
- Granulated sugar
- Eggs
- Egg yolks
- Red food coloring (liquid or gel)
- Unsweetened cocoa powder
- Vanilla extract
- Salt
- White vinegar
- Powdered sugar for dusting
Optional Cream Cheese Center (Highly Recommended)
- Cream cheese, softened
- Powdered sugar
- Vanilla extract
For Serving
- Vanilla bean ice cream
- Fresh raspberries or strawberries
- Whipped cream
See recipe card for quantities.
Instructions
Step 1: Prepare Your Ramekins and Preheat
- Preheat your oven to 425°F (220°C). This high temperature is crucial for getting that molten center right.
- Generously butter four 6-ounce ramekins, making sure to coat every surface including the rim.
- Dust the buttered ramekins with cocoa powder, tapping out any excess. This prevents sticking and adds extra chocolate flavor.
- Place the prepared ramekins on a baking sheet for easy handling; this makes your red velvet lava cake foolproof.
Step 2: Melt Chocolate and Butter
- Combine the butter and chopped chocolate in a microwave-safe bowl.
- Microwave in 20-second intervals, stirring between each, until completely smooth and melted (usually 60-80 seconds total).
- Let the mixture cool for 2-3 minutes while you prepare other ingredients.
- If making the cream cheese center, mix softened cream cheese with powdered sugar and vanilla until smooth; set aside.
Step 3: Mix the Red Velvet Batter
- In a medium bowl, whisk together the eggs, egg yolks, and granulated sugar until slightly thickened (about 1 minute).
- Add the cooled chocolate-butter mixture, vanilla extract, and red food coloring; whisk until well combined and vibrant red.
- Sift in the flour, cocoa powder, and salt; gently fold until just combined with no visible flour streaks.
- Add the white vinegar and fold it in; this reacts with the cocoa to enhance the red velvet lava cake color and adds that signature tang.
Step 4: Fill, Bake, and Serve
- Divide half the batter among the prepared ramekins (about 2 tablespoons each).
- If using cream cheese filling, add a small spoonful to the center of each ramekin, then cover with remaining batter.
- Bake for exactly 12-14 minutes; the edges should be set but the center should still jiggle slightly when gently shaken.
- Remove from oven and let rest for 1 minute, then carefully run a knife around edges and invert onto serving plates; dust with powdered sugar and serve your red velvet lava cake immediately.
Expert Cooking Tips
Getting the perfect red velvet lava cake requires attention to a few key details that separate good from extraordinary.
- Temperature is Everything The oven must be fully preheated to 425°F before your cakes go in. A properly heated oven creates the temperature shock needed to set the edges while keeping that molten center. Use an oven thermometer if your oven runs hot or cold; even 25 degrees can mean the difference between perfection and disappointment.
- Timing Cannot Be Overlooked Set a timer for 12 minutes and check your cakes. They should have risen slightly with set edges but a soft, jiggly center. If you overbake by even 2 minutes, you'll lose that signature lava flow. The center will continue cooking from residual heat after removal, so slightly underbaked is better than overdone.
- Room Temperature Eggs Matter Cold eggs from the refrigerator won't incorporate smoothly into your batter and can cause the chocolate to seize. Take your eggs out 30 minutes before baking, or place them in warm water for 5 minutes. This simple step ensures your batter stays silky smooth and your red velvet lava cake texture is perfect.
- Quality Food Coloring Makes a Difference Gel food coloring provides more vibrant red without adding extra liquid to your batter. Liquid food coloring works but may require more volume to achieve that classic red velvet hue. Whatever you use, add it gradually; you can always add more but can't take it away.
Recipe Variations & Substitutions
This versatile red velvet lava cake adapts beautifully to different preferences and dietary needs.
Dietary Modifications
For a gluten-free version, substitute the all-purpose flour with a 1:1 gluten-free baking blend. The texture remains nearly identical, though you may want to add ¼ teaspoon xanthan gum if your blend doesn't include it. The molten center works just as perfectly in gluten-free versions.
Make it dairy-free by swapping butter with coconut oil or vegan butter, and use dairy-free chocolate. For the cream cheese center, dairy-free cream cheese brands work wonderfully. You won't sacrifice any of that gooey goodness.
Creative Flavor Twists
Create a white chocolate center by pressing a square of white chocolate into the middle instead of cream cheese filling. As it bakes, it creates a sweet, creamy lava that contrasts beautifully with the cocoa-flavored cake. This makes your red velvet lava cake even more decadent.
Add espresso powder (½ teaspoon) to intensify the chocolate flavor without making it taste like coffee. You can also fold in mini chocolate chips for extra texture. Some bakers love adding a tablespoon of bourbon or rum extract for grown-up sophistication.
Try different toppings like crushed Oreos, caramel sauce, or fresh berries. Each variation gives you a completely different dessert experience while maintaining that show-stopping molten center everyone loves.
Equipment Recommendations
Having the right tools makes preparing this red velvet lava cake much easier and ensures consistent results.
- 6-ounce ramekins ; these are the perfect size for individual servings and ensure even baking
- Baking sheet ; holds your ramekins steady and catches any overflow
- Whisk and mixing bowls ; essential for combining ingredients smoothly
- Microwave-safe bowl ; for melting chocolate and butter quickly
- Fine-mesh sieve ; helps sift flour and cocoa for a lump-free batter
- Small offset spatula ; helpful for releasing cakes from ramekins
- Kitchen timer ; crucial for timing that perfect molten center
Storage & Meal Prep Tips
While red velvet lava cake tastes best fresh from the oven, you can prepare components ahead.
Make-Ahead Instructions
Prepare the batter and fill the ramekins up to 24 hours in advance. Cover each ramekin tightly with plastic wrap and refrigerate. When ready to bake, let them sit at room temperature for 10 minutes, then add 2-3 minutes to the baking time since they're starting cold.
You can also freeze unbaked filled ramekins for up to 1 month. Wrap each individually in plastic wrap, then aluminum foil. Bake from frozen, adding 5-6 extra minutes to the baking time. This makes entertaining effortless since you can have dessert ready to pop in the oven.
Storage Guidelines
Honestly, these red velvet lava cakes are meant to be enjoyed immediately after baking for that perfect molten center. However, if you have leftovers (rare but possible), store them covered in the refrigerator for up to 2 days.
Reheat refrigerated cakes in the microwave for 20-30 seconds. They won't have the same molten center, but they're still delicious as rich, fudgy cakes. You can also enjoy them cold as dense, brownie-like treats.
Grandma's Secret That Changed Everything
Here's what transformed this from just another recipe into my go-to signature dessert; it's all about the vinegar and the wait.
That tiny splash of white vinegar isn't just tradition; it's chemistry. When vinegar hits the cocoa powder and buttermilk-style ingredients, it creates a reaction that brightens the red color naturally and adds that subtle tang that makes red velvet lava cake so distinctive. Don't skip it, even though it seems odd. This one ingredient elevates the entire dessert from chocolate cake with food coloring to authentic red velvet.
The second secret is patience after baking. I know it's tempting to flip those ramekins immediately, but waiting exactly 60 seconds lets the edges pull away slightly while keeping the center molten. Flip too soon and the cake might stick; wait too long and you lose heat. That one-minute rest is the difference between restaurant-quality presentation and a crumbled mess. Master this timing, and your red velvet lava cake will look as professional as it tastes.
FAQ
What are the ingredients for red velvet cake?
Traditional red velvet cake contains flour, cocoa powder, butter, sugar, eggs, buttermilk, vanilla, red food coloring, and vinegar. The red velvet lava cake uses similar ingredients but in different proportions to create that molten center, with less flour and more eggs for a gooey texture.
What makes a lava cake?
A lava cake gets its molten center from carefully timed underbaking. The high oven temperature sets the outer edges while keeping the center liquid. The balance of eggs, chocolate, and flour creates a batter that can achieve both textures simultaneously in your red velvet lava cake.
What is the actual flavor of red velvet?
Red velvet tastes like a subtle chocolate cake with vanilla and slight tanginess from buttermilk or vinegar. It's not intensely chocolatey like devil's food cake; instead, the cocoa provides mild richness. The red velvet lava cake captures this delicate flavor profile with a gooey chocolate center.
How is red velvet cake traditionally made?
Traditional red velvet cake is made by creaming butter and sugar, adding eggs, then alternating buttermilk and flour mixtures. Cocoa powder, red food coloring, and vinegar give it signature characteristics. Our red velvet lava cake simplifies this method while maintaining authentic flavor in individual portions.
The Perfect Ending to Any Meal
This red velvet lava cake proves that impressive desserts don't require hours of work or pastry chef credentials. In just minutes, you can create a restaurant-quality treat that makes any occasion feel special. The combination of rich red velvet flavor with that dramatic molten center never fails to wow guests.
Once you master this red velvet lava cake recipe, you'll find yourself making it for everything from casual weeknight dinners to elegant celebrations. Pair it with our Red Velvet Pancakes Recipe for a red velvet-themed brunch that'll have everyone asking for seconds, or follow dinner with this decadent lava cake and start the next morning with our Blueberry Breakfast Cake Recipe for a complete dessert-to-breakfast experience. The versatility and simplicity of this red velvet lava cake make it an essential recipe in any home baker's collection.
With love from my kitchen to yours,
Kaitlyn Reed
Related
Looking for other recipes like this? Try these:


Pairing
These are my favorite dishes to serve with this red velvet lava cake recipe:


Red Velvet Lava Cake Recipe
Equipment
- 4 ramekins (6-ounce)
- Baking sheet
- Whisk
- Mixing bowls
- Microwave-safe bowl
- Fine-mesh sieve
- Offset spatula
- Kitchen timer
Ingredients
For the Lava Cake Batter
- 4 tablespoon unsalted butter plus extra for greasing ramekins
- 2 oz semi-sweet chocolate chopped
- ½ cup all-purpose flour
- ½ cup granulated sugar
- 2 large eggs
- 2 large egg yolks
- 1 tablespoon red food coloring liquid or gel
- 1 tablespoon unsweetened cocoa powder
- 1 teaspoon vanilla extract
- ¼ teaspoon salt
- ½ teaspoon white vinegar
- powdered sugar for dusting
Optional Cream Cheese Center
- 2 oz cream cheese softened
- 2 tablespoon powdered sugar
- ½ teaspoon vanilla extract
For Serving
- vanilla bean ice cream
- fresh raspberries or strawberries
- whipped cream
Instructions
- Preheat oven to 425°F (220°C). Grease and dust ramekins with cocoa powder.
- Microwave butter and chocolate until melted and smooth, then cool slightly.
- Whisk together eggs, yolks, and sugar. Add melted chocolate mixture, vanilla, and red food coloring.
- Sift in flour, cocoa, and salt. Fold gently, then stir in vinegar.
- Divide half the batter among ramekins. Add a spoonful of cream cheese mixture if using, then cover with remaining batter.
- Bake 12–14 minutes until edges are set but centers still jiggle.
- Let rest 1 minute, invert onto plates, dust with powdered sugar, and serve warm with ice cream or berries.


Leave a Reply