Nothing beats the satisfying crunch and gooey sweetness of homemade rice krispies treats! As someone who's been perfecting this beloved recipe for years, I can tell you that making your own Recipe at home is not only simple but incredibly rewarding. These iconic treats have been bringing smiles to faces for generations, and today I'm sharing my foolproof method to create the most delicious rice krispies you've ever tasted.
The beauty of rice krispies lies in their simplicity - just three basic ingredients transform into pure magic. Whether you're planning a birthday party, need a quick dessert for unexpected guests, or simply craving that nostalgic childhood flavor, this recipe will become your go-to solution. Trust me, once you taste these homemade treats, you'll never go back to store-bought versions!
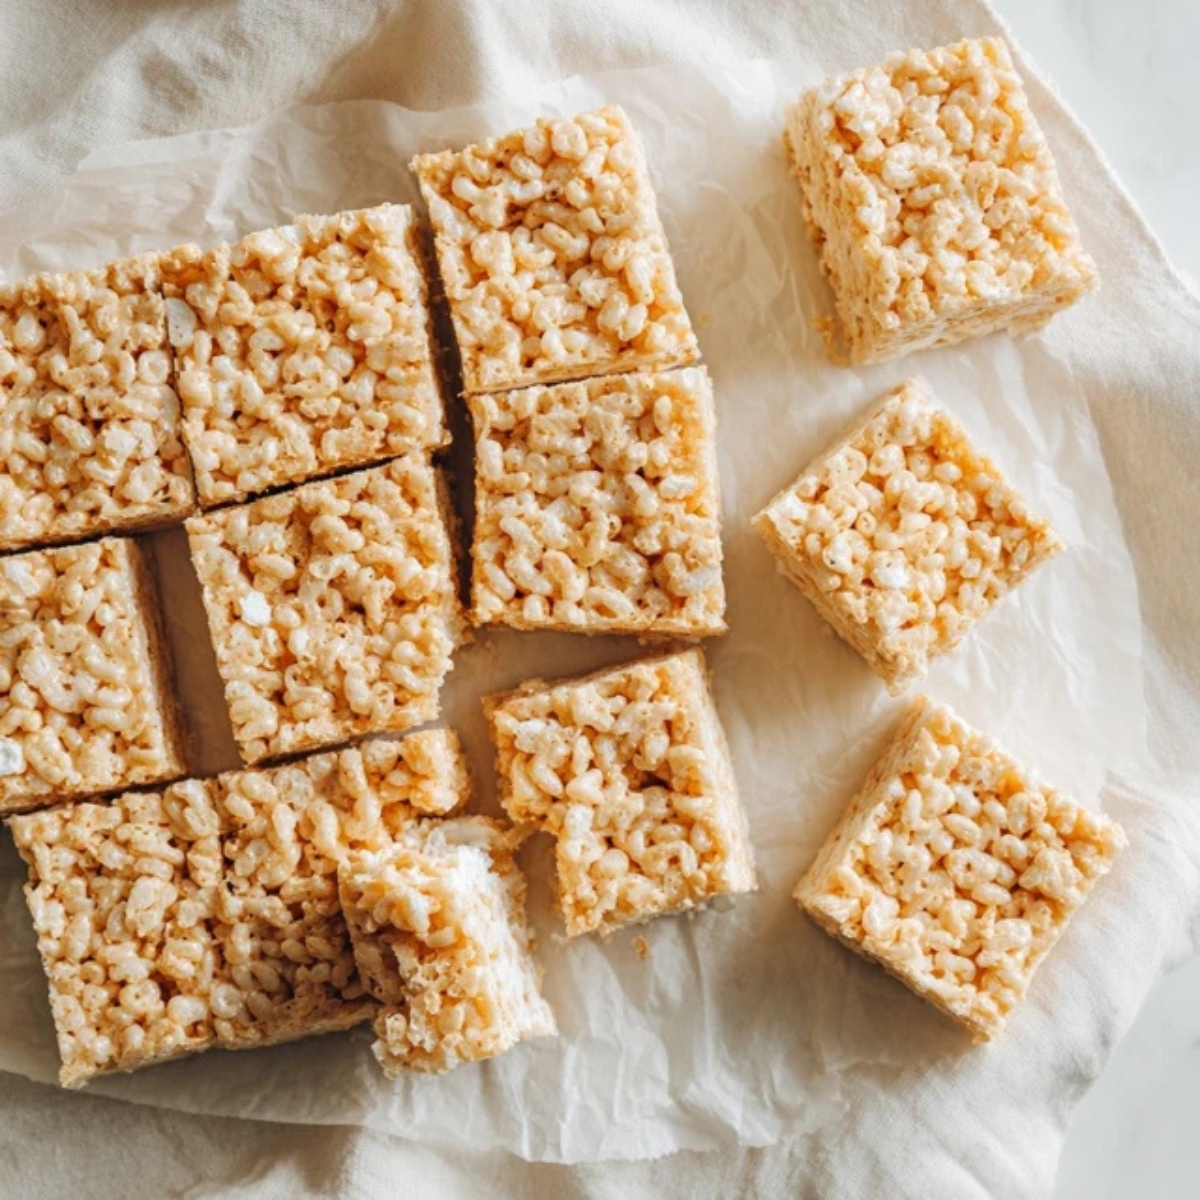
Background & Why This Recipe Stands Out
What makes this recipe truly special is the perfect balance of texture and sweetness that I've refined over countless batches. Unlike many recipes that result in rock-hard squares or overly sticky messes, this method creates treats that are perfectly chewy with just the right amount of crunch. The secret lies in understanding the science behind melting marshmallows and timing your mixing process to perfection.
This particular recipe approach has been passed down through my family for three generations, with each cook adding their own special touch. The technique I'm sharing today combines traditional methods with modern insights about ingredient ratios and temperature control. You'll discover why using fresh marshmallows makes such a difference, and how a simple adjustment in cooking time can transform ordinary rice krispies into extraordinary treats that rival any bakery creation.
Jump to:
Ingredients
Essential Ingredients
- Rice Krispies cereal (fresh for best results)
- Mini marshmallows (or 40 regular marshmallows)
- Butter (unsalted preferred)
- Vanilla extract (optional but recommended)
- Pinch of salt (brings out sweetness)
Optional Add-ins
- Sprinkles for decoration
- Chocolate chips
- Peanut butter
- Food coloring for themed treats

See recipe card for quantities.
Instructions
Preparation Phase
- Line a 9x13 inch pan with parchment paper, leaving overhang for easy removal
- Spray with cooking spray or lightly butter the parchment
- Measure out your Rice Krispies cereal into a large mixing bowl
- Have all ingredients ready - this rice krispies recipe moves quickly once you start
Marshmallow Melting Process
- In a large microwave-safe bowl, combine butter and marshmallows
- Microwave in 30-second intervals, stirring between each interval
- Continue until marshmallows are completely smooth and glossy (usually 1.5-2 minutes total)
- Immediately stir in vanilla extract and salt while mixture is hot
Combining and Shaping
- Pour hot marshmallow mixture over Rice Krispies cereal
- Working quickly but gently, fold mixture until all cereal is evenly coated
- Transfer to prepared pan and press down lightly with buttered hands or wax paper
- Allow to cool completely (about 30 minutes) before cutting into squares
Expert Cooking Tips
Getting perfect rice krispies every time requires attention to these crucial details:
Temperature Control: Never overheat your marshmallows, as this creates tough, chewy treats instead of the desired soft texture. The marshmallow mixture should be smooth and pourable, not thick and sticky.
Gentle Mixing: When combining the hot marshmallow mixture with your rice krispies, fold gently rather than stirring vigorously. This prevents the cereal from breaking and maintains that signature crunch we all love.
Pressing Technique:
- Use buttered hands or wax paper when pressing the mixture into your pan
- Apply gentle, even pressure - over-packing creates dense, hard squares
- Work quickly while the mixture is still warm and pliable
Timing is Everything:
- Don't let the marshmallow mixture sit too long before adding cereal
- Have everything measured and ready before you start melting
- Cut treats while slightly warm for clean edges, but not hot or they'll fall apart
Recipe Variations & Substitutions
Transform your basic rice krispies into exciting flavor adventures with these creative variations:
Chocolate Lovers' Dream: Stir in ½ cup of chocolate chips while the marshmallow mixture is still warm. The residual heat will slightly melt the chips, creating pockets of gooey chocolate throughout your treats.
Peanut Butter Paradise: Add ¼ cup of creamy peanut butter to the melted marshmallow mixture before combining with cereal. This creates rich, nutty treats that pair beautifully with chocolate drizzle on top.
Seasonal Celebrations:
- Halloween: Add orange food coloring and mini chocolate chips
- Christmas: Mix in red and green sprinkles or crushed candy canes
- Valentine's Day: Create heart shapes and drizzle with melted pink chocolate
Dietary Adaptations:
- Gluten-free: Use certified gluten-free rice cereal
- Vegan: Substitute vegan butter and marshmallows
- Lower sugar: Reduce marshmallows by 25% and add extra vanilla for flavor
Equipment Recommendations
Having the right tools makes creating perfect rice krispies much easier:
- Large microwave-safe mixing bowl: Glass or ceramic works best for even heating
- 9x13 inch baking pan: Non-stick or lined with parchment paper
- Wooden spoon or silicone spatula: For gentle folding without breaking cereal
- Kitchen scale: For precise measurements that guarantee consistent results
- Sharp knife: Clean cuts require a sharp blade dipped in warm water
The key to success with any rice krispies recipe is using equipment that allows for quick, efficient mixing while the marshmallow mixture maintains its ideal consistency.
Storage & Meal Prep Tips
Proper storage keeps your rice krispies fresh and delicious for days:
Short-term Storage:
- Store in airtight container at room temperature for up to one week
- Layer treats between parchment paper to prevent sticking
- Keep away from heat and humidity to maintain crispness
Long-term Options:
- Freeze individually wrapped squares for up to 3 months
- Wrap tightly in plastic wrap, then place in freezer bags
- Thaw at room temperature for 30 minutes before serving
Make-Ahead Tips:
- Cut treats can be stored for 3 days before serving
- Uncut pan can be covered and stored for up to 5 days
- Perfect for meal prep - make Sunday, enjoy all week
Your rice krispies will maintain their perfect texture when stored properly, making them ideal for busy schedules and planned events.
Grandma's Secret That Changed Everything
Here's the game-changing secret that transforms ordinary rice krispies into extraordinary treats: add a tablespoon of light corn syrup to your melted marshmallow mixture. This simple addition creates treats that stay soft and chewy for days instead of hardening after 24 hours. The corn syrup acts as a moisture retainer, giving your rice krispies that perfect bakery-quality texture that everyone will rave about.
Another secret I learned from years of experimentation is the power of toasting your Rice Krispies cereal lightly in a dry pan for 2-3 minutes before adding the marshmallow mixture. This extra step intensifies the flavor and creates an even better crunch that makes these rice krispies absolutely irresistible. The toasted cereal adds depth and complexity that separates homemade treats from anything you can buy in stores.
FAQ
Is Rice Krispies healthy?
Rice krispies treats are a sweet treat and should be enjoyed in moderation. While Rice Krispies cereal itself is fortified with vitamins and minerals, the added marshmallows and butter make these treats higher in sugar and calories. They're perfect for occasional enjoyment and special occasions.
What are Rice Krispies made of?
Rice Krispies cereal is made from rice grains that are cooked, dried, and toasted to create the signature "snap, crackle, and pop" texture. Combined with marshmallows and butter, they create the classic rice krispies treat we all love.
Why do so many bodybuilders eat Rice Krispies?
Rice krispies provide quick-digesting carbohydrates that help replenish muscle glycogen after intense workouts. Many athletes appreciate the convenience and energy boost that rice krispies treats offer as a post-workout snack.
Are Rice Krispies being discontinued?
No, Rice Krispies cereal continues to be a popular breakfast option and remains widely available in grocery stores. The classic rice krispies recipe and cereal maintain their popularity across generations.
Sweet Endings and What's Next
Creating perfect rice krispies at home is one of life's simple pleasures that brings families together in the kitchen. This foolproof recipe ensures you'll achieve bakery-quality results every single time, whether you're making them for a school bake sale or a weekend family treat. The versatility of rice krispies makes them perfect for any occasion, and the techniques you've learned here will serve you well for years to come.
Now that you've mastered the art of rice krispies, why not expand your baking repertoire with other family favorites? Try our Mini Blueberry Muffins Recipe for perfectly portioned breakfast treats, or indulge in our Lemon Blueberry Muffins Recipe that brings bright, citrusy flavors to your morning routine. Both recipes share the same approachable style and guaranteed success that make rice krispies such a beloved classic in kitchens everywhere.
With love from my kitchen to yours,
Kaitlyn Reed
Related
Looking for other recipes like this? Try these:
Pairing
These are my favorite dishes to serve with this rice krispies recipe:

Rice Krispies Recipe
Equipment
- Large microwave-safe bowl
- 9x13 inch baking pan
- Wooden spoon or silicone spatula
- Parchment paper
- Sharp knife
Ingredients
Essential Ingredients
- 6 cups Rice Krispies cereal fresh for best results
- 4 cups mini marshmallows or 40 regular marshmallows
- 3 tablespoon unsalted butter
- ¼ teaspoon vanilla extract optional, for flavor
- 1 pinch salt
Optional Add-ins
- ½ cup chocolate chips
- ¼ cup creamy peanut butter
- Food coloring holiday or themed treats
- Sprinkles for decoration
Instructions
- Line the baking pan with parchment paper.
- Microwave the butter in a large microwave-safe bowl until melted.
- Add marshmallows and microwave in 30-second intervals, stirring until fully melted and smooth.
- Stir in vanilla and salt (if using), then gently fold in the Rice Krispies cereal until fully coated.
- Press the mixture evenly into the prepared pan using a spatula or parchment paper.
- Let the treats cool for 30 minutes at room temperature.
- Cut into squares using a sharp knife and serve.







Leave a Reply