
Listen, I know what you're thinking; smores pizza sounds too good to be true, right? Well, buckle up because this smores pizza is about to become your new favorite dessert that brings all those campfire memories right into your kitchen. I've made this smores pizza countless times for family gatherings, and let me tell you, it disappears faster than any traditional pizza I've ever served.
This smores pizza recipe is pure magic on a plate, combining everything we love about classic s'mores with the fun of pizza night. The best part? You don't need a campfire, fancy equipment, or even impressive cooking skills to nail this smores pizza. Just grab some pizza dough, chocolate, marshmallows, and graham crackers, and you're fifteen minutes away from dessert heaven.
Background & Why This Dessert Pizza Changed Game Night Forever
Here's the thing about smores pizza that makes it stand out from every other dessert out there; it's ridiculously versatile and feeds a crowd without breaking a sweat. I started making this chocolate marshmallow pizza when my kids got tired of the same old desserts, and honestly, it's been a total game-changer. The combination of crispy pizza dough, melted chocolate, and those perfectly toasted marshmallows creates textures that regular s'mores just can't match.
What really makes this smores pizza special is how it brings people together around the table, just like traditional pizza does. You get that same sharing experience, but with the nostalgic flavors of summer campfires. Plus, you can customize each slice differently, which means picky eaters and adventurous foodies alike will find something to love. Whether you're hosting a pizza bar for birthdays or just want a fun weeknight treat, this gooey marshmallow dessert delivers every single time.
Jump to:
- Background & Why This Dessert Pizza Changed Game Night Forever
- Ingredients
- Instructions
- Recipe Variations & Substitutions
- Equipment Recommendations
- Storage & Meal Prep Tips
- The Broiler Trick That Creates Perfect Marshmallow Peaks
- FAQ
- Your Next Dessert Pizza Adventure Awaits
- Related
- Pairing
- S’mores Pizza Recipe
Ingredients
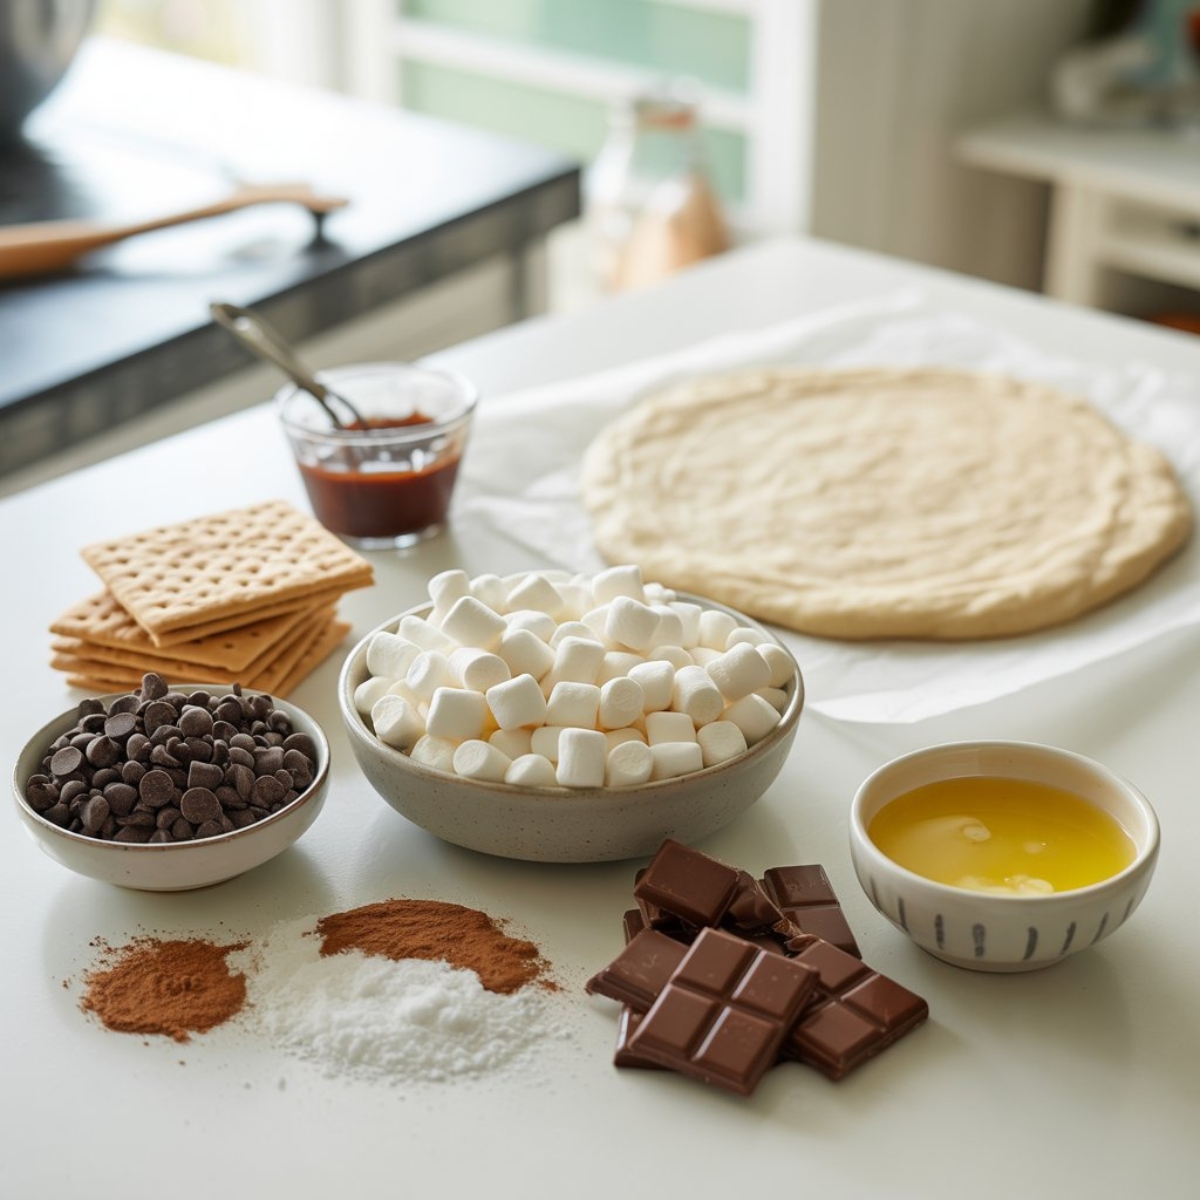
For the Pizza Base
- Pizza dough (store-bought or homemade dough works perfectly)
- Melted butter
- Granulated sugar
- Cinnamon (optional, but adds warmth)
For the Toppings
- Mini marshmallows (or regular marshmallows cut in half)
- Chocolate chips (semi-sweet or milk chocolate)
- Graham cracker crumbs (about 8-10 crackers, crushed)
- Chocolate chunks or Hershey's chocolate bars, broken into pieces
- Chocolate sauce for drizzling
Optional Add-ins
- Peanut butter chips
- Caramel sauce
- Crushed cookies
- Fresh strawberries
See recipe card for quantities.
Instructions
Step 1: Prepare Your Dough and Preheat
- Preheat your oven to 425°F and line a large baking sheet or pizza stone with parchment paper.
- Remove your refrigerated pizza dough from the fridge and let it sit at room temperature for about 10 minutes; this makes it easier to stretch.
- Dust your work surface with flour and roll or stretch the dough into a 12-14 inch circle or rectangle, depending on your preference.
- Transfer the stretched dough to your prepared baking sheet and brush the entire surface with melted butter.
- Mix the sugar and cinnamon together, then sprinkle this mixture evenly over the buttered dough.
Step 2: Pre-Bake the Crust
- Place the prepared dough in the preheated oven and bake for 5-7 minutes until it just starts to turn golden and puff up slightly.
- Remove from the oven and let it cool for 2 minutes; this initial baking ensures you won't end up with a soggy bottom.
- Use a fork to gently press down any large air bubbles that formed during baking.
Step 3: Add Your S'mores Toppings
- Sprinkle half of the graham cracker crumbs evenly over the pre-baked crust, leaving about a half-inch border around the edges.
- Scatter the chocolate chips and chocolate chunks across the entire surface of the dessert pizza.
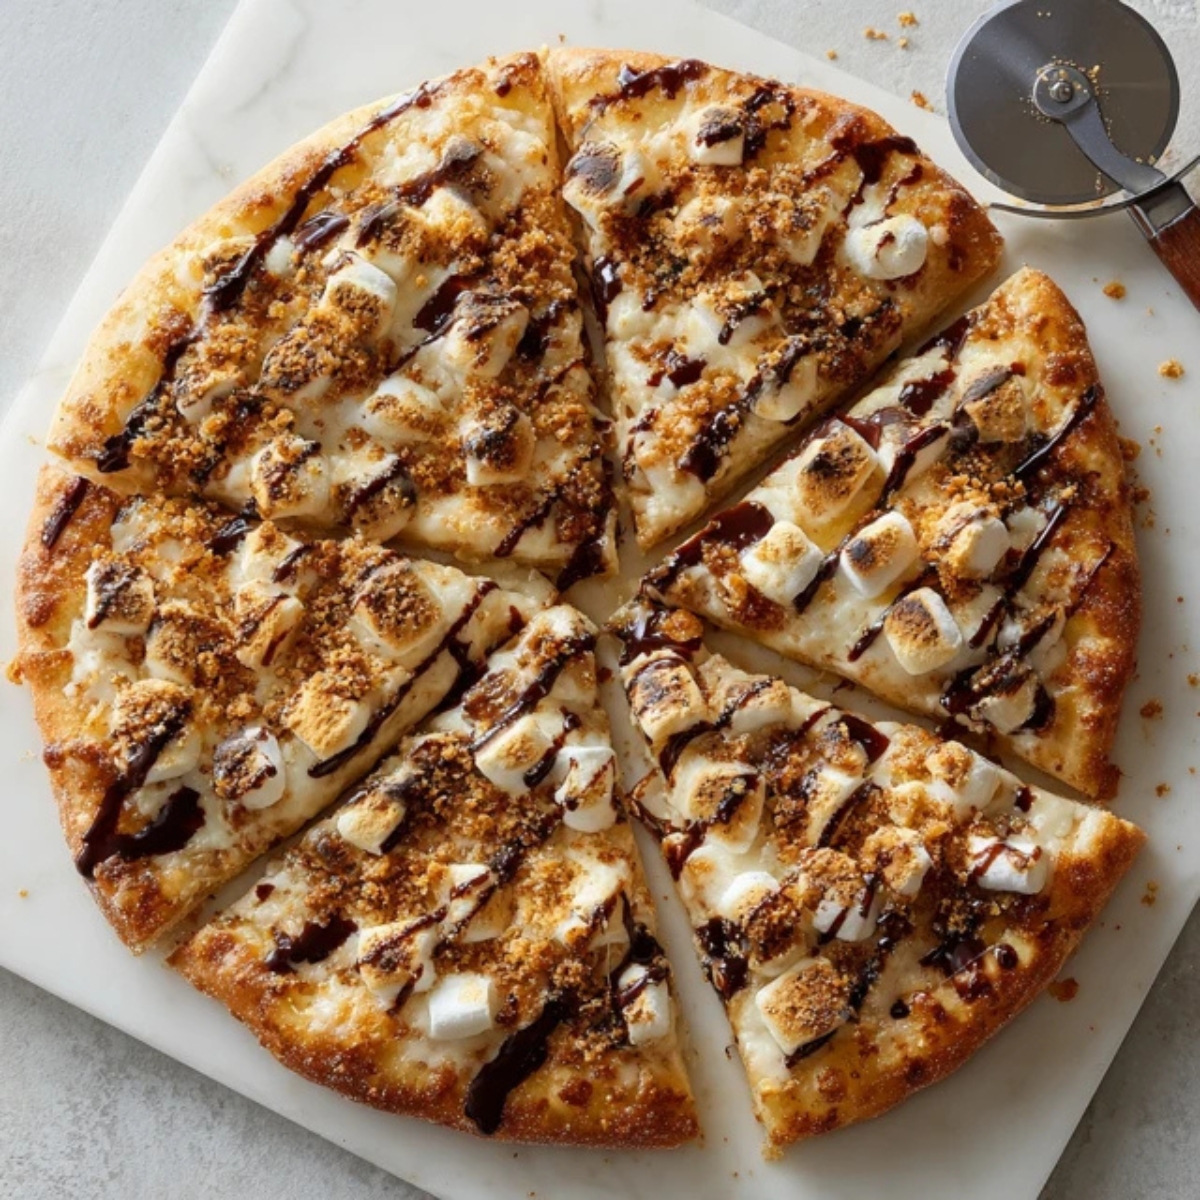
- Distribute the mini marshmallows on top, making sure to cover the chocolate layer completely for that classic campfire dessert pizza look.
- Finish by sprinkling the remaining graham cracker crumbs over the marshmallows.
Step 4: Bake Until Golden and Gooey
- Return the topped pizza to the oven and bake for 8-10 minutes, keeping a close eye on those marshmallows.
- You're looking for golden-brown, slightly charred marshmallow tops and fully melted chocolate underneath.
- If you want extra browning on top, switch to broil for the last 1-2 minutes, but watch it like a hawk because marshmallows can burn quickly.
- Remove from the oven when the marshmallows are toasted to your liking and the chocolate has melted into gooey perfection.
- Let the pizza cool for 3-4 minutes before slicing; this allows the chocolate to set slightly so it's not a complete mess when you cut it.
- Drizzle with chocolate sauce right before serving for an extra decadent touch.
- Slice with a pizza cutter or sharp knife and serve immediately while it's still warm and the marshmallows are at their gooiest.
Expert Cooking Tips
Temperature Control Is Everything
Getting that perfect balance between melted chocolate and toasted marshmallows without burning anything comes down to oven temperature. I always keep my oven at 425°F for the main bake, which gives you enough heat to melt everything beautifully without scorching. If your marshmallows are browning too fast but the chocolate isn't melted, tent the pizza loosely with foil for a few minutes.
The Pre-Bake Secret
One mistake I see people make with this smores pizza is skipping the pre-bake step. Trust me, those extra 5-7 minutes make all the difference between a crispy crust and a soggy disappointment. The crust needs to firm up before you load it with toppings.
Marshmallow Distribution
- Space your marshmallows about an inch apart for best results
- Mix mini marshmallows with some larger ones for varied texture
- Press them gently into the chocolate layer so they don't roll off
- For extra gooey centers, add a second layer of marshmallows in some spots
Chocolate Choices Matter
Using a combination of chocolate chips and chocolate chunks gives you the best melted chocolate pizza experience. The chips melt smoothly and evenly, while the chunks create those dramatic chocolate pools. I like mixing semi-sweet with milk chocolate for balanced sweetness.
Graham Cracker Technique
Don't pulverize your graham crackers into fine dust; leave some texture. Crush them in a zip-top bag with a rolling pin until you have a mix of crumbs and small chunks. This creates better texture contrast on your finished s'mores cookie pizza.
Recipe Variations & Substitutions
For Different Dietary Needs
If you're working with gluten sensitivities, swap regular pizza dough for a gluten-free version or use a sugar cookie dough base instead. The texture changes slightly, but you still get that amazing sweet pizza experience. For dairy-free friends, use coconut oil instead of butter and dairy-free chocolate chips.
Flavor Twists to Try
- Peanut Butter Lover's Version: Spread a thin layer of peanut butter on the pre-baked crust before adding toppings
- Triple Chocolate: Use chocolate pizza dough, dark chocolate chunks, and white chocolate chips
- Strawberry S'mores: Add fresh strawberry slices between the chocolate and marshmallow layers
- Salted Caramel: Drizzle caramel sauce and sprinkle flaky sea salt over the finished pizza
- Cookie Butter Twist: Replace some graham crackers with crushed Biscoff cookies
- Nutella Dream: Spread Nutella as your base sauce before adding other toppings
Crust Alternatives
You don't have to stick with traditional pizza dough for this smores dessert pizza. Try these options:
- Refrigerated crescent roll dough pressed together
- Homemade sugar cookie dough rolled thin
- Naan bread or flatbread for individual personal pizza servings
- Biscuit dough for a fluffier, bread-like base
- Pre-made flatbread crusts for the quickest version
Equipment Recommendations
For making the perfect smores pizza, you really only need basic kitchen tools. A large baking sheet (preferably 15x10 inches) or pizza stone works best for even heat distribution. If you're serious about making this regularly, a pizza stone gives you that crispier bottom crust that takes it to the next level.
- Large baking sheet or pizza stone
- Parchment paper (prevents sticking and makes cleanup easier)
- Rolling pin for stretching dough
- Pastry brush for the butter
- Pizza cutter or sharp chef's knife
- Oven mitts (those marshmallows get hot!)
- Cooling rack for serving
Storage & Meal Prep Tips
Storing Leftovers
Honestly, leftovers are rare with this smores pizza because it's so addictive, but if you do have extras, here's what to do. Let the pizza cool completely to room temperature, then store slices in an airtight container with parchment paper between layers. Keep in the refrigerator for up to 2 days, though the marshmallows will firm up and lose some of that gooey texture.
Can You Freeze It?
Technically yes, but I don't recommend freezing assembled s'mores dessert pizza because the marshmallows get weird and watery when thawed. However, you can freeze the pre-baked crust for up to 2 months, then add fresh toppings when you're ready to bake.
Reheating for Best Results
- Preheat oven to 350°F
- Place slices on a baking sheet
- Heat for 5-7 minutes until chocolate melts again
- Don't microwave; it makes everything soggy
Make-Ahead Strategy
You can prepare the crust a day ahead by pre-baking it completely, then storing it wrapped in plastic wrap at room temperature. When you're ready to serve, just add toppings and bake. You can also pre-crush graham crackers and store them in an airtight container.
The Broiler Trick That Creates Perfect Marshmallow Peaks
Here's something my grandmother taught me that changed my smores pizza game forever; finish it under the broiler for just 60-90 seconds. After your pizza comes out of the regular bake, switch your oven to broil and slide that pan back in on the top rack. Watch it constantly because those marshmallows go from perfect golden peaks to burnt disaster in seconds. This technique gives you those gorgeous campfire-style charred spots that make people think you're some kind of dessert pizza wizard.
The key is pulling it out right when you see those first brown spots appearing on the marshmallow tops. The residual heat will continue toasting them for another 30 seconds after you remove the pizza from the oven. This two-stage baking method ensures your smores pizza has a crispy bottom, melted chocolate middle, and those Instagram-worthy toasted marshmallow peaks on top.
FAQ
Why are they called smores?
The name "s'mores" comes from the phrase "some more," because they're so delicious that everyone always wants some more! This classic campfire treat got its name in the 1920s and has been a favorite ever since, which is exactly why this smores pizza is such a hit.
What is marshmallow pizza?
Marshmallow pizza, also known as dessert pizza or smores pizza, is a sweet version of traditional pizza that uses pizza dough as a base and tops it with sweet ingredients like marshmallows, chocolate, and graham crackers instead of savory toppings. It's essentially a creative way to enjoy dessert in pizza form.
Are S Mores tasty?
Absolutely! S'mores are incredibly tasty because they combine three perfect elements: crunchy graham crackers, creamy melted chocolate, and gooey toasted marshmallows. When you make them as a smores pizza, the flavors are even better because the pizza format allows everything to melt together more evenly.
What is making s mores?
Making s'mores traditionally involves roasting marshmallows over a campfire until golden and gooey, then sandwiching them with chocolate between two graham crackers. With this smores pizza recipe, we're bringing that same concept indoors using your oven, creating an easier way to enjoy this classic treat without needing a campfire.
Your Next Dessert Pizza Adventure Awaits
Now that you've mastered this smores pizza, you're ready to take on any dessert pizza challenge that comes your way. This recipe proves that pizza night doesn't have to end with the main course; it can be the star of dessert too. The beauty of this smores pizza is that it's forgiving, fun, and always brings smiles to the table.
Whether you're making it for a crowd or just treating yourself on a random Tuesday night, this gooey chocolate marshmallow creation delivers every time. Once you've perfected your smores pizza technique, try experimenting with our Zucchini Pizza Boats Recipe for a savory option that's equally impressive, or switch things up with our refreshing Lemon Pizza Recipe for a tangy dessert twist. The world of creative pizza is endless, and this smores pizza is just the beginning of your delicious journey.
With love from my kitchen to yours,
Kaitlyn Reed
Related
Looking for other recipes like this? Try these:


Pairing
These are my favorite dishes to serve with this smores pizza recipe:


S’mores Pizza Recipe
Equipment
- 1 Large baking sheet or pizza stone For even baking
- 1 Rolling pin To stretch dough
- 1 Pastry brush For melted butter
- 1 Parchment paper Prevents sticking
- 1 Pizza Cutter For easy slicing
- 1 Cooling rack For resting the pizza
Ingredients
For the Pizza Base
- 1 pound pizza dough Store-bought or homemade
- 2 tablespoon butter Melted
- 1 tablespoon granulated sugar
- 0.5 teaspoon cinnamon Optional, adds warmth
For the Toppings
- 1.5 cups mini marshmallows Or regular marshmallows cut in half
- 1 cup chocolate chips Semi-sweet or milk chocolate
- 1 cup graham cracker crumbs About 8–10 crackers, crushed
- 0.5 cup chocolate chunks Or Hershey’s pieces
- 2 tablespoon chocolate sauce For drizzling
Optional Add-Ins
- peanut butter chips Adds nutty flavor
- caramel sauce For drizzling
- crushed cookies For crunch
- fresh strawberries For a fruity twist
Instructions
- Preheat oven to 425°F and line baking sheet or pizza stone with parchment paper.
- Roll dough into a 12–14 inch circle, brush with melted butter, and sprinkle with cinnamon sugar.
- Pre-bake crust for 5–7 minutes until lightly golden.
- Add toppings: graham cracker crumbs, chocolate chips, chunks, and marshmallows.
- Bake 8–10 minutes until marshmallows are golden and chocolate is melted.
- Broil for 1–2 minutes for toasted peaks, watching carefully to avoid burning.
- Cool 3–4 minutes on a rack, drizzle with chocolate sauce, slice, and serve warm.


Leave a Reply