
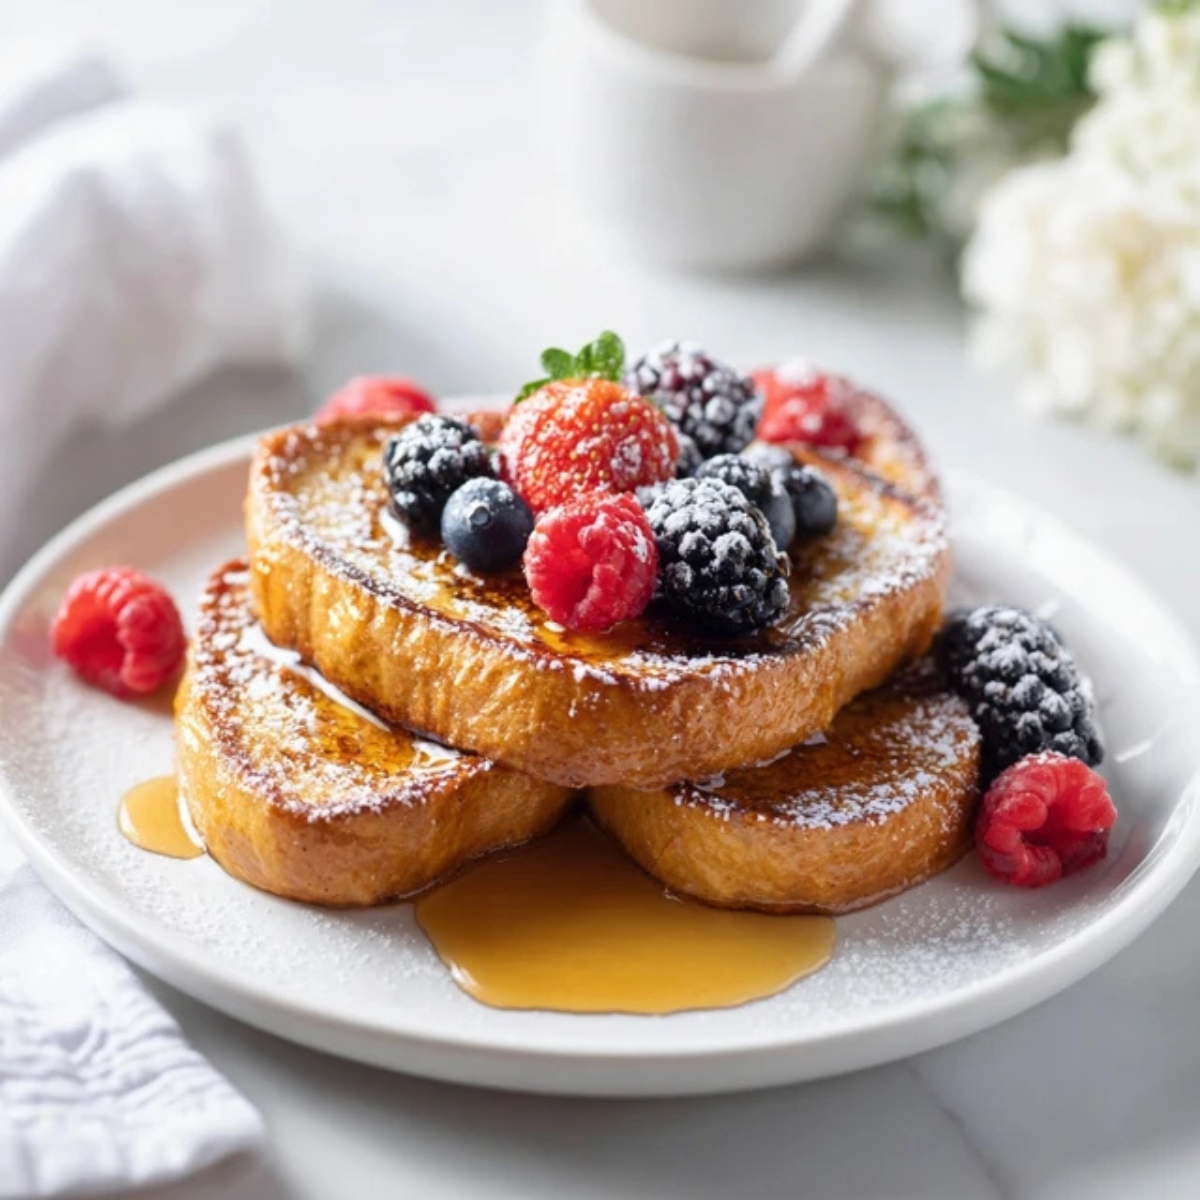
There's nothing quite like waking up to the sweet aroma of cinnamon and vanilla wafting through your kitchen. For those following a gluten-free lifestyle, finding that perfect breakfast treat can feel challenging, but I'm here to tell you that Gluten Free French Toast is about to become your new weekend ritual. This recipe delivers all the comfort and flavor of traditional french toast without any gluten, making it safe for celiacs and anyone avoiding wheat. Whether you're new to gluten-free cooking or a seasoned pro, this Gluten Free French Toast comes together in under 20 minutes and tastes absolutely incredible.
What makes this Gluten Free French Toast so special is how it maintains that classic custardy center with crispy golden edges that we all crave. Using the right gluten-free bread and a perfectly balanced egg mixture, you'll create a breakfast that even gluten-eating friends will request again and again.
Background & Why This Recipe Stands Out
French toast has been a breakfast staple for centuries, but the gluten-free version deserves its own spotlight. Traditional french toast relies on wheat bread's ability to soak up egg mixture without falling apart, which is where many gluten-free attempts fail. This Gluten Free French Toast recipe solves that problem by using slightly stale gluten-free bread that holds its structure beautifully while absorbing just the right amount of custard.
The beauty of Gluten Free French Toast is its versatility throughout the year. Serve it for lazy Sunday mornings, holiday brunches, or when you need a quick but impressive breakfast for guests. This recipe works perfectly as a base for seasonal toppings like fresh berries in summer, caramelized apples in fall, or a simple drizzle of pure maple syrup any time. The method I'm sharing creates consistently fluffy results that prove gluten-free cooking doesn't mean compromising on taste or texture.
Jump to:
Ingredients
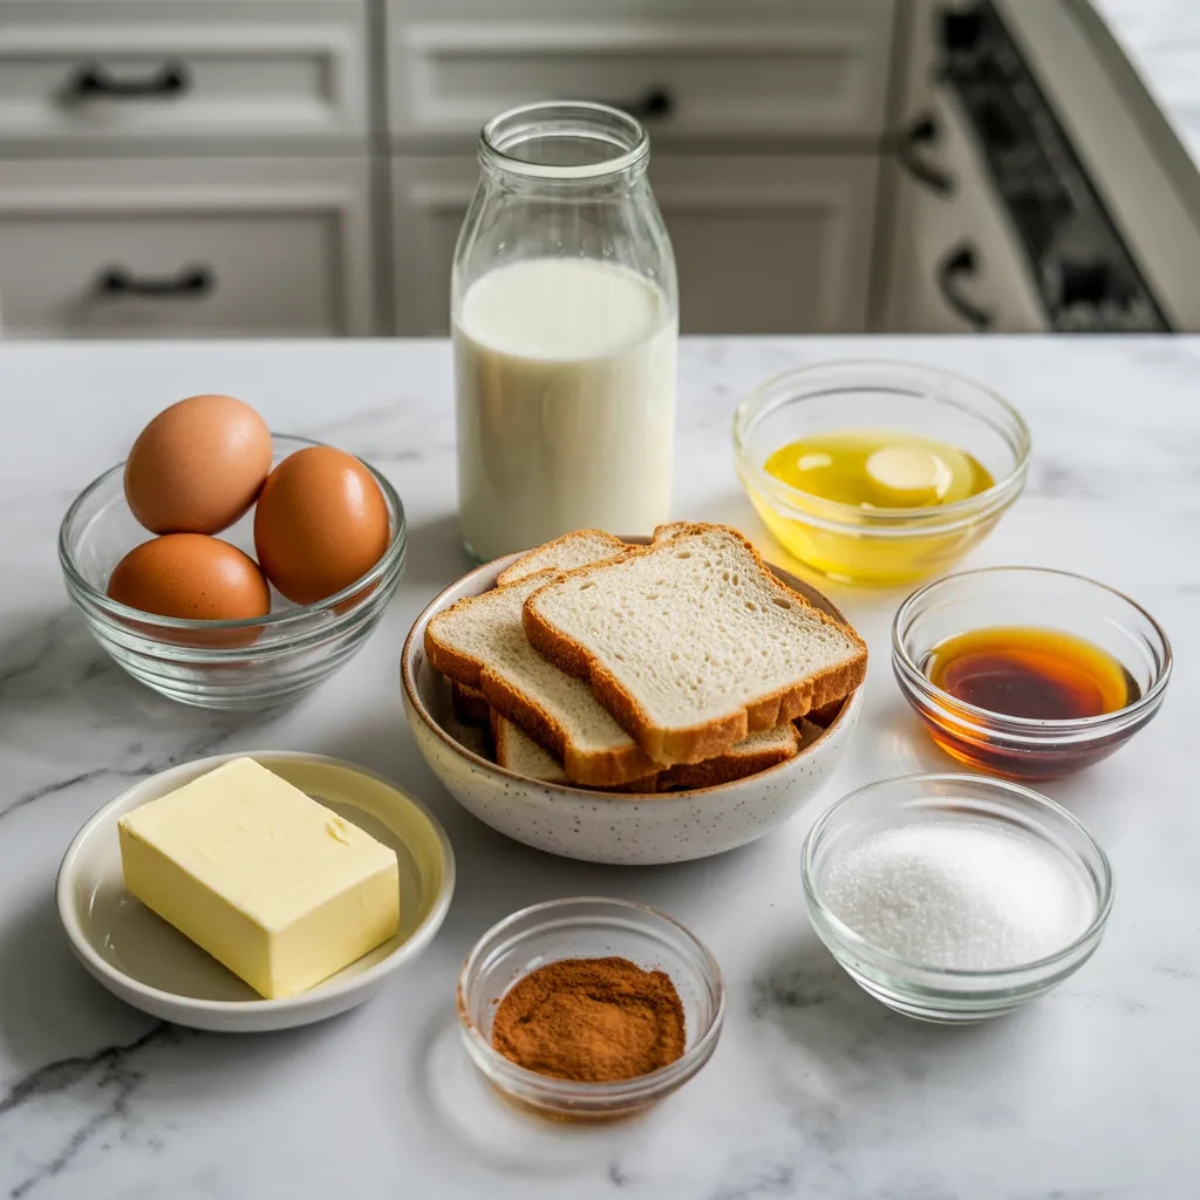
For the French Toast
- Gluten-free bread (slightly stale works best)
- Eggs
- Whole milk (or almond milk for dairy-free)
- Pure maple syrup
- Pure vanilla extract
- Ground cinnamon
- Ground nutmeg
- Pinch of salt
- Unsalted butter (or coconut oil for dairy-free)
Optional Toppings
- Fresh berries (strawberries, blueberries, raspberries)
- Sliced bananas
- Powdered sugar
- Pure maple syrup
- Whipped cream
- Chopped nuts
See recipe card for quantities.
Instructions
Step 1: Prepare Your Ingredients and Workspace
- Remove your gluten-free bread from the package and let it sit out for 30 minutes if it's fresh; slightly stale bread absorbs the egg mixture better without becoming soggy.
- Gather all your ingredients and place them near your cooking area for easy access.
- Set a wire rack over a baking sheet and place it near the stove; this keeps finished pieces warm and crispy while you cook the remaining slices.
- Preheat your oven to 200°F if you're making a large batch and want to keep everything warm until serving time.
Step 2: Create the Perfect Custard Mixture
- Crack the eggs into a shallow, wide bowl or pie dish; the wider surface makes dipping easier.
- Add the milk, maple syrup, vanilla extract, cinnamon, nutmeg, and salt to the eggs.
- Whisk everything together vigorously for about 30 seconds until the mixture is completely smooth and slightly frothy; this incorporates air for lighter texture.
- Let the custard mixture sit for 2-3 minutes while the spices bloom and flavors meld together.
Step 3: Soak and Cook the Bread
- Heat a large non-stick skillet or griddle over medium heat and add 1 tablespoon of butter, letting it melt and coat the surface evenly.
- Take one slice of bread and dip it into the custard mixture, letting it soak for 10-15 seconds per side; gluten-free bread is delicate so don't oversoak.
- Lift the bread and let excess custard drip off before placing it gently in the hot skillet.
- Cook for 3-4 minutes on the first side until golden brown and crispy, then flip carefully and cook another 3 minutes on the second side.
- Transfer the cooked Gluten Free French Toast to your prepared wire rack and repeat with remaining slices, adding more butter as needed.
Step 4: Serve and Enjoy
- Arrange the french toast on serving plates while still warm for the best texture and flavor.
- Add your favorite toppings generously; fresh fruit adds brightness while maple syrup provides classic sweetness.
- Dust with powdered sugar just before serving for an elegant finishing touch.
- Serve immediately while hot and crispy for the ultimate breakfast experience.
Expert Cooking Tips
- Choose the Right Bread The foundation of amazing Gluten Free French Toast starts with quality bread. Look for brands with a sturdy texture like Canyon Bakehouse or Udi's; avoid overly soft or crumbly varieties that fall apart when soaked. Bread that's a day or two old works even better because it's slightly dried out and absorbs custard without getting mushy.
- Temperature Control is Key Medium heat is your sweet spot for cooking french toast. Too hot and the outside burns before the inside cooks through; too low and you end up with soggy, pale slices. Test your pan temperature by flicking a drop of water onto it; it should sizzle and evaporate within 2-3 seconds.
- Don't Oversoak This is where most people go wrong with gluten-free versions. While regular wheat bread can handle a longer soak, gluten-free bread needs just 10-15 seconds per side. You want it saturated but not falling apart in your hands.
- Use Full-Fat Dairy Whole milk creates a richer, more custardy interior compared to skim milk. The fat content helps the egg mixture coat the bread better and creates that signature creamy center.
- Add Butter Between Batches Don't try to stretch one tablespoon of butter across all your slices. Adding fresh butter for each batch keeps the cooking surface properly lubricated and adds delicious flavor to every piece.
- Keep It Warm If cooking for a crowd, keep finished pieces on a wire rack in a 200°F oven. This maintains their crispy exterior while keeping them warm; stacking them directly on a plate makes them steam and get soggy.
Recipe Variations & Substitutions
- Dairy-Free Version Replace whole milk with unsweetened almond milk, oat milk, or coconut milk for equally delicious results. Swap butter with coconut oil or vegan butter for cooking. The texture remains perfectly fluffy with these simple substitutions.
- Vegan Gluten Free French Toast Use a flax egg mixture (3 tablespoons ground flaxseed mixed with ¾ cup water, left to gel for 5 minutes) combined with plant-based milk. Add an extra tablespoon of maple syrup to compensate for the sweetness eggs provide. Cook in vegan butter or coconut oil.
- Overnight French Toast Bake Turn this into a make-ahead casserole by arranging soaked bread slices in a greased baking dish, covering with plastic wrap, and refrigerating overnight. In the morning, bake at 350°F for 35-40 minutes until golden and set.
- Stuffed French Toast Spread cream cheese, nut butter, or fruit preserves between two slices before dipping in custard. Press edges together gently and cook as directed for an indulgent breakfast sandwich.
- Savory French Toast Skip the maple syrup and cinnamon in the custard mixture. Instead, add garlic powder, black pepper, and herbs. Top with crispy bacon, avocado, or a fried egg for a savory brunch option.
- Different Flavor Profiles Try orange zest and cardamom for a bright twist, or add cocoa powder and chocolate chips for a dessert-worthy version. Pumpkin spice blend works wonderfully in fall months.
Equipment Recommendations
- Large Non-Stick Skillet or Griddle A 12-inch non-stick pan lets you cook 2-3 slices at once, making breakfast service much faster. Cast iron works beautifully too if you prefer traditional cookware; just make sure it's well-seasoned.
- Shallow Wide Bowl A pie dish or wide shallow bowl makes dipping bread so much easier than a regular mixing bowl. The wider surface means you can lay the bread flat for even soaking.
- Wire Cooling Rack This keeps finished Gluten Free French Toast crispy while you finish cooking. The elevated surface allows air circulation underneath so steam doesn't make the bottom soggy.
- Quality Spatula A thin, flexible metal spatula slides under delicate gluten-free bread without breaking it. Avoid thick plastic spatulas that can tear your french toast when flipping.
- Whisk A proper whisk incorporates air into your custard mixture, creating a lighter, fluffier final product compared to just stirring with a fork.
Storage & Meal Prep Tips
- Refrigerator Storage Store leftover Gluten Free French Toast in an airtight container in the refrigerator for up to 3 days. Layer pieces between parchment paper to prevent sticking. Reheat in a toaster or skillet for best texture; microwaving makes them soggy.
- Freezer Instructions Freeze cooked french toast for up to 2 months by placing cooled slices on a baking sheet until frozen solid, then transferring to a freezer bag. This prevents them from sticking together. Toast directly from frozen for quick weekday breakfasts.
- Make-Ahead Custard Prepare the egg mixture the night before and store it covered in the refrigerator. Give it a quick whisk before using; this saves precious morning minutes.
- Prep the Bread Leave bread out overnight to dry slightly if yours is very fresh. This simple step prevents soggy french toast and takes zero effort.
- Batch Cooking Make a double batch on Sunday and freeze individual portions for grab-and-go breakfasts throughout the week. Kids love having restaurant-quality french toast ready in minutes.
Grandma's Secret That Changed Everything
Here's the game-changing tip my grandmother taught me that transforms ordinary Gluten Free French Toast into something extraordinary: add a tablespoon of melted butter directly into your custard mixture. This small addition creates an incredibly rich flavor and helps the exterior caramelize beautifully while keeping the inside tender. Most recipes skip this step, but once you try it, you'll taste the difference immediately.
The second secret is letting your custard mixture rest for a few minutes before dipping. This allows the spices to bloom and the ingredients to meld together, creating deeper, more complex flavors. Those extra three minutes of patience result in Gluten Free French Toast that tastes like it came from a fancy brunch spot instead of your home kitchen.
FAQ
Can French toast be gluten-free?
Absolutely! Gluten Free French Toast is just as delicious as the traditional version when made with quality gluten-free bread. The key is choosing a sturdy gluten-free bread that can absorb the egg mixture without falling apart, and following proper soaking times. Many people find they actually prefer gluten-free versions because the bread's texture creates an extra crispy exterior.
What is a common substitute for bread in a gluten-free sandwich?
For Gluten Free French Toast specifically, look for certified gluten-free sandwich bread made from rice flour, tapioca starch, or almond flour blends. Brands like Schar, Canyon Bakehouse, and Udi's make excellent options. Some people also use thick-cut gluten-free brioche or challah for an even richer french toast experience.
What to replace bread with gluten-free?
When making Gluten Free French Toast, replace regular wheat bread with any certified gluten-free bread variety. Sandwich-style sliced bread works perfectly, but you can also try gluten-free sourdough, cinnamon raisin bread, or even gluten-free bagels cut in half. The recipe adapts beautifully to whatever gluten-free bread you have available.
Do you have any gluten-free options in French?
Yes, french cuisine offers many naturally gluten-free options, and Gluten Free French Toast (pain perdu sans gluten) is increasingly popular in France as awareness grows. When traveling, look for "sans gluten" labels and ask specifically about ingredients. This Gluten Free french toast recipe adapts perfectly to french culinary traditions while remaining completely safe for gluten-free diets.
Your New Breakfast Tradition Awaits
Creating the perfect Gluten Free French Toast doesn't require fancy techniques or hard-to-find ingredients; it just needs good gluten-free bread, a well-balanced custard mixture, and the confidence to cook it properly. This recipe proves that living gluten-free doesn't mean sacrificing flavor, texture, or those special weekend breakfast moments with family. The golden, crispy exterior and custardy center will have everyone at your table asking for seconds, regardless of their dietary needs.
Once you've mastered this Gluten Free French Toast, I encourage you to explore other amazing breakfast recipes that complement it beautifully. Try our Hawaiian Roll French Toast Recipe for a sweet, tropical twist on the classic, or warm up your mornings with the cozy flavors of our Pumpkin French Toast Recipe during fall and winter months. Both recipes offer unique flavor profiles while maintaining that same comforting french toast experience you love. Start your morning right with any of these delicious options, and don't forget to share your Gluten Free French Toast creations in the comments below!
With love from my kitchen to yours,
Aubrey James
Related
Looking for other recipes like this? Try these:


Pairing
These are my favorite dishes to serve with this Gluten Free French Toast recipe:


Gluten Free French Toast Recipe
Equipment
- Large non-stick skillet or griddle
- Shallow wide bowl for egg mixture
- Whisk to mix custard
- Wire cooling rack keeps toast crispy
- Flexible spatula for flipping
Ingredients
- 8 slices gluten-free bread slightly stale works best
- 4 large eggs
- 0.75 cup whole milk or almond milk for dairy-free
- 2 tablespoon maple syrup pure
- 1 teaspoon vanilla extract pure
- 1 teaspoon ground cinnamon
- 0.25 teaspoon ground nutmeg optional
- 1 pinch salt
- 2 tablespoon butter or coconut oil for dairy-free
- 1 cup fresh berries for topping
- 2 tablespoon powdered sugar optional
- 4 tablespoon maple syrup for serving
Instructions
- Prep bread and workspace; let gluten-free bread sit out for 30 minutes if fresh.
- Whisk eggs, milk, maple syrup, vanilla, cinnamon, nutmeg, and salt until smooth.
- Heat skillet and melt butter; soak bread 10–15 seconds per side.
- Cook each slice 3–4 minutes per side until golden and crisp.
- Serve warm with berries, powdered sugar, and maple syrup.


Leave a Reply