
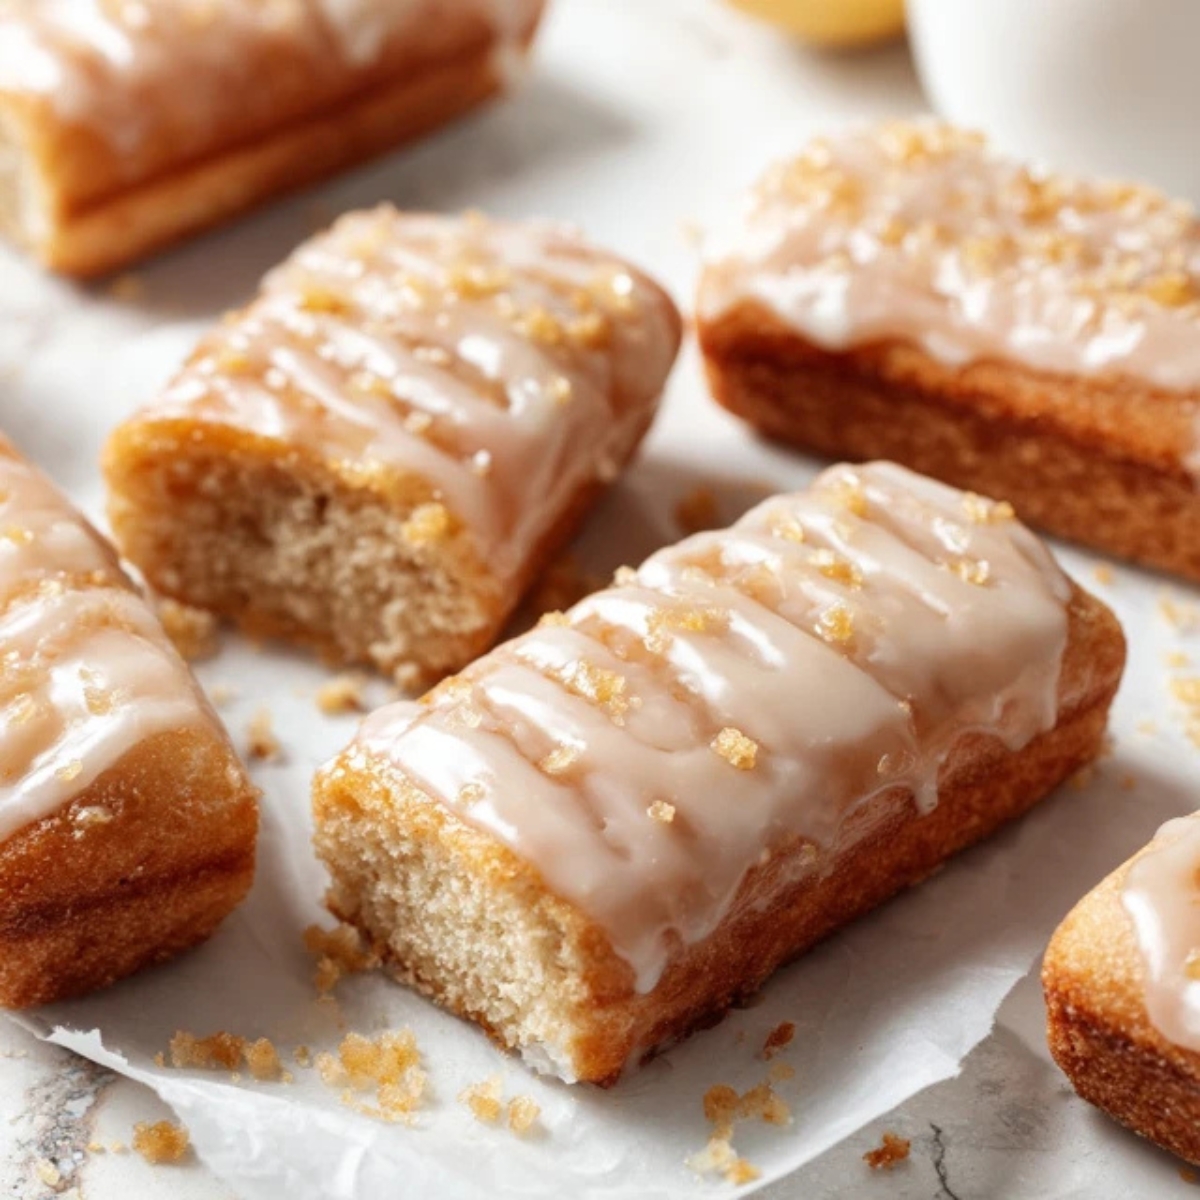
There's something magical about biting into soft, pillowy maple donut bars that remind you of your favorite bakery treat. These maple donut bars bring together the rich flavor of pure maple syrup with a tender, cake-like texture that melts in your mouth. Whether you're craving a cozy fall breakfast or need an impressive dessert for brunch, these maple donut bars deliver every single time. I've been making maple donut bars for years, and this recipe has become my go-to because it's foolproof, uses simple ingredients you probably already have, and tastes even better than the coffee shop version. Trust me, once you try these homemade maple bars, you'll never want the store-bought version again.
Background & Why These Bars Are Simply Irresistible
Maple donut bars have been a beloved bakery staple for decades, especially popular on the West Coast where maple bars became an iconic treat. What makes these maple donut bars special is their unique texture; they're softer and more cake-like than traditional yeast donuts, which means they're easier to make at home without any fancy equipment or rising time. The secret lies in the baking method rather than frying, giving you that perfect soft bake with way less mess and calories.
These baked maple donut bars capture all the nostalgic flavors of classic maple doughnuts while being simple enough for beginners to master. The pure maple syrup in both the bars and glaze creates an authentic, rich flavor that artificial maple just can't match, making these maple donut bars a true homemade treat worth making again and again.
Jump to:
Ingredients
For the Donut Bars:
- All-purpose flour
- Granulated sugar
- Baking powder
- Baking soda
- Salt
- Ground cinnamon
- Ground nutmeg
- Whole milk (room temperature)
- Pure maple syrup
- Eggs
- Melted butter (cooled slightly)
- Vanilla extract
For the Maple Glaze:
- Powdered sugar
- Pure maple syrup
- Heavy cream or milk
- Vanilla extract
- Pinch of salt
See recipe card for quantities.
Instructions
Step 1: Prep Your Pan and Mix Dry Ingredients
- Preheat your oven to 350°F and grease a 9x13-inch baking pan with butter or cooking spray, then line with parchment paper for easy removal.
- In a large mixing bowl, whisk together the flour, sugar, baking powder, baking soda, salt, cinnamon, and nutmeg until well combined.
- Make sure all your dry ingredients are evenly distributed to ensure your maple donut bars bake uniformly without any pockets of leavening agents.
Step 2: Combine Wet Ingredients
- In a separate medium bowl, whisk together the milk, maple syrup, eggs, melted butter, and vanilla extract until smooth and fully incorporated.
- Pour the wet mixture into the dry ingredients and gently fold together using a spatula until just combined; don't overmix or your bars will become dense.
- The batter should be thick but pourable, similar to a thick cake batter.
Step 3: Bake to Golden Perfection
- Pour the batter into your prepared pan and spread it evenly using an offset spatula or the back of a spoon.
- Bake for 20-25 minutes, or until a toothpick inserted into the center comes out with just a few moist crumbs; overbaking will dry out your maple donut bars.
- Remove from the oven and let cool in the pan for 10 minutes before transferring to a wire rack to cool completely.
Step 4: Make and Apply the Maple Glaze
- While the bars cool, whisk together powdered sugar, maple syrup, 3 tablespoons of cream, vanilla, and salt until smooth; add more cream if needed for a pourable consistency.
- Once the bars are completely cool, pour the glaze over the top and spread evenly with a spatula or let it drip naturally for that classic bakery look.
- Allow the glaze to set for 15-20 minutes before cutting into bars; this makes cleaner cuts and prevents the glaze from smearing.
Expert Cooking Tips
Getting bakery-style maple donut bars at home is all about the details. Here are my tried-and-true tips:
- Temperature Matters: Always use room temperature milk and eggs. Cold ingredients can cause the melted butter to solidify, creating lumps in your batter. Let everything sit out for about 30 minutes before you start.
- Don't Skip the Maple Syrup Quality: Use pure maple syrup, not pancake syrup or imitation maple. The real stuff has depth and complexity that makes these maple donut bars taste authentic and rich.
- The Perfect Glaze Consistency: Your maple glaze should be thick enough to coat the back of a spoon but thin enough to spread smoothly. If it's too thick, add cream one teaspoon at a time. Too thin? Add more powdered sugar gradually.
- Avoid Overmixing: Once you combine wet and dry ingredients, mix just until you don't see dry flour streaks. Overmixing develops gluten, making your bars tough instead of tender.
- Check Doneness Early: Start checking at 20 minutes. These bars continue cooking slightly after you remove them from the oven, so slightly underbaking ensures they stay soft and moist.
- Double Glaze for Extra Flavor: For true maple lovers, apply a thin first layer of glaze, let it set for 10 minutes, then add a second layer. This creates an extra-thick, glossy coating.
Recipe Variations & Substitutions
These maple donut bars are incredibly versatile. Here are some creative twists:
- Maple Bacon Donut Bars: Crumble 4-5 strips of crispy bacon and sprinkle over the glaze before it sets. The sweet-salty combination is absolutely divine and adds a savory crunch.
- Maple Pecan Donut Bars: Fold ½ cup chopped toasted pecans into the batter and sprinkle more on top of the glaze. The nutty flavor complements the maple perfectly.
- Maple Cinnamon Donut Bars: Increase the cinnamon to 1 teaspoon in the batter and add ¼ teaspoon to the glaze for a spiced version that's perfect for fall.
- Gluten-Free Option: Replace all-purpose flour with a 1:1 gluten-free baking flour blend. The texture will be slightly more delicate but still delicious.
- Dairy-Free Version: Substitute the milk with almond or oat milk, use vegan butter, and replace heavy cream in the glaze with full-fat coconut cream.
- Maple Brown Butter Glaze: Brown 2 tablespoons of butter until golden and nutty, then use it in place of some of the cream in the glaze for extra depth.
- Lower Sugar Option: Reduce the sugar in the bars to ⅓ cup; the maple glaze provides plenty of sweetness, so the bars themselves don't need to be overly sweet.
Equipment Recommendations
The right tools make these maple donut bars even easier:
- 9x13-inch Metal Baking Pan: Metal conducts heat better than glass, giving you more even baking and better browning on the edges.
- Parchment Paper: Makes removal a breeze and cleanup virtually nonexistent.
- Wire Cooling Rack: Essential for cooling the bars completely before glazing to prevent sogginess.
- Offset Spatula: Perfect for spreading both batter and glaze evenly across the surface.
- Whisk: A good balloon whisk incorporates air and blends ingredients smoothly without overmixing.
- Large Mixing Bowls: You'll need at least two; having enough space prevents messy counters and makes mixing easier.
Storage & Meal Prep Tips
Keep your maple donut bars fresh with proper storage:
- Room Temperature Storage: Store in an airtight container at room temperature for up to 3 days. The glaze may soften slightly, but they'll still taste amazing.
- Refrigerator Storage: If your kitchen is warm or you want them to last longer, refrigerate in an airtight container for up to 5 days. Bring to room temperature before serving for the best texture.
- Freezing Instructions: These freeze beautifully! Wrap individual bars tightly in plastic wrap, then place in a freezer bag. Freeze for up to 3 months. Thaw overnight in the refrigerator or at room temperature for 2 hours.
- Freezing Without Glaze: For best results, freeze the bars unglazed. Make fresh glaze when you're ready to serve; it only takes 5 minutes.
- Make-Ahead Tips: Bake the bars the night before, let them cool completely, cover tightly, and glaze the next morning for fresh-tasting results.
- Preventing Soggy Glaze: Always make sure bars are completely cool before glazing, and store with parchment paper between layers if stacking.
Grandma's Secret That Changed Everything
Here's what took my maple donut bars from good to absolutely incredible: adding a tablespoon of sour cream to the batter. I discovered this trick from my grandmother's old recipe box, and it creates the most tender, moist crumb you've ever tasted in maple donut bars. The slight tang balances the sweetness perfectly while keeping the bars soft for days.
The second game-changer is brushing the warm bars with a thin layer of melted butter before glazing; this adds richness and helps the maple glaze adhere beautifully while creating that signature bakery shine. These two simple steps transform homemade maple donut bars into something truly special that everyone will think came from an expensive bakery.
FAQ
What is a Maple Bar donut called?
A maple bar donut is typically called a "maple bar" or "maple long john" depending on your region. These maple donut bars are rectangular-shaped, glazed with maple icing, and are a classic bakery favorite, especially popular in the Pacific Northwest and West Coast areas.
Does Krispy Kreme make maple bars?
Krispy Kreme occasionally offers maple-glazed donuts as limited-time or seasonal items, but they don't consistently have traditional maple bars on their regular menu. That's why making homemade maple donut bars is perfect; you can enjoy this delicious treat anytime you want!
What makes maple donuts different?
Maple donuts stand out because of their rich, distinctive maple glaze made with real maple syrup, creating a deeper, more complex sweetness than regular glazed donuts. The maple donut bars also typically have a softer, cake-like texture and that unmistakable warm, caramel-like maple flavor that's perfect for fall.
Are maple bars a West coast thing?
Yes, maple bars are especially popular on the West Coast, particularly in the Pacific Northwest where they're a bakery staple. While you can find maple donut bars across the country now, they originated and remain most beloved in West Coast states like Oregon, Washington, and California.
Bringing It All Together: Your New Favorite Treat
These maple donut bars are about to become your most requested recipe, and for good reason. The combination of tender, soft bakes with that signature rich maple glaze creates a treat that's perfect for breakfast, brunch, or dessert. Making maple donut bars at home means you control the quality of ingredients, especially using pure maple syrup for authentic flavor that beats any store-bought version. Once you've mastered these maple donut bars, you'll want to explore more homemade treats that bring bakery favorites right to your kitchen.
If you loved these bars, you'll absolutely adore our Churro Donuts Recipe, which brings cinnamon-sugar magic in every bite, perfect for when you want something equally indulgent but with different flavors. For a fruity twist, try our Blueberry Baked Donuts Recipe that offers the same soft texture with bursts of fresh blueberries throughout. Both recipes are just as easy to make and will expand your homemade donut repertoire beautifully!
With love from my kitchen to yours,
Taylor Monroe
Related
Looking for other recipes like this? Try these:


Pairing
These are my favorite dishes to serve with this maple donut bars recipe:


Maple Donut Bars Recipe
Equipment
- 9x13 inch metal baking pan for even baking and easy cutting
- Parchment paper prevents sticking and helps with cleanup
- Wire cooling rack allows bars to cool evenly before glazing
- Whisk to mix wet and dry ingredients smoothly
- Offset spatula for spreading batter and glaze evenly
- Mixing bowls one for dry and one for wet ingredients
Ingredients
For the Donut Bars
- 2 cups all-purpose flour spoon and level for accuracy
- ½ cup granulated sugar adds sweetness and structure
- 2 teaspoons baking powder helps bars rise
- ½ teaspoon baking soda balances acidity
- ½ teaspoon salt enhances flavor
- ½ teaspoon ground cinnamon adds warmth
- ¼ teaspoon ground nutmeg for a bakery-style aroma
- ¾ cup whole milk room temperature
- ⅓ cup pure maple syrup use Grade A or B for flavor depth
- 2 large eggs room temperature
- ¼ cup melted butter cooled slightly
- 2 teaspoons vanilla extract adds flavor
For the Maple Glaze
- 2 cups powdered sugar sifted for smooth texture
- ¼ cup pure maple syrup adds authentic flavor
- 3–4 tablespoons heavy cream or milk adjust for consistency
- ½ teaspoon vanilla extract optional but enhances sweetness
- 1 pinch salt balances the glaze
Instructions
- Preheat oven to 350°F and line a 9x13-inch pan with parchment.
- Whisk flour, sugar, baking powder, baking soda, salt, cinnamon, and nutmeg.
- Combine milk, maple syrup, eggs, butter, and vanilla in another bowl.
- Gently fold wet ingredients into dry until just combined.
- Spread batter evenly in pan and bake 20–25 minutes.
- Cool 10 minutes, then transfer to a wire rack to cool completely.
- Whisk glaze ingredients until smooth and pourable.
- Pour glaze over cooled bars, spread evenly, and let set 15–20 minutes.
- Slice into bars and enjoy!


Leave a Reply